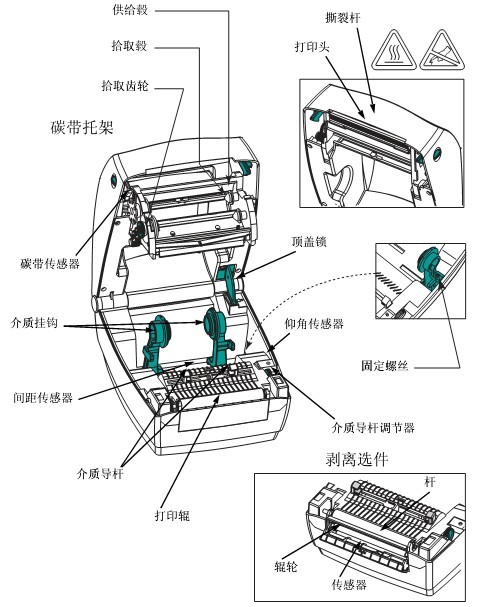
1. Introduction to the Components of the Zebra TLP2844 Barcode Printer
1.1 External Introduction: Paper Feed Button/Status Indicator/Release Button/Power Switch/Power Jack/Interface Connector

1.2 Internal Introduction: Ribbon Feed Shaft/Ribbon Pickup Shaft/Pickup Gear/Ribbon Carrier/Ribbon Sensor/Top Cover Lock/Media Hook/Gap Sensor/Elevation Sensor/Media Guide Rod/Print Roller/Media Guide Rod Adjuster/Print Head/Tear Rod/Fixing Screw/Peeling Option
2. Zebra TLP2844 Barcode Printer Operation Controls Instructions
2.1 Power Switch
Press up to turn on the printer, press down to turn off the printer.
Caution: Always turn off the power before connecting or disconnecting the communication cable and power cord .
2.2 Paper Feed Button
Forces the printer to feed a blank label.
Removes the printer from a “paused” state (the printer enters a “paused” state due to programming commands or error conditions).
Use the paper feed button to view the printer settings and status.
2.3 Status Indicators
Used as printer operation indicators.
3. Zebra TLP2844 Barcode Printer Installation Steps
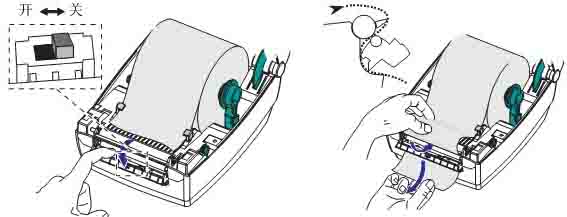
3.1 Loading Rolled Media
When loading media, the rolled media must be placed on the media hook, and then the media guide lever must be adjusted. The correct media for the required printing type must be used. If printing without a ribbon, thermally sensing media must be used; if using a ribbon, thermal transfer media must be used. The printer’s ribbon sensor detects whether the feed shaft is moving.
Regardless of whether the media is rolled inwards or outwards, it must be loaded into the printer in the same way.
① Open the printer, making sure to pull the release lever towards the front of the printer.
② Remove the outer portion of the media. During transport, the rolled media may become soiled during handling or accumulate dust during storage. Removing the outer portion prevents sticky or unclean media from being dragged between the print head and the print roller.
③ Separate the media hooks and keep them open.
④ Determine the method for rolling the media so that the printing side faces upward as it passes through the printing roller.
⑤ Place the rolled media downward between the hooks, then close the hooks and pass it through the center of the rolled media.
⑥ Turn the guide rod adjuster knob to the back to open the media guide rod.
⑦ Pass the media through the guide rod.
⑧ Turn the guide rod adjuster knob to the front to close the media guide rod. The guide rod should just touch the edge of the media, but should not restrict it.
⑨ If no ribbon is needed, close the top cover. Note that you need to open the top cover lock, lower the top cover, and press it down until the release button clicks into place.
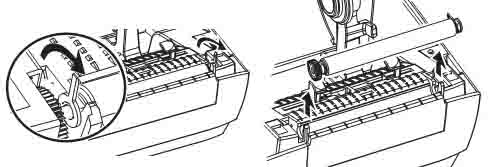
3.2 Loading the Ribbon
When using a ribbon, a heat transfer medium must be used. When loading the ribbon, first install the supply roller and pickup roller, and then tighten the ribbon on the carrier.
① Install the ribbon supply shaft, pass the ribbon through the carrier, press the right end of the supply shaft onto the supply hub, align the slot at the left end of the supply roller, and mount it on the spokes of the left hub.
② Install the pickup roller shaft. Press the right end of the pickup roller onto the pickup hub, align the slot on the left end of the pickup roller, and mount it onto the spokes of the left hub.
③ Connect and tighten the ribbon. The ribbon must be aligned so that it is wound straight onto the pickup roller. Connect the ribbon to the pickup roller, use the tape on the new pickup roller, rotate the ribbon pickup gear counterclockwise, tighten the ribbon, close the top cover, making sure to open the top cover lock, lower the top cover, and press down until the release button clicks into place.
3.3 Media Length Detection
Before connecting the printer to the computer, ensure the printer is in normal operating condition. This allows the printer to perform a media measurement operation and print the status output.
After loading the media, perform the following steps to measure the length of each label.
① Ensure the printer power is off.
② Press and hold the paper feed button . ③
Turn on the printer power.
④ Release the paper feed button when the status indicator light flashes.
⑤ The printer will advance the media, measure and check the length of individual labels, then print a status summary report and remain in diagnostic dump mode.
⑥ To begin normal operation, tap the paper feed button. The printer will then print “out of DUMP” and advance the label.
3.4 Connecting the Printer and Computer
Caution: Turn off the power before connecting the interface cable. Before connecting or disconnecting the communication cable, the through power connector must be inserted into the power jack on the back of the printer.
Interface cable requirements:
① The data cable must be fully shielded and equipped with a metal or metallized connector housing. The shielded cable and connector must prevent radiation and receive electrical noise.
② Minimize the pickup level of electrical noise in the cable.
③ Keep the data cable as short as possible (1.83m recommended).
④ Do not tightly bundle the data cable and power cord together.
⑤ Do not tie the data cable to the power cord conduit.
3.5 Printing in Peel Mode
Using the optional distributor, you can print in “Peel Mode,” where the label backing travels through different channels, and only one label is placed at a time for subsequent placement.
① Remove several labels from the printing backing .
② Open the top cover.
③ Open the distributor door.
④ Turn on the label sensor.
⑤ Insert the backing in front of the peel bar and behind the peel roller.
⑥ Close the distributor door.
⑦ Close the top
cover. ⑧ Press the paper feed button to move the label forward
. During the printing job, the printer will peel off the backing, revealing a single label. Remove the label from the printer so that the printer can print the next label.
3.6 Using the Cutter Option
If the printer is equipped with a baffle with an electric blade, it can dispense one or more media and then automatically cut them off from the media roll. This option can cut continuous paper and label backings in rolls of media, keeping the cutter dry and eliminating the need to use any solutions or solvents to clean the blade.
4. Replacement of Vulnerable Parts in Zebra TLP2844 Barcode Printer
4.1 Replacing the Print Roller
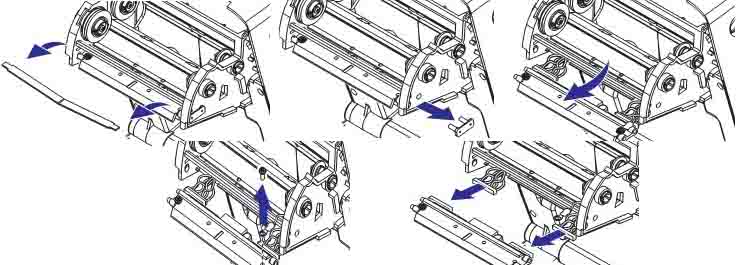
① Disassembly
Open the printer, remove all media, use a pointed tool to release the latches on both sides, then rotate forward to lift the print roller from the bottom of the printer base.
② Assembly
Check that the right bearing is on the print roller shaft, align the print roller with the left gear, place it downwards on the bottom of the printer base, and rotate the latch backwards to lock it in place.
4.1 Replacing the Print Head
Note: Turn off the printer power, unplug the power cord, and then replace the print head.
Prepare a work area to prevent static discharge. The work area must be anti-static. Use a properly grounded conductive shockproof pad to support the printer, and wear a conductive wrist strap.
① Disassembly
Pull the release button forward, then lift the top cover upwards to open the printer and remove the ribbon from the tray. ① Grasp the printhead spring and pull it to the left, then slide it off the carriage. Use the spring to spring the printhead clip away from the right end of the carriage. Pull the printhead and bracket forward. Use a #2 screwdriver to remove the screw securing the ground wire. Disconnect the two bundles of printhead wires from the connector.
② Assembly:
New printheads come with clips and grounding screws. Align the printhead and bracket. Connect the left and right connectors to the black and white wire harness. Connect the ground wire and secure it with the screws. Tighten the screws with a #2 screwdriver. Insert the bracket pin into the left end of the carriage, aligning it with the right end of the bracket. Insert the printhead clip through the right end of the ribbon carriage into the bracket. Slide the left end of the printhead spring into the left end of the ribbon carriage, then slide the right end into the other end of the carriage. The “V” angle should align with the notch at the top of the printhead bracket. Clean the printhead with a cleaning pen. Reload the media and ribbon. Plug in the power cord. Print the status report to ensure it is working properly.
5. Troubleshooting Zebra TLP2844 Barcode Printer
5.1 Diagnosing Faults Based on Status Indicator Lights
■ No color: Check the power connection between the AC power outlet and the printer.
■ Stable amber: Possible causes: ① Top cover opening sensor is active. Press down on the top cover, close it, and lock it in place. ② Printer has syntax or command errors. Check the program and resend the print job.
■ Flashing red: Possible causes: ① Firmware download is in progress. The indicator light will first be red, then green. ② After turning on the printer, a signal to start media length detection is emitted. Release the paper feed button.
■ Stable red: Possible causes: ① Media or ribbon is used up. Load new media and press the paper feed button to continue. ② Power failure. Turn off the power and then turn it on again. ③ The printer is preparing to receive Flash programming during firmware download.
5.2 Diagnosing Printer Faults Based on Operation:
■ Media not moving forward: Possible causes and solutions: ① Check the interface cable connection from the computer to the printer. ② Check if the top cover is closed and locked in place. ③ Check if the label is correct. ④ Check if the printing side of the media is facing upwards. ⑤ When printing with thermal transfer, check if the transfer ribbon is aligned correctly and if the toner edge is facing outwards. ⑥ If the printer has syntax or command errors, check the program and resend the print job.
■ Media moving but not printing: Possible causes and solutions: ① Check if the label type is correct (thermal transfer or thermal sensor). ② Check if the loaded roll of media has the thermal side facing upwards. ③ Clean the print head with a cleaning pen. ④ Check if the top cover is closed and locked in place.
■ Printing The print color is fading or the print quality is poor. Possible causes and solutions: ① Clean the print head with a cleaning pen. ② Adjust the print speed/density in the software. ③ Check the media and ensure the print side is facing upwards. ④ Check if the thermal media used is correct.
■ Only part of the label is printed or the label printing is skipped. Possible causes and solutions: ① Perform media length detection. ② The label is stuck to the print head. ③ The top cover is not fully locked . ④ It may be a software problem
. ■ Printing stops, and the indicator light is amber or red. Possible causes and solutions: ① Perform media length detection. ② It may be a label paper quality problem; use only approved labels. ③ The label may be stuck. ④ Insufficient memory for the label size. ⑤ It may be a software problem.
5.3 Troubleshooting based on media operation
■ Printing continues between labels. Possible causes and solutions: ① Check if the label sensor is open. ② The label sensor is blocked or dirty; remove debris or dust. ③ Continuous media may be set.
■ Printing stops after printing one label. Possible causes and solutions: ① Check if the quantity setting is correct.
5.4 Diagnosing Print Quality Issues
■ No content printed on the label. Possible causes and solutions: ① The correct media for the required printing method must be used. If printing without a ribbon, thermal transfer media must be used. If using a ribbon, thermal transfer media must be used. The printer’s ribbon sensor detects whether the supply shaft is moving. ② Is the media loaded correctly?
■ The printed image appears problematic. Possible causes and solutions: ① The print head is not clean; clean the print head. ② The print head temperature is too low. ③ Adjust the printer density or printing speed. ④ The correct media is incompatible with the printer.
■ Several labels have many blank vertical lines (blank lines). Possible causes and solutions: ① The print head is not clean; clean the print head. ② The print head components are damaged; replace the print head.
■ Printing does not start from the top of the label, or one to three labels have printing errors. Possible causes and solutions: ① The media may not have passed under the media guide. ② The printer needs calibration
. ■ The label format has been sent to the printer, but the printer cannot recognize it. Possible causes and solutions: ① Is the printer in pause mode? If yes, press the paper feed button. ② If the status LED is lit or flashing, determine the fault based on the status indicator light. ③ Check if the data cable is installed correctly. ④ If a communication problem occurs, check if the correct communication port has been selected on the computer.
6. Cleaning the Zebra TLP2844 Barcode Printer:
● Printhead; Interval: As needed or after every five rolls of media; Method: Allow the printhead to cool down for one minute, then use a new cleaning pen to wipe the print elements from start to finish (the fine gray lines on the printhead). If print quality is still poor after cleaning, try using a printhead cleaning film to remove dust.
● Print Roller; Interval: As needed; Method: Manually rotate the print roller and thoroughly clean with 95% alcohol and a cleaning swab, cleaning card, or lint-free soft cloth.
● Peel Bar; Interval: As needed; Method: Thoroughly clean with 95% alcohol and a cotton swab.
● Tear Bar; Interval: As needed; Method: Thoroughly clean with 95% alcohol and a cotton swab.
● Exterior; Interval: As needed; Method: Wet cloth.
● Interior; Interval: As needed; Method: Brush or air jet.
● Cutter; Interval: As needed; Method: Remove debris using tweezers.
7. To update the firmware of your Zebra TLP2844 barcode printer,
download the 2844_V4_70_1A_CHN.prg file from the Zebra website (http://www.zebra.com.cn/), and then copy this file to the port