1. Introduction to the Components of the Zebra ZM400 Barcode Printer
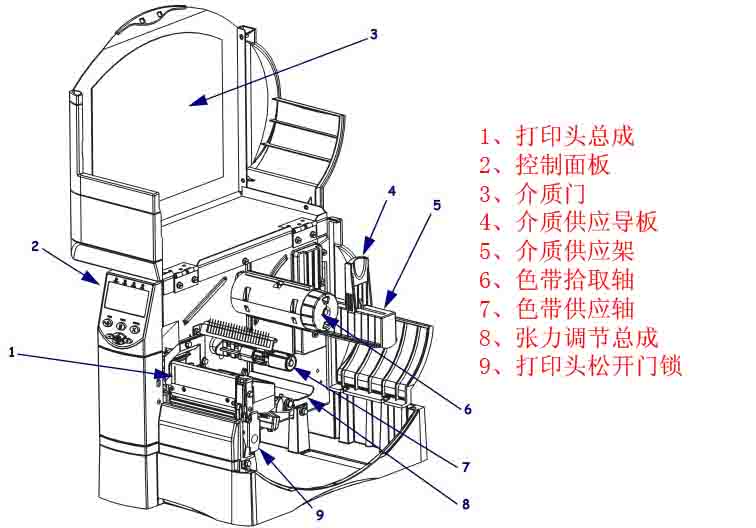
1.1 Printhead Assembly / Control Panel / Media Door / Media Supply Guide / Media Supply Rack / Ribbon Pickup / Ribbon Supply Shaft / Tension Adjustment Assembly / Printhead Release Door Lock
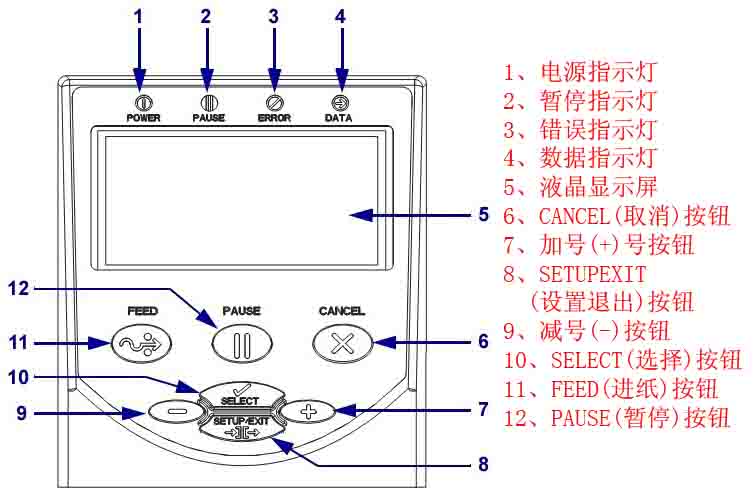
1.2 Power Indicator / Pause Indicator / Error Indicator / Data Indicator / LCD Display / CANCEL Button / Plus (+) Button / SETUPEXIT Button / Minus (-) Button / SELECT Button / FEED Button / PAUSE Button
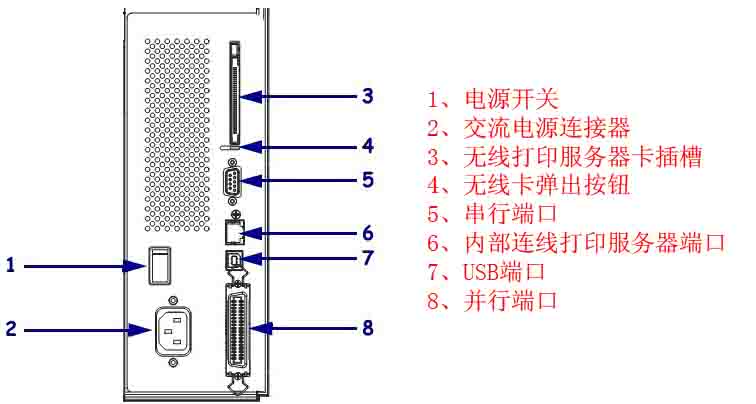
1.3 Power Switch / AC Power Connector / Wireless Print Server Card Slot / Wireless Card Ejection Button / Serial Port / Internal Wiring Print Server Port / USB Port / Parallel Port
2. Zebra ZM400 Barcode Printer Control Panel Button and Indicator Description
2.1 Control Panel Button Description
■ FEED (Paper Feed): Function: Each press forces the printer to feed a blank label. ① If the printer is not printing, immediately feed a blank label; ② If printing is in progress, feed a blank label after completing the current batch of labels.
■ PAUSE (Pause): Function: Starts and stops the printing process. ① If the printer is not printing, there is no printing action. Pressing PAUSE again resumes printing; ② If printing is in progress, stop printing after completing the current batch of labels. ■ CANCEL (Cancel
): Function: Cancels the print job when the printer is paused. ① If the printer is not printing, the next stored label format will not be printed; ② If printing is in progress, print all labels for the day and cancel the next label format. Pressing and holding for a few seconds cancels all print jobs in memory.
■ SETUP/EXIT (Setup/Exit), Function: Enters and exits configuration mode.
■ SELECT (Select), Function: Switches the functions of the plus (+) and minus (-) signs between “scrolling” and “changing mode”. ① Press once to change the selected value using the plus (+) and minus (-) signs; ② Press again to scroll between menu items using the plus (+) and minus (-) signs.
■ Plus (+) (Scrolling Mode), Function: Scrolls to the next option.
■ Plus (+) (Changing Mode), Function: ① Increases the value; ② Performs operations at the bottom right of the LCD screen.
■ Minus (-) (Scrolling Mode), Function: Scrolls to the previous option.
■ Minus (-) (Changing Mode), Function: ① Decreases the value; ② Performs operations at the bottom right of the LCD screen; ③ Moves to the next digit.
2.2 Control Panel Indicator Light Description
■ POWER (Power), Off: Printer is off or not powered; On: Printer power is on.
■ PAUSE: Off: Printer is working normally; On: Printer has stopped all printing operations; Flashing: The “Pause” indicator flashes when initializing the “Flash” memory or when a label is in “Peel Mode”.
■ ERROR: Off: Printer is working normally; On: An error condition prevents printing, including MEDIA OUT and RIBBON OUT errors; Flashing: An error condition exists, but printing can still continue, including RIBBON IN warning, HEAD UNDER TEMP warning, and HEAD OVER TEMP error.
■ DATA: Off: Printer is working normally and is not receiving or processing data; Flash once: The CANCEL button was pressed and the format was successfully canceled; Slow flashing: The printer cannot accept more data from the host; Rapid flashing: The printer is receiving data; On: Partial format has been received, and there is no further data activity.
3. Zebra ZM400 Barcode Printer Data Communication Interface Selection
Users can send label formats to the printer through any available data communication interface. All necessary data cables must be provided for the specific situation. Ethernet does not require shielding, but other data cables must be fully shielded and equipped with metal or metallized connector housings. Using unshielded cables will result in electromagnetic radiation levels exceeding regulatory limits.
To minimize electrical noise pickup levels in the cables:
● Use the shortest possible data cables
. ● Do not tightly bundle data cables and power cords together.
● Do not tie data cables to power cord conduits.
Data Communication Interface Characteristics:
● RS232 Serial Port (Standard): ① Maximum cable length 15.24 meters; ② Printer parameters need to be changed to match the host computer; ③ If using a standard modem cable, a blank modem needs to be connected to the printer.
● IEEE1284 Bidirectional Parallel Port (Standard): ① Maximum cable length 3 meters; ② Recommended cable length 1.83 meters; ③ No printer parameter changes are required for compatibility with the host computer.
● USB (Standard): Features: ① Maximum cable length 5 meters; ② Compatible with host computer without requiring changes to printer parameters.
● Internal Wired Ethernet Print Server (Optional): Features: ① Prints from any computer on the user’s LAN to the printer; ② Communicates with the printer via its web interface in ZPL mode; ③ The computer must have an Ethernet card; ④ The printer must be configured to use the LAN.
● Wireless Ethernet Print Server (Optional): Features: ① Prints from any computer on a wireless LAN (WLAN) to the printer; ② Communicates with the printer via its web interface in ZPL mode; ③ The printer must be configured to use the WLAN.
Note: Before connecting the data communication cable, ensure the printer is powered off (O). Connecting the data communication cable while the power switch is on (I) may damage the printer.
4. Zebra ZM400 Printer Calibration and Printhead Pressure Adjustment
4.1 Printer Calibration
The printer can be set to automatic or manual calibration.
4.1.1 Automatic Calibration
When the MEDIA POWER UP or HEAD CLOSE control panel is set to CALIBRATION, the printer will automatically perform calibration when the printhead is powered on or off. During automatic calibration, the printer determines the label length and sensor settings. The results of automatic calibration are stored in the printer’s memory and are not lost even when the printer is powered off. These parameters remain valid until the next calibration is performed.
Note: If the MEDIA POWER UP or HEAD CLOSE control panel is set to LENGTH, NO MOTION, or FEED, the printer will begin printing without automatic calibration.
4.1.2 Manual Calibration
Performing media and ribbon sensor calibration resets the sensor sensitivity for more accurate media and ribbon detection. If you have changed the ribbon or media type, this calibration process will improve your printer’s performance.
You can adjust the sensitivity of the media and ribbon sensors using the following steps:
① Press the SETUP/EXIT button on the control panel.
② Press the plus (+) or minus (-) button to select the “Media and Ribbon Calibration” parameter.
③ Press SELECT to select the parameter.
④ Press the plus (+) button to begin the calibration process. The printer displays the LOAD BACKING prompt.
⑤ Open the printhead .
⑥ Peel approximately 203 mm of the label off the backing paper and feed the media into the printer, ensuring only the backing paper is between the media sensors.
⑦ Keep the printhead open.
⑧ Press the plus sign (+) to continue; the REMOVE RIBBON prompt will appear.
⑨ If a ribbon is used, it should be removed.
⑩ Close the printhead.
⑾ Press the plus sign (+) to continue; the CALIBRATING PLEASE WAIT message will appear. The printer adjusts the signal gain received from the media and ribbon sensors based on the specific media and ribbon combination used. On the sensor graph, this corresponds to the graphical peak that moves up and down to better read your printing application. After calibration is complete, RELOAD ALL will be displayed.
12. Open the printhead and push the media forward so that the label is below the media sensor.
13. Reload the ribbon (if used).
14. Close the printhead
. 15. Press the plus sign (+) to continue. The printer performs automatic calibration. During this process, the printer checks the media and ribbon readings against the newly established scale to determine the ribbon length and printing mode. To view the readings on the new scale, you can print a sensor chart.
16. Press SELECT to accept any changes and cancel parameter selection.
4.1.3 Adjusting the Printhead Pressure
If the printed color is too light on one side, if the media is too thick, or if the media shifts to one side during printing, you may need to adjust the printhead pressure.
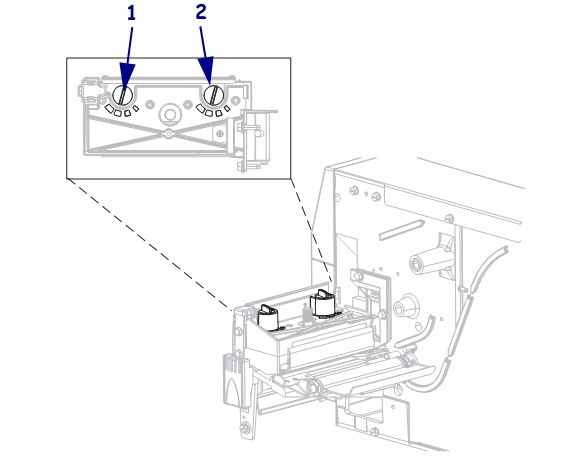
The ZM400 pressure adjustment wheel has four available settings, indicated by progressively larger embossed markers on the printing unit. The smallest marker (maximum counterclockwise rotation) is position 1, and the largest marker (maximum clockwise rotation) is position 4.
Adjust the positions of the inner adjusting wheel 2 and the outer adjusting wheel 1 according to the media width:
● Media width 25.4mm: Inner adjusting wheel at position 3, outer adjusting wheel at position 1.
● Media width 51mm: Inner adjusting wheel at position 4, outer adjusting wheel at position 1.
● Media width 76mm: Inner adjusting wheel at position 3, outer adjusting wheel at position 2.
● Media width ≥ 89mm: Inner adjusting wheel at position 3, outer adjusting wheel at position 4.
If the pressure adjusting wheel needs to be adjusted due to media thickness or other factors, it can be adjusted as follows:
● If the media requires higher pressure to improve print quality, increase the position of both adjusting wheels by one position
. ● If the media slides to the left during printing, increase the position of the outer adjusting wheel by one position, or decrease the position of the inner adjusting wheel by one position.
● If the media slides to the right during printing, increase the position of the inner adjusting wheel by one position, or decrease the position of the outer adjusting wheel by one position
. ● If the printed content on the left side of the media label is too light, increase the position of the inner adjusting wheel by one position.
● If the printed content on the right side of the media label is too light, increase the position of the outer adjusting wheel by one position.
5. Zebra ZM400 Barcode Printer Configuration
5.1 Entering, Using, and Exiting Setup Mode
5.1.1 Entering Setup Mode
Use the LCD screen on the control panel to view and adjust printer settings in setup mode. When changing parameters, an asterisk (*) displayed in the upper left corner of the screen indicates that the value is different from the value used in the printer that day.
Press the SETUP/EXIT key to enter or exit setup mode.
Press the SELECT key to select or deselect parameters.
Press the plus (+) key to continue processing the next parameter.
Press the minus (-) key to return to the previous parameter in the loop.
5.1.2 Exiting Setup Mode
When exiting setup mode, there are several options to save, change, or not change parameters.
To exit Setup Mode, complete the following steps:
① Press SETUP/EXIT. The LCD screen will display SAVE CHANGES.
② Press the plus (+) or minus (-) button to select the save option:
◆PERMANENT: These values are saved in the printer even after the printer is powered off.
◆TEMPORARY: Saves changes until the power is turned off.
◆CANCEL: Cancels all changes made after entering “Setup” mode, excluding color depth and cutter settings, which take effect immediately after changes.
◆LOAD DEFAULTS: Restores all parameters except network settings to factory default values. Be careful when loading default values, as you will need to reload all manually changed settings afterward.
◆LOAD LAST SAVE: Loads the parameter values that were last permanently saved.
◆DEFAULT NET: Restores wired and wireless network settings to factory default values.
③ Press the SETUP/EXIT button to select the displayed option. After the configuration and calibration process is complete, PRINTER READY will be displayed.
5.2 Changing Password-Protected Parameters
Certain parameters, including communication parameters, are password-protected by the manufacturer’s default values. Do not change password-protected parameters unless you have a complete understanding of their function; otherwise, the printer will not function properly.
When a user attempts to change a password-protected parameter for the first time, the printer will display ENTER PASSWORD. The user must enter a four-digit numeric password to change the parameter. After correctly entering the password, unless SETUP/EXIT or the printer power is turned off, the password does not need to be entered again.
To enter a password for a password-protected parameter, complete the following steps:
① You can use the minus sign (-) at the password prompt to change the selected digits.
② If you have already selected the digits to change, you can use the plus sign (+) to increase the selected value. Repeat the above two steps for each digit of the password.
③ After entering the password, press SELECT to display the parameter you selected to change. If the user has entered the correct password, the value can be changed. The default
password value is 1234. The password can be changed using the ZPL’s ^KP command or the printer’s web page.
The ^KP command can be used to set the password to 0000 to disable password protection, thus eliminating the need for the user to enter a password. To re-enable password protection, send the ZPL command ^KPx, where x can be a number from 1 to 9999.
5.3 Standard Control Panel Parameters
Note: Label printing software or printer drivers may override adjustments made through the control panel.
■Density: Adjusting print density. The optimal density setting depends on various factors, including ribbon type, label, and printhead condition. Adjusting the density allows for consistent, optimal print quality.
Note: Set the density to the lowest value that provides the best print quality. If the density is set too high, the ink will spread, the ribbon will burn through, and the printhead will wear out prematurely.
If the printed content is too light or there are blank areas in the printed area, increase the print density.
If the printed color is too dark, or if the print ink spreads or bleeds, decrease the print density.
Default: +10, Range: 00 to +30
■ Print speed: Adjusting the print speed usually results in higher print quality.
Default: 2 IPS, Range: 2 to 10 IPS (203 dpi) / 2 to 8 IPS (300 dpi) / 1 to 4 IPS (600 dpi)
■ Tear off the paper and adjust the cutting position. This parameter sets the position of the media on the cutter/peel bar after printing.
Increasing the number moves the media outward (the cutting line moves to the leading edge of the next label), and decreasing the number moves the media inward (the cutting line moves towards the edge of the printed label).
Default value: 0, range: -120 to +120
■ Print Mode: Select the print mode. This parameter instructs the printer how to feed the printed label. Ensure that the user has selected a print mode compatible with the printer and printer options.
Default: TEAR-OFF; Options: TEAR-OFF, PEEL-OFF, CUTTER, DELAYED CUT, REWIND.
■Media Type: Sets the media type. This parameter informs the printer of the type of parameters you are using. If Option Media is selected, a label length instruction must be included in the label format. If Non-Continuous Media is selected, the printer feeds the media to calculate the label length (the distance between two alignment points identified on the label gap, weave, alignment notch, or perforation).
Default: Gap/Notch; Options: Gap/Notch, Marking, Continuous.
■ Printing Method: Select the printing method. This parameter informs the printer user of the desired printing method: thermal (without ribbon) or thermal transfer (using thermal transfer media and ribbon).
Default: Thermal Transfer; Options: Thermal Transfer, Thermal
■ Print Width: Sets the print width. This parameter specifies the printable area within the label width range.
200dpi: Default 832, range 2 to 832
300dpi: Default 1248, range 2 to 1248
600dpi: Default 2496, range 2 to 2496
Note: Setting the width too narrow may prevent some label formats from printing on the media. Setting the width too wide will waste format memory, causing labels to print outside the lines or onto the print roller. If using a flipped image, this setting will affect the horizontal position of the label format.
■Maximum Length: Sets the maximum label length. This parameter is used during the media section of the calibration process. The maximum label length should be set to at least 25.4 mm longer than the actual label length. If this value is set to less than the label length, the printer will assume continuous media is loaded, and the printer will be unable to calibrate.
Default: 988 mm. Option: This value can be adjusted in 25.4 mm increments.
■ Early Warning: Enables early maintenance warnings. If this function is enabled, the printer will warn you when the printhead needs cleaning.
Default: MAINT.OFF (Maintenance Off), Options: MAINT.OFF (Maintenance Off), MAINTENANCE ON (Maintenance On)
■ The printhead is being cleaned. This setting provides an early warning for the printhead cleaning interval. This parameter is only displayed when “Early Maintenance Warning” is enabled. The value should correspond to the length of the media or ribbon roll used by the user.
Default: 450 meters/1476 feet; Options: 100 meters/328 feet to 450 meters/1476 feet, in 50-meter increments.
■ Printhead cleaned? This is an early warning to reset the printhead cleaning counter. This parameter is only displayed when “Early Maintenance Warning” is enabled.
■ Printhead Life: Sets the printhead life for early warning. This parameter is only displayed when “Early Maintenance Warning” is enabled. Set this value to the number of inches of media the printhead is expected to print.
Default: 1,000,000 inches; Range: 100 to 1,000,000 inches.
■A new printhead has been used? This is a warning to reset the printhead life counter. This parameter is only displayed when “Early Maintenance Warning” is enabled.
■ Non-reset counter: View the non-reset counter. This parameter displays the total length of media printed by the printer.
■ Reset Counter 1. View the user-controlled Counter 1. This parameter displays the total length of media printed by the printer since the last reset. The ZPL command can be used to change the unit of measurement of this counter and reset it.
■ Reset Counter 2. View the user-controlled Counter 2. This parameter displays the total length of media printed by the printer since the last reset. The ZPL command can be used to change the unit of measurement of this counter and reset it.
■ Print meter readings, print counter readings, and can print a label listing the following length readings: ① Non-resettable counter ② Two user-controlled counters ③ “Early Maintenance Warning” indicates the last time the printhead was cleaned and the lifespan of the printhead (if the “Early Maintenance Warning” function is disabled, the associated counters will not be printed).
■ List Fonts: This option prints a label listing the fonts available in the printer, including standard printer fonts and any optional fonts. Fonts can be stored in RAM or flash memory.
■ List barcodes. This option prints a label listing the barcodes available in the printer. The barcodes can be stored in RAM or flash memory.
■ List Images: This option prints a label listing the images available in the printer, which can be stored in RAM, flash memory, or an optional PCMCIA card.
■ List Formats: This option prints a label listing the available formats for your printer. These images can be stored in RAM, flash memory, or an optional PCMCIA card.
■ List Settings: This option prints a configuration label that lists the current printer configuration.
■ List Networks: This option prints a list of network configuration tabs, which show the settings of the installed print servers.
■ List All: This option allows you to print labels that list available fonts, barcodes, graphics, formats, and current printer and network configurations.
■ Format the memory card. This parameter will only appear if a flash memory chip is installed on the Wireless Plus tab.
■ Initialize flash memory. This option erases information previously stored in the flash memory, and can completely erase the contents stored in the flash memory.
■ Sensor calibration chart, media sensor graph. The sensor graph shows the settings compared to the actual sensor readings. This label can be used to troubleshoot printing problems.
■ Media and Ribbon: To calibrate the sensitivity of the media and ribbon sensors, follow these steps:
① Press the SETUP/EXIT button on the control panel. ②
Press the plus (+) or minus (-) button to select the “Media and Ribbon Calibration” parameter.
③ Press SELECT to select the parameter.
④ Press the plus (+) button to start the calibration process. The LOAD BACKING message will appear.
⑤ Open the printhead .
⑥ Peel approximately 203 mm of label from the backing paper and feed the media into the printer, ensuring only the backing paper is between the media sensors.
⑦ Keep the printhead open.
⑧ Press the plus (+) button to continue; the REMOVE RIBBON message will appear.
⑨ If a ribbon is used, remove it.
⑩ Close the printhead.
⑾ Press the plus (+) button to continue; the CALIBRATING PLEASE WAIT message will appear. The printer adjusts the signal gain received from the media and ribbon sensors based on the specific media and ribbon combination used. On the sensor graph, this corresponds to the graphical peak that moves up and down to better read your printing application. After calibration, RELOAD ALL will be displayed.
⑿ Open the printhead and push the media forward so the label is below the media sensor.
⑃ Reload the ribbon (if used).
⑭ Close the printhead
. ⑮ Press the plus sign (+) to continue. The printer performs automatic calibration, during which it checks the media and ribbon readings against the newly established scale to determine the ribbon length and printing mode. To view the readings on the new scale, print a sensor graph.
⑮ Press SELECT to accept any changes and deselect parameters.
■ Parallel Communication: Configure parallel traffic by selecting a communication port that matches the computer host’s settings.
Default: Bidirectional; Options: BIDIRECTIONAL (Bidirectional), UNIDIRECTIONAL (Unidirectional)
■ Serial Communication: Configure serial communication by selecting the communication port that matches the settings used by the computer host. This setting only applies when using a serial port.
Note: If using an external adapter to enable RS422/485 operation, select RS232.
Default: RS232, Options: RS232, RS485 MULTIFROP
■ Baud Rate: Set the baud rate. This setting is only applicable when using a serial port. For accurate communication, the computer host’s baud rate setting must match the printer’s baud rate setting. Select a value that matches the settings used by the computer host.
Default: 9600, Options: 300, 600, 1200, 2400, 4800, 9600, 14400, 19200, 28800, 38400, 57600, 115200
■ Data Bits: Sets the data bits. This setting is only applicable when using a serial port. For accurate communication, the computer host’s data bit setting must match the printer’s data bit setting. Select a value that matches the settings used by the computer host.
Default: 8 bits, Options: 7 bits, 8 bits
■ Parity bit: Sets the parity. This setting only applies when using a serial port. For accurate communication, the computer host’s parity setting must match the printer’s parity setting. Select a value that matches the parity setting used by the computer host.
Default: NONE, Options: ENVEN (Even), ODD (Odd), NONE (None)
■ Host Handshake: Configure host handshake. This setting is only applicable when using a serial port. For accurate communication, the computer host’s handshake protocol must match the printer’s handshake protocol. Select a handshake protocol that matches the settings used by the computer host.
Default: XON/XOFF, Options: XON/XOFF, DSR/DTR, RTS/CTS
■ Protocol: Configure the protocol. The protocol is an error type checking system. Depending on the options, an indicator can be sent from the printer to the host computer, indicating that data has been received. The protocol requested by the host computer should be selected.
Default: NONE; Options: NONE, ZEBRA, ACK_NAK.
Note: ZEBRA and ACK_NAK are the same, but the ZEBRA response message order is different. If ZEBRA is selected, the printer must use DSR/DTR as the host handshake protocol.
■ Network Identifier: Set a network identifier. If the printer operates in an RS422/485 multi-point download environment, a unique identifier should be assigned to the printer. This allows the host computer to communicate with the specific printer without affecting the TCP/IP or IPX network.
Default: 000, Range: 000 to 999
■ Communication: Configure communication mode. The communication diagnostic mode is a troubleshooting tool used to check the interconnection between the printer and the host computer.
Default: Normal mode; Options: Normal mode, Diagnostics.
■ Control Character Prefix: Sets the control character prefix. The printer looks for this two-digit hexadecimal character to indicate the start of the ZPL control specification.
Note: Do not use the same hexadecimal value for the control, format, and delimiter characters. The printer must use different characters to function correctly.
Default: 7E, Range: 00 to FF
■ Format Prefix: Sets the format prefix, which is a two-digit hexadecimal value used as a parameter position marker in the ZPL format specification. The printer looks for this hexadecimal character that indicates the start of the ZPL format instruction.
Note: Do not use the same hexadecimal value for the control, format, and delimiter characters; the printer must use different characters to function correctly.
Default: 5E, Range: 00 to FF
■ Separator: Sets the separator, which is a two-digit hexadecimal value used as a parameter position marker in the ZPL format specification.
Note: Do not use the same hexadecimal value for the control, format, and separator characters; the printer must use different characters to function correctly.
Default: 2C, Range: 00 to FF
■ZPL Mode: Selecting ZPL mode will keep the printer in that mode until the mode is changed by this parameter or the ZPL command. The printer can accept label formats written using ZPL or ZPLII without needing to rewrite any existing ZPL formats.
Default: ZPLII, Options: ZPLII, ZPL
■ Media is powered on. Select the Media Power-On option. This parameter sets the media operation when the printer is powered on.
Default: CALIBRATION, Options: CALIBRATION, SHORT CAL, LENGTH, NO MOTION, FEED.
The calibration process adjusts the sensor level and threshold, determines the length, and feeds the media to the next mesh.
Short calibration sets the media and mesh thresholds without adjusting the sensor gain, determines the length, and feeds the media to the next mesh. Length is used to determine
the label length using the current sensor value and feeds the media to the next mesh.
No Motion instructs the printer not to move the media; you must manually confirm that the mesh is correctly positioned, or you can press the Feed button to position the next mesh.
Feed feeds the label to the first alignment point.
■ Printhead Close: Sets the printhead close options. This parameter is used to set media operation when the printhead is closed.
Default: CALIBRATION, Options: CALIBRATION, SHORT CAL, LENGTH, NO MOTION, FEED.
The calibration process adjusts the sensor level and threshold, determines the length, and feeds the media to the next mesh.
Short calibration sets the media and mesh thresholds without adjusting the sensor gain, determines the length, and feeds the media to the next mesh. Length is used to
determine the label length using the current sensor value and feeds the media to the next mesh.
No movement instructs the printer not to move the media; you must manually confirm that the mesh is correctly positioned, or you can press the feed button to position the next mesh.
Feed feeds the label to the first alignment point.
■Rewind: Select the rewind sequence. This parameter sets when the label rewinds after being retrieved in some printing modes. This setting is invalid in “Wrap-up” mode. When received as part of the label format, this setting is replaced by ~JS.
Default: Default (90%), Options: DEFAULT (default), AFTER (before), OFF (off), FEFORE (after), 10%, 20%, 30%, 40%, 50%, 60%, 70%, 80%
■ Label Top: Adjusts the top position of the label. This parameter adjusts the vertical printing position of the label. A positive number moves the top of the label down (away from the print head) by a specified number of dots, while a negative number moves the label down (towards the print head) by a specified number of dots.
Default: +000, Options: Range: -120 to +120
■Left Position: Adjusting the left position allows you to adjust the label’s horizontal printing position. Positive numbers shift the printed content to the left by a specified number of dots, while negative numbers shift it to the right.
Default: +000, Options: Range: -9999 to +9999
■ Reprint Mode: This setting allows users to reprint the previously printed label by issuing the ~PR command or pressing the minus (-) button on the control panel.
Default: Disabled; Options: Enable, Disabled
■ Format Conversion: Select Format Conversion, then select Bitmap Scaling. The first number is the origin of the dots per inch (dpi) value, and the second number is the dpi to be scaled.
Default: NONE, Options: None, 150 300, 150 600, 200 600, 300, 600
■ Idle Display: Selecting standby display allows you to choose the LCD screen option for the real-time clock.
Note: If the default value is not selected, pressing the plus (+) or minus (-) sign will briefly display the printer’s firmware version.
Default: Firmware version; Options: MM/DD/YY (24HR), MM/DD/YY (12HR), DD/MM/YY (24HR), DD/MM/YY (12HR), Firmware version
■ Real-time clock date: Sets the real-time clock (RTC) date. This parameter allows users to set the date according to the specifications listed in IDLE DUSPLAY (Standby Display).
■ Real-time clock time: Sets the real-time clock (RTC) time. This parameter allows users to set the time according to the specifications listed in IDLE DUSPLAY (Standby Display).
■ Password Level: Specifies the password level. This parameter allows the user to choose whether to password-protect selected menu items or all menu items.
Default: Selected items; Options: Selected items, All items.
■Language: Select the display language. This parameter changes the language displayed on the LCD screen. Each language option is displayed in its own language.
Default: English; Options: English, Spanish, French, German, Italian, Norwegian, Portuguese, Swedish, Danish, Spanish 2, Dutch, Finnish, Japanese, Korean, Simplified Chinese, Traditional Chinese
6. Zebra ZM400 Barcode Printer Routine Maintenance
Important Note: Zebra is not responsible for damage caused by the use of cleaning solutions on this printer.
6.1 Recommended Cleaning Schedule
Depending on the application and media, more frequent cleaning may be required.
Printhead, Method: 95% alcohol solvent, Interval: After one media roll in thermal mode, after using a Perfect Silk ribbon for thermal transfer, or after every three media rolls.
Rollers, Method: 95% alcohol solvent, Interval: After one media roll in thermal mode, after using a Perfect Silk ribbon for thermal transfer, or after every three media rolls.
Media Sensor, Method: Air jetting, Interval: After one media roll in thermal mode, after using a Perfect Silk ribbon for thermal transfer, or after every three media rolls.
Ribbon Sensor, Method: Air jetting, Interval: After one media roll in thermal mode, after using a Perfect Silk ribbon for thermal transfer, or after every three media rolls.
Media Path, Method: 95% alcohol solvent, Interval: After one media roll in thermal mode, after using a Perfect Silk ribbon for thermal transfer, or after every three media rolls.
Ribbon Path: Method: 95% alcohol solvent, Time Interval: After using one media roll in thermal mode, after using a perfect silk ribbon in thermal transfer or after every three media rolls.
6.2 Cleaning Steps
6.2.1 Cleaning the Printer Housing
The printer’s outer surface can be cleaned with a lint-free cloth and a small amount of neutral detergent. Do not use abrasive cleaners or solvents.
6.2.2 Cleaning the Printhead and Roller Printhead
wear can be minimized and print quality maintained through routine maintenance. As printing continues, the media or ribbon passing through the printhead will continuously wear down the ceramic protective layer, constantly exposing and eventually damaging the printed elements. To prevent corrosion:
◆ Clean the printhead frequently and use a backed and fully lubricated thermal transfer ribbon to reduce friction.
◆ Optimize the balance between the two by using the lowest possible printhead pressure and burn-in temperature settings.
◆ Ensure the thermal transfer ribbon width is greater than or equal to the label media width to protect the printed elements from exposure to more corrosive label materials.
For best results, clean the printhead after each ribbon roll change. Unstable print quality, such as blank spaces in printed barcodes or graphics, may indicate a dirty printhead.
Caution: When performing tasks involving close proximity to the exposed printhead, remove all rings, watches, long necklaces, ID cards, and other metal objects that may come into contact with the printhead.
Caution: The printhead can get very hot and may cause severe burns; allow it to cool completely. Caution:
Before touching the printhead assembly, touch the printer’s metal frame or use an anti-static wrist strap or pad to discharge any accumulated static electricity. To
clean the printhead and rollers, follow these steps:
① Open the printhead assembly .
② Remove the media and ribbon
. ③ Use a cleaning swab to wipe the brown strip on the printhead assembly from one end to the other.
④ While manually rotating the pressure roller, thoroughly clean it with a cotton swab to allow the solution to evaporate completely.
⑤ Reinstall the media and ribbon and close the printhead assembly.
Note: If print quality does not improve after performing the above steps, try cleaning the printhead with the Save-a-Printhead cleaning film. This is a material with a special coating that removes accumulated dirt without damaging the printhead.
6.2.3 Cleaning the Media Tank and Sensors
To clean the media tank and sensors, complete the following steps:
① Use a brush or vacuum cleaner to remove accumulated paper scraps and dust from the media and ribbon path.
② Use a brush or vacuum cleaner to remove paper scraps and dust from the sensors.
7. Troubleshooting Zebra ZM400 Barcode Printer
7.1 LCD Screen Error Messages
When an error occurs, the LCD screen displays a message. The following lists the LCD screen errors, possible causes, and recommended solutions.
●INVALID HEAD (Invalid printhead); Possible cause: An original Zebra printhead was not used when replacing the printhead; Solution: Install an original Zebra printhead.
●RIBBON OUT (Ribbon exhausted); Possible causes and solutions: ① In thermal transfer mode, the ribbon is not loaded or is incorrectly loaded. Please load the media correctly. ② In thermal transfer mode, the ribbon sensor does not detect an incorrectly loaded ribbon. Please load the media correctly and calibrate the sensor. ③ In thermal transfer mode, the media is blocking the ribbon sensor. Please load the media correctly and calibrate the sensor. ④ In thermal transfer mode, even if the ribbon is loaded, the printer still does not detect the ribbon. Please print the sensor chart, calibrate the sensor, or load the printer default settings.
●RIBBON IN (Ribbon loaded); Possible cause: The ribbon is loaded, but the printer is set to thermal mode; Solution: Thermal media does not require a ribbon. If you want to use thermal transfer media that requires a ribbon, you should set the printer to “Thermal Transfer” mode.
●PAPER OUT (Paper Out), Possible Causes and Solutions: ① No media loaded or improper media loading. Please load the media correctly. ② Media sensor misalignment. Please check the media sensor position. ③ The printer is set to use non-continuous media, but continuous media is loaded. Please install the correct media type, or reset the printer to the current media type and perform calibration.
● HEAD OPEN (Print Head Open), Possible Causes and Solutions: ① Print head not fully closed. Please fully close the print head. ② Print head open sensor malfunction. Please replace the sensor.
7.2 Calibration Fault
● Fault: Print alignment mark missing on label, vertical offset of top alignment mark on form too much. Possible Causes and Solutions: ① Paper pressure roller too dirty. Please clean the paper pressure roller. ② Media guide plate position incorrect. Please ensure the media guide plate is correctly positioned. ③ Incorrect media type. Please set the printer to use the correct media type. ④ Incorrect media loading. Please load the media correctly.
● Fault: Automatic calibration failed. Possible causes and solutions: ① Incorrect media or ribbon loading. Please load the media and ribbon correctly. ② The sensor did not detect the media or ribbon. Please manually calibrate the printer. ③ The sensor is too dirty or incorrectly positioned, preventing detection. Please ensure the sensor is clean and the media is in the correct position. ④ Incorrect media type setting. Please set the printer to use the correct media type.
7.3 Communication Failure
● Failure: The label format has been sent to the printer, but it is not recognized, and the DATA indicator light is not flashing. Possible cause: Incorrect communication parameters. Solutions: ① Check the printer driver or software communication settings. ② If using a serial port, check the port settings in the control panel menu. ③ If using a driver, check the driver communication settings related to the connection.
● Failure: The label format has been sent to the printer, but after printing multiple labels, the printer skips, misplaces, loses, or distorts the image on the labels. Possible cause: Incorrect serial communication settings. Solutions: ① Ensure the flow control settings match. ② Check the communication cable length. ③ Check the printer driver or software communication settings.
● Failure: The label format has been sent to the printer, but it is not recognized. The DATA light flashes, but no printing occurs. Possible causes and solutions: ① The prefix and separator character sets in the printer do not match the character sets in the label format. Please check the prefix and separator characters. ② Incorrect data is being sent to the printer. Please check the communication settings on your computer to ensure that these settings match the settings on the printer. If the problem persists, check the label format.
7.4 Ribbon Fault
● Fault: Ribbon is damaged or melted. Possible cause: Depth setting value is too high. Solution: ① Lower the depth setting value. ② Thoroughly clean the print head.
● Fault: The printer does not detect that the ribbon is used up. Possible cause: The printer was calibrated without a ribbon, and then the ribbon was inserted without performing a user recalibration of the printer, or the printer defaults were not loaded. Solution: Now calibrate the printer with the ribbon, or load the printer defaults.
● Fault: In thermal transfer mode, the printer does not detect the ribbon even though it is correctly loaded. Possible cause: The printer was calibrated without a ribbon, and then the ribbon was inserted without performing a user recalibration of the printer, or the printer defaults were not loaded. Solutions: Use the ribbon to calibrate the printer now, or load the printer defaults.
● Fault: The ribbon indicator light is still on even when the ribbon is correctly loaded. Possible Cause: The printer has not been calibrated for the labels and ribbon to be used. Solution: Perform calibration of the media and ribbon sensor sensitivity
7.5. Printer Diagnostics
Self-tests and other diagnostic methods can provide specific information about the printer’s condition. Self-tests can provide sample printouts and can provide specific information to help determine the printer’s working condition . The most commonly used are the “Power-On” self-test and the CANCEL self-test.
Important Note: Use full-width media when performing self-tests. If your media is not wide enough, the test label will print on the pressure rollers. To prevent this, check the print width setting on the control panel and ensure that the width is correct for the media to be used.
Note: ▲ Do not send data from the host to the printer while performing these self-tests. ▲ If the media is shorter than the label to be printed, the test will continue printing on the next label. ▲ If you cancel the self-test before it is actually completed, you can reset the printer by turning off the power and then on again.
7.5.1 Power-On Self-Test
A power-on self-test will be performed each time the printer is powered on. During this self-test, the control panel indicator lights will turn on and off to ensure correct operation. At the end of the self-test, only the power indicator light will be on. When the power-on self-test is complete, the media will be fed into the correct position. 7.5.2 CANCEL
Self-Test
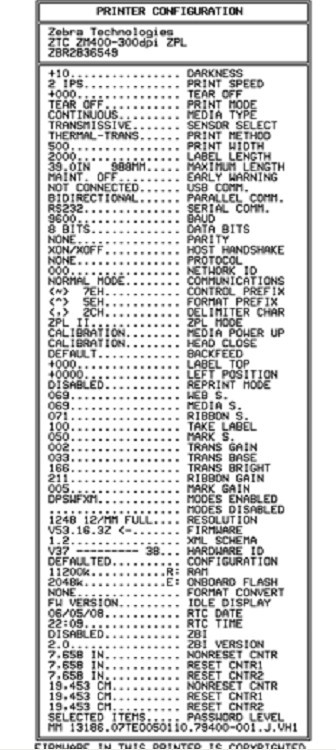
To perform the “CANCEL self-test,” complete the following steps:
① Turn off the printer power.
② With the printer power on, press and hold the CANCEL button until the first control panel light goes out. A printer configuration label will be printed, as shown below.
7.5.3 PAUSE Self-Test
This self-test can be used to provide a necessary checklist when adjusting the printer’s mechanical components or determining whether the printhead components are working properly.
To perform the PAUSE self-test, complete the following steps:
① Turn off the printer power
. ② With the printer power on, press and hold the PAUSE button until the first control panel light goes out.
● During the initial self-test, the printer prints 15 labels at its lowest speed, then automatically pauses. Each time the PAUSE button is pressed, an additional 15 labels will be printed.
● While the printer is paused, pressing CANCEL will change the self-test; each time PAUSE is pressed, 15 labels will be printed at a speed of 152 mm/s.
● While the printer is paused, pressing CANCEL again will change the self-test; each time PAUSE is pressed, 50 labels will be printed at the printer’s lowest speed.
● When the printer is paused, pressing CANCEL again will change the self-test for the third time. Each time PAUSE is pressed, 50 labels will be printed at a speed of 152 mm/s.
● When the printer is paused, pressing CANCEL again will change the self-test for the fourth time. Each time PAUSE is pressed, 15 labels will be printed at the printer’s maximum speed.
● Holding down CANCEL will exit the self-test at any time.
7.5.4 FEED Self-Test
Different types of media may require different depth settings. During the FEED self-test, labels are printed at two different printing speeds with different depth settings. Each label will be printed with a relative depth and printing speed. ANSI grading can be performed on the barcodes on these labels to check print quality.
The depth value starts below the printer’s current depth value (relative depth 3) and increases to three depth settings above the current depth value (relative depth + 3).
Depending on the printhead dot density, a series of 7 labels can be printed at each speed:
● 203dpi printer: 2ips, 6ips, and 10ips
● 300dpi printer: 2ips, 6ips, and 8ips
● 600dpi printer: 2ips and 4ips
To perform a FEED self-test, complete the following steps:
① Print a configuration label to display the printer’s current configuration.
② Turn off the printer power.
③ With the printer power on, press and hold the FEED button until the first control panel light goes out. The printer will print a series of labels at different speeds and depths above and below the depth value shown in the configuration label.
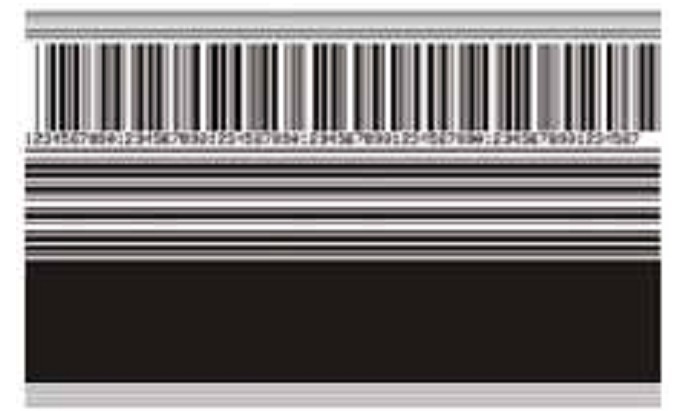
④ Use the diagram below to check the test labels and determine which label has the best print quality for your application. If you have a barcode detector , you can use it to measure the barcode/blank and calculate the print contrast. If you do not have a barcode detector, you can use a visual method or a system scanner to select the best depth setting based on the labels printed in this self-test.
■ Too Dark: The label is too dark and obvious. It is readable but does not conform to specifications. This manifests as an enlarged size of the regular barcode, with ink filling the spaces for small alphanumeric characters. Rotating the barcode results in crowded spaces.
■ Slightly Dark: The label is slightly darker and not very noticeable. This is a standard barcode with slightly thickened small alphanumeric characters, appearing somewhat crowded. Rotating barcodes have less space compared to standard barcodes, potentially making the code unreadable.
■ Conforms to Specifications: This type of barcode can only be verified using a barcode detector, but it still has some visual characteristics. Regular barcodes have complete, balanced bars and clear, distinct gaps; rotating barcodes also have complete, balanced bars and clear, distinct gaps. While not as visually appealing as slightly darker barcodes, these barcodes conform to specifications. In both regular and rotating styles, small alphanumeric characters appear more complete.
■ Slightly Lighter: In some cases, for “conforms to specifications” barcodes, slightly lighter labels are more effective than darker ones. The results show that both regular and rotating barcodes conform to specifications, but small alphanumeric characters may be incomplete.
■ Too light, indicating the label color is too light and indistinct. This manifests as incomplete regular and rotating barcodes, and unreadable small alphanumeric characters.
⑤ Pay attention to the relative depth value and printing speed on the label that produces the best results.
⑥ The relative depth value can be added to or subtracted from the depth value specified on the configuration label; the resulting numerical value is the optimal depth value for a specific label/ribbon combination and printing speed.
⑦ If necessary, the depth value should be changed to the depth value on the label that produces the best results.
⑧ The printing speed should be changed to the same speed as the label that produces the best results, as needed.
7.5.5 FEED and PAUSE Self-Test
Performing this self-test can temporarily reset the printer to factory defaults. Unless these values are retained in memory, they will only take effect after the power is turned off. If the factory defaults are permanently retained, a media calibration procedure must be performed.
To perform the FEED and PAUSE self-test, complete the following steps:
① Turn off the printer power.
② With the printer power on, press and hold the FEED (paper feed) and PAUSE (pause) buttons. ③ Press and hold the FEED and PAUSE buttons until the first control panel light goes out. The printer configuration will be temporarily reset to factory defaults. No labels, barcodes, or ribbons will
be printed when this test is completed.