Zebra ZT410 thermal transfer industrial printer, 4-inch, with selectable resolutions of 203dpi, 300dpi, and 600dpi.Print head and other accessories are available in large quantities.

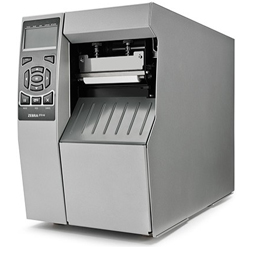
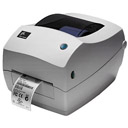
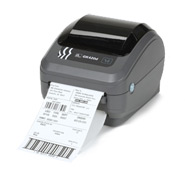
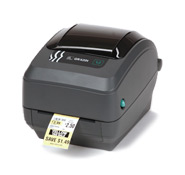
The meticulously designed Zebra ZT410 printer is durable and delivers exceptional performance in a wide range of applications. This series of printers ensures your critical business operates efficiently. Built on the Z series’ field-proven reliability, the ZT410 enhances print speed, print quality, and connectivity options.

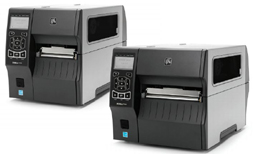
The ZT410 printer is exceptionally easy to use, featuring an intuitive icon-based LCD graphical user interface and easy-to-install supplies. Furthermore, the ZT410 printer includes standard USB, serial, Ethernet, and Bluetooth connectivity. Expanded RFID capabilities provide enhanced tracking, deeper visibility, and business insights.

The ZT410 is a 4-inch model that comes standard with a range of advanced features to ensure your printer investment meets your needs now and in the future. Its all-metal frame and unique folding door design make it ideal for use in space-constrained environments. With Zebra’s Link-OS environment—an innovative operating system that combines a powerful multi-platform software development kit (SDK) with software applications—the ZT410 printer can be easily integrated, managed, and maintained from anywhere in the world.

Zebra ZT410 Product Advantages:
◆ Application Flexibility
* Extend your printer’s performance with a wide range of excellent media features and media delivery options.
* Customize your printer to match current and future business needs with media handling options available to the end user.
* Standard serial, USB, Ethernet, and Bluetooth capabilities—along with two open media slots—enable you to utilize non-standard connectivity options.
* Extended RFID functionality is easy to install and use.
* High-resolution printing ensures excellent output quality for small label applications.
◆ Easy Integration
* The USB host port allows for easy data transfer from USB flash drives via mapping and extended mapped drive memory, simplifying printer configuration.
* In addition to ZPL and EPL, the Virtual Device application enables Link-OS-enabled printers to support some common existing printer languages ​​and competitor printer languages—effectively ensuring your return on investment.
◆ Ease of Use
* Dynamic QR codes provide web-based on-demand support for quickly resolving printer errors.
* With Print Touch, these Link-OS-enabled printers offer web-based startup using Near Field Communication (NFC), providing easy access to Zebra’s comprehensive knowledge base, including instructional videos and product support.
* Illuminated media and ribbon paths allow for easy viewing of the printer’s internals, even in low-light conditions.
◆ Easy Management
* Zebra’s Link-OS environment offers enhanced functionality for monitoring, managing, and maintaining printers from anywhere.
* Cloud connectivity enables Link-OS-enabled printers to securely interact directly with the cloud environment for printing and device management.
Profile Manager allows you to edit and manage a single printer, volume printer, or all Link-OS-enabled printers on your network from anywhere in the world.
◆ Applicable Scenarios
* Manufacturing – Work-in-Process Management – ​​Product ID/Serial Number – Packaging Labels – Receiving/Handling Labels
* Transportation & Logistics – Order Sorting/Packaging – Shipping/Receiving – Direct Packaging – Compliance Label Printing
* Retail – Distribution Centers – Store Back-Office Operations
* Healthcare – Laboratory Labels – Blood Bank Labels – Asset Tracking – Drug Label Printing

Zebra ZT410 Detailed Specifications

Standard Features
● Printing Method: Thermal or Thermal Transfer
● Printing Mode: Thermal Transfer and Thermal Printing
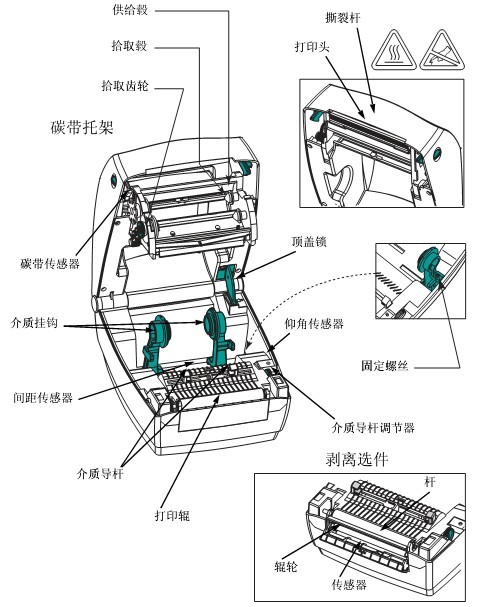
● Design: Metal frame and folding metal media cover with a large, clear window
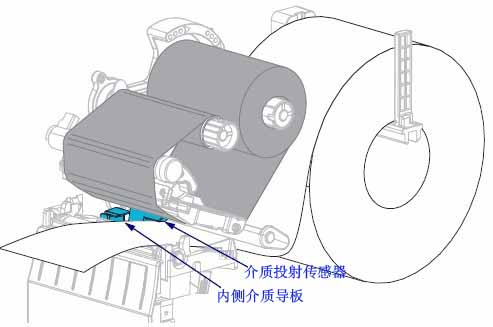
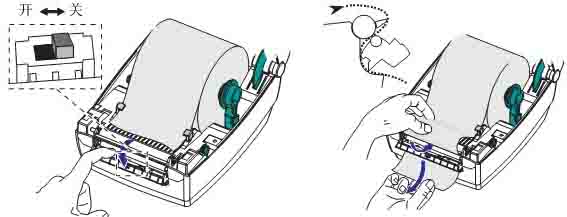
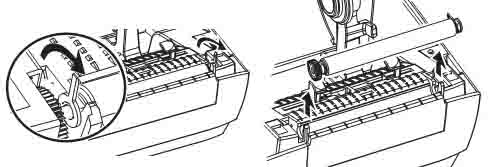
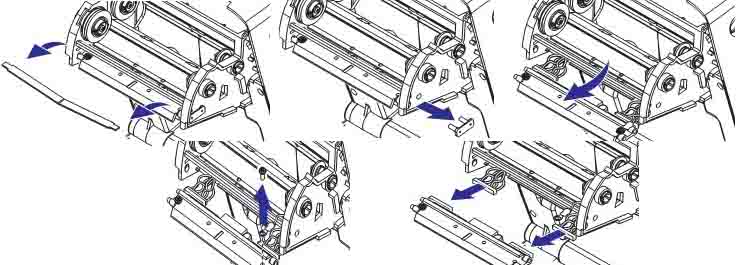
● Side-mounted consumable loading for simplified media and ribbon installation
● Excellent print quality with Element Energy Equalizer (E3) technology
● Communication: USB 2.0, High Speed, RS-232 Serial, 10/100 Ethernet, Bluetooth 2.1, USB host port
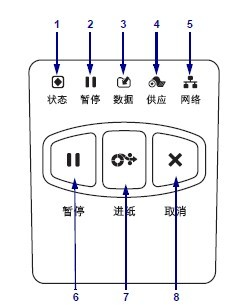
● Backlit, multi-graphic LCD display with intuitive menus and an easy-to-use keyboard for quick operation
● Dual-color status LEDs for quick monitoring of printer status
● ENERGY STAR certified

Print Specifications
● Resolution: 203dpi (8 dots/mm), 300dpi (12 dots/mm) (optional), 600dpi (24 dots/mm) (optional)
● Memory: Standard: 256MB RAM, 512MB Flash
● Maximum Print Width: 4.09 inches/104 mm
● Maximum Print Length: 203dpi: 3988 mm; 300dpi: 1854 mm; 600dpi: 991 mm
● Maximum Print Speed: 14 inches/second (356 mm/second)
● Media Sensor: Transmissive and Reflective

Media Characteristics
● Media Width (Label and Backing): 1 inch/25.4 mm to 4.5 inch/114 mm, tear/cutter; 1 inch/25.4 mm to 4.25 inch/108 mm, peel/rewind
● Maximum Length of Non-Continuous Labels: 39 inch/991 mm
● Maximum Media Roll Size: 8 inch/203 mm, Core Outer Diameter 3 inch/76 mm, Core Inner Diameter
● Media Thickness: 0.0023 inch/0.058 mm to 0.010 inch/0.25 mm
● Media Types: Continuous paper, die-cut paper, notched paper, black label paper

Ribbon Characteristics
● Maximum Outer Diameter: 450 meters: 3.2 inches/81.3 mm, Core Outer Diameter: 1 inch/25.4 mm, Core Inner Diameter
● Standard Length: 1476′/450 meters
● Width: 2.00 inches/51 mm to 4.33 inches/110 mm
● Ribbon Setup: Ink side of the ribbon is wound outwards; optional ribbon reels can be used for ink side winding inwards.

Operating Parameters
● Operating Temperature: 40°F/5°C – 105°F/41°C
● Storage/Transportation Ambient Temperature: -40°F/-40°C – 140°F/60°C
● Operating Humidity: 20-85%, non-condensing
● Storage Humidity: 5-85%, non-condensing

Electrical Parameters
● Automatic detection (PFC compliant) 100-240VAC, 50-60Hz, rated power 100 watts
● ENERGY STAR certified

Physical parameters (closed state)
● Width: 10.6 inches / 269 mm
● Height: 12.75 inches / 324 mm
● Depth: 19.50 inches / 495 mm
● Weight: 36 lbs / 16.33 kg

Fonts/Graphics/Symbols
● 16 built-in scalable ZPL II bitmap fonts and two built-in scalable ZPL fonts
● Scalable smooth bitmap fonts for Asian and other international languages
​​● Unicode: suitable for multilingual printing
● Downloadable objects include images, scalable fonts and bitmap fonts, label templates and formatting.
● The IBM Code Page 850 international character set is available for fonts A, B, C, D, E, F, G and 0 via software control.
● Code Page 1250, 1252, 1253, 1254, and 1255 support font 0.

Barcode Types:
● 1D Barcodes: Code 11, Code 39, Code 93, Code 128 with A/B/C subsets and UCC Case Codes, ISBT-128, UPC-A, UPC-E, EAN-8, EAN-13, UPC and EAN 2- or 5-digit extensions, Plessey, Postnet, Standard 2-of-5, Industrial 2-of-5, Interleaved 2-of-5, Logmars, MSI, Codabar and Planet Code
● 2D Barcodes: Codablock, PDF417, Code 49, Data Matrix, MaxiCode, QR Code, TLC 39, MicroPDF RSS-14 (and additional codes), Aztec

Link-OS Solutions
: ● Documentation Design: Quickly design custom printing solutions using business data and Zebra’s intuitive plug-and-play design tools.
● Device Integration: Zebra’s applications and products help you integrate Zebra devices into existing systems.
● Device Management: Manage local and global printing operations with Zebra’s device management tool suite.
● Developer Tools: Provides the tools you need to create your own applications, including documentation, source code, programming languages, templates, and more.

Firmware
● Built-in ZPL, ZPL II, and EPL programming languages ​​can be selected via software or front panel.
● Supports XML printing – Enables XML communication for barcode label printing.

Options and Accessories
● Communication
* Parallel Port (Bidirectional Interface)
* Wireless: ZebraNet Print Server — Supports 802.11a/b/g/n networks via internal integrated options supporting Webview and Alert functionality
● Media Handling
* Rewinder: Rewinds all printed labels inwards onto the 3-inch core, and can also peel and rewind backing paper (factory setting only)
* Peeler: Forward backing paper, passively peelable
* Peeler: Backing paper take-up option — When used with the peeler option, the entire backing paper take-up shaft can accommodate various standard printers
* Cutter: Forward-facing guillotine cutter and receiving tray
* 1-inch core inner diameter media supply rack
* Ribbon supply shaft supports ribbon ink-side inward winding
● Radio Frequency Identification (RFID)
* Supports signage compatible with UHF EPC Gen 2 V1.2/ISO 18000-6C
* Integrated RFID system can be upgraded by the user in the field
* Adaptive coding technology automatically selects the optimal coding settings
● Keyboard Display Unit: Supports KDU Plus and ZKDU – Input variable data, retrieve stored format, suitable for standalone applications.

The Zebra ZT510 thermal transfer industrial printer, 4-inch, with 203dpi and 300dpi resolution options, elevates the 105SL PLUS to a new level with its superior performance and value.Print head and other accessories are available in large quantities.

The Zebra ZT510 strikes the perfect balance between performance and value, containing the core features you need for an industrial printer while remaining cost-effective.

Built upon its industry-leading predecessor, the Zebra 105SLPlus, the ZT510 offers proven, durable design and construction, while adding advanced management and monitoring capabilities.

This means you can use it reliably 24/7, ensuring your business operations run smoothly and efficiently now, while its long lifespan and advanced features help you meet every challenge you face in the future—delivering exceptional value.Zebra ZT510 Product Advantages:
◆ 24/7 Reliability, Eliminating Downtime
You need a printing system that can support your mission-critical processes and proactively meet growing demands. The ZT510 utilizes Zebra’s renowned high-quality printing mechanisms and internal components to maintain outstanding performance around the clock, consistently delivering high-quality prints and virtually eliminating costly downtime.
◆ Unparalleled Reliability to Withstand the Harshest Usage Conditions
With its all-metal design, durable construction, and sealed membrane keys, the ZT510 is dustproof, dirtproof, and moisture-proof, enabling reliable use in today’s most demanding manufacturing and warehouse environments. This durable device can withstand years of continuous use, maintaining excellent performance even under extreme temperatures and rough handling.
◆ Excellent Value Within Your Budget
For cost-sensitive companies, the ZT510 is ideal, combining outstanding next-generation printing performance with exceptional value. It offers high-intensity reusability, outstanding reliability, fast processing, advanced Link-OS functionality, and the essential features you need—without adding extra cost. It is ENERGY STAR certified, further ensuring no impact on business profitability.
◆ Multiple connectivity options for flexible configuration
Multiple standard communication options, including USB, serial, Gigabit Ethernet, and Bluetooth, make the ZT510 easy to integrate with existing systems and connect to various networks. Optional features include a parallel 802.11a/c wireless network card with Bluetooth 4.0, USB Host, and IPv6.
◆ Excellent adaptability to meet evolving needs
With the easy-to-use Link-OS application, hardware upgrades are simplified, integration with common device management software is seamless, and software updates are easy. The ZT510 can evolve as your future business needs change.
◆ More features to enhance performance From
a high-speed processor supporting complex graphics processing to the conveniently located optional USB Host card slot at the rear of the printer, the ZT510 continuously optimizes performance. Users can easily and accurately switch between 203dpi and 300dpi print resolutions for precise media handling and quiet operation. Dynamic QR codes enable more web-based on-demand support to quickly resolve printer errors.
◆ Link-OS provides enhanced visibility, remote management, and easier maintenance.
Zebra’s highly intelligent, best-in-class Link-OS environment offers deeper insights into the real-time status and operational condition of your printing processes. With Link-OS, you can manage routing, firmware updates, printer configuration, and more—on-site or remotely—using a single cloud-based application. Applications such as Virtual Devices, Profile Manager, Near Field Communication (NFC), and Print Touch are also supported.Zebra ZT510 Detailed SpecificationsStandard Features
● Printing Methods: Thermal transfer and thermal printing
● Body Design: Metal frame
● Printhead with Element Energy Equalizer (E3) technology contributes to excellent print quality
● Communication: USB, serial, Gigabit Ethernet, Bluetooth LE
● Backlit multi-line display includes intuitive menus, an easy-to-use keyboard, and password protectionPrint Specifications
● Resolution: 203 dpi (8 dots/mm), 300 dpi (12 dots/mm) (optional)
● Memory: 512MB RAM, 2GB Flash
● Maximum Print Width: 4.09 inches/104 mm
● Maximum Print Length: 203 dpi: 3810 mm; 300 dpi: 2540 mm
● Maximum Print Speed: 12 inches/second (305 mm/second)
● Media Sensor: Transmissive and ReflectiveMedia Characteristics
● Media width (label and backing paper): 0.79 inches/20 mm to 4.5 inches/114 mm
● Maximum media roll size: 8 inches/203 mm, core outer diameter 3 inches/76 mm, core inner diameter
● Minimum label length: 0.25 inches/6 mm (rewind mode); 0.5 inches/13 mm (peel mode); 0.7 inches/18 mm (tear mode); 1.5 inches/38 mm (cut mode)
● Media thickness: 0.003 inches/0.076 mm to 0.009 inches/0.23 mm (cut mode); 0.012 inches/0.305 mm (non-cut mode)
● Media type: Continuous paper, die-cut paper, notched paper, black label paper
Ribbon Characteristics
● Maximum Outer Diameter: 450 meters: 3.2 inches/81.3 mm, Core Outer Diameter: 1 inch/25.4 mm, Core Inner Diameter
● Standard Length: 1476′/450 meters
● Width: 0.79 inches/20 mm to 4.33 inches/110 mm
● Ribbon Setup: Ink side of the ribbon is facing outwards when wound.Operating Parameters
● Operating Temperature: 40°F/5°C – 104°F/40°C
● Storage/Transportation Ambient Temperature: -22°F/-30°C – 140°F/60°C
● Operating Humidity: 20-85%, non-condensing
● Storage Humidity: 5-85%, non-condensingElectrical Parameters
● Automatic detection (PFC compliant) 90-250VAC, 47-63Hz, rated power 250 watts
● ENERGY STAR certifiedPhysical parameters (closed state)
● Width: 10.56 inches / 268.2 mm
● Height: 15.58 inches / 395.68 mm
● Depth: 20.17 inches / 512.3 mm
● Weight: 50 lbs / 22.7 kgFonts/Graphics/Symbols
● 16 built-in scalable ZPL II bitmap fonts and two built-in scalable ZPL fonts
● Scalable smooth bitmap fonts for Asian and other international languages
​​● Unicode: suitable for multilingual printing
● Downloadable objects include images, scalable fonts and bitmap fonts, label templates and formatting.
● The IBM Code Page 850 international character set is available for fonts A, B, C, D, E, F, G and 0 via software control.
● Code Page 1250, 1252, 1253, 1254, and 1255 support font 0.Barcode Types:
● 1D Barcodes: Code 11, Code 39, Code 93, Code 128 with A/B/C subsets and UCC Case Codes, ISBT-128, UPC-A, UPC-E, EAN-8, EAN-13, UPC and EAN 2- or 5-digit extensions, Plessey, Postnet, Standard 2-of-5, Industrial 2-of-5, Interleaved 2-of-5, Logmars, MSI, Codabar and Planet Code
● 2D Barcodes: Codablock, PDF417, Code 49, Data Matrix, MaxiCode, QR Code, TLC 39, MicroPDF RSS-14 (and additional codes), AztecSoftware Tools
● Link-OS Solutions
* Documentation Design: Quickly design custom printing solutions using business data and Zebra’s intuitive plug-and-play design tools.
* Device Integration: Zebra’s applications and products help you integrate Zebra devices into existing systems.
* Device Management: Manage local and global printing operations with Zebra’s device management tool suite.
* Developer Tools: Provides the tools you need to create your own applications, including documentation, source code, programming languages, templates, and more.
● Web View:
Connect and control your printer using ZPLII commands through your printer’s web interface using your preferred web browser.
● Alert:
Printers equipped with a ZebraNet printer server can notify you from any email-enabled, wired, or wireless device to minimize downtime.Firmware
● ZBI 2.0 – An optional, powerful programming language that enables the printer to run standalone applications and connect to peripherals.
● ZPL and ZPLII – Zebra programming languages ​​that provide advanced label formatting and printer control, compatible with all Zebra printers.
● XML Printing Support – Allows XML communication for barcode label printing.Options and Accessories
● Connectivity: Two available communication slots for adding internal cards to 802.11ac, parallel, Ethernet, and labeler interfaces. IPv6 option as an external adapter attached to the parallel port.
● Media Handling:
* Rewinder: Rewinds all printed labels inwards onto the 3-inch core, and can also peel and rewind backing paper (factory setting only).
* Cutter: Forward-facing guillotine cutter and receiver tray.
● Keyboard Display Unit: Supports ZKDU keyboard display unit, suitable for standalone printing applications.

Zebra ZT230 thermal transfer industrial printer,Print head and other accessories are available in large quantities.

The Zebra ZT200 Series is designed with the broadest range of customer feedback, diverse printing applications, evolving business needs, and various operational challenges in mind.

Whether you’re adopting barcode technology for the first time or upgrading an existing printer model, the ZT200 Series is ideal for a variety of label applications. These innovative new printers offer users numerous advantages. The ZT200 Series is characterized by ease of use, comprehensive functionality, and exceptional value.

The Zebra ZT200 series features a streamlined design and compact size, taking up less physical space than the Stripe and S4M models. Operators can become proficient in using the ZT200 series printers with virtually no training, thanks to the tool-free standard parts maintenance and durable design, minimizing maintenance work. Backward compatibility will be a major plus for your IT staff, as it ensures that new printers can operate smoothly while minimizing downtime.

The Zebra ZT230 features a rugged, durable all-metal casing for long-lasting use; it supports a 450-meter ribbon capacity, reducing ribbon replacement frequency and extending uptime; users can configure and control the printer through a graphical user interface; it is ideal for barcode label applications that require frequent label changes.

Zebra ZT230 Product Advantages:
◆ Space Saving
* Compact and streamlined design easily fits into even the most limited spaces.
* Elegant compact design with a unique folding door (requires 102 mm/4 inch open space) easily blends into tight spaces and maximizes effective workspace.
◆ Quick Installation and Integration
* Ideal replacement for older Stripe and S4M models.
* Multiple connectivity options: parallel, 10/100 Ethernet, 802.11a/b/g/n wireless.
◆ Intuitive, Easy Media Loading
* Side-mounted media loading design effectively eliminates complicated consumable wires.
* Color-coded cues provide new users with an intuitive guide to loading ribbons and media.
* Illuminated movable sensors are visible throughout the media for trouble-free sensor position adjustment.
* Icon-based status LEDs provide clear, real-time printer status
. ◆ Print Quality
* Designed for greater print precision with fine-tuning capabilities.
* Clean, crisp text and barcodes—even on narrow media.
◆ The inherent reliability and durability of Zebra products
. Designed for light industrial and commercial environments
* Compliant with Energy Star specifications
* Utilizes a drive system for optimal performance with minimal maintenance
◆ Simplified maintenance
* Easy to maintain; impression cylinder and printhead can be disassembled without tools, making cleaning and replacement very easy
* Simple interchangeable connection options support quick printer replacement and upgrades
* Basic maintenance can be achieved with just three common tools
◆ Suitable for
* Manufacturing/Work-in-process, Product ID/Serial Number, Packaging Labels, Receiving/Stocking Labels
* Transportation and Logistics/Order Sorting/Packaging, Shipping/Receiving, Direct Delivery, Compliance Labels
* Healthcare/Work Orders, Sample Labels, Asset Tracking, Dosage Labels
* Retail/Shelf Labels, Shipping, Returns, Item Labels
* Government Agencies/Asset Tracking, Logistics Labels, Warehousing

Zebra ZT230 Detailed Specifications

Standard Features
● Printing Method: Thermal or Thermal Transfer
● Frame: Metal Frame
● Media Folding Door with Transparent Window
● Side-mounted Consumable Loading for Simplified Media and Ribbon Loading
● Excellent Print Quality with Element Energy Equalizer (E3) Technology
● Dual-Color LEDs for Quick Printer Status Monitoring
● Icon-Based LCD Multilingual Graphical User Interface and Full-Function Keyboard
● USB 2.0 and RS-232 Serial Ports
● Simple Three-Button User Interface
● Energy Star Compliant

Print Specifications
● Resolution: 203dpi (8 dots/mm), 300dpi (12 dots/mm) (optional)
● Memory: Standard: 128MB RAM (4MB available to users), 128MB Flash (58MB available to users)
● Maximum Print Width: 104mm
● Maximum Print Length: 203dpi: 3988mm; 300dpi: 1854mm
● Maximum Print Speed: 6 inches/second (152 mm/second)
● 32-bit RISC Processor
● Media Sensors: Transmissive and Reflective
● Media Characteristics: Maximum Label and Backing Width: 114mm; Maximum Length of Non-continuous Labels: 991mm
● Media Width: 19.4mm to 114mm
● Maximum Media Roll Size: Outer Diameter 203mm, Core Inner Diameter 76mm; or, Outer Diameter 152mm, Core Inner Diameter 25mm
● Media Thickness: 0.076mm to 0.25mm
●Media Type: Continuous paper, die-cut paper, label paper, black label paper
●Ribbon outer diameter: 81.3mm, core inner diameter: 25mm
●Standard ribbon length: 450 meters
●Ribbon width: 40mm to 110mm
●Ribbon setup: Ink side of the ribbon is facing outwards, core to core.

Operating Parameters
● Operating Temperature: 40°F/5°C – 105°F/41°C
● Storage/Transportation Ambient Temperature: -40°F/-40°C – 140°F/60°C
● Operating Humidity: 20-85%, non-condensing
● Storage Humidity: 5-85%, non-condensing

Electrical Parameters
● Universal Auto-Range Power Supply (PFC compliant) 100-240 VAC, 47-63 Hz
● Compliant with Energy Star

Physical parameters
: ● Dimensions: 277mm*242mm*432mm
● Weight: 9.1kg

Fonts/Graphics/Symbols
● Seven bitmap fonts and one smooth vector font (CG Triumvirate™ Bold Compressed Font) including Agfa Monotype Corporation’s UFST for the EMEA character set. Pre-loaded with Unicode-compliant scalable fonts.
● Supports the following international character sets: IBM Code Page 850.
● Supports user-defined fonts and graphics—including custom logos
. ● ZPL II drawing commands—including boxes and lines.

Barcode Types:
● Linear Barcodes: Code 11, Code 39, Code 93, Code 128 with A/B/C subsets and UCC Case Codes, ISBT-128, UPC-A, UPC-E, EAN-8, EAN-13, 2-digit or 5-digit extensions of UPC and EAN, Plessey, Postnet, Standard 2-of-5, Industrial 2-of-5, Interleaved 2-of-5, Logmars, MSI, Codabar, Planet Code
● Two-Dimensional Barcodes: Aztec, Codablock, PDF417, Code 49, Data Matrix, MaxiCode, QR Code, MicroPDF417, TLC 39, RSS-14 (and additional codes)

ZebraLink Solutions
● Optional Software: ZebraDesigner Pro; ZebraNet Bridge Enterprise; ZebraNet Setup Utilities v 7.0; ZBI 2.0 ZBI-Developer
● Optional Connectivity: ZebraNet b/g/n Wireless Print Server (built-in); ZebraNet 10/100 Print Server (built-in or external); Centronics Parallel Port (built-in)
● ZPL II; Zebra Global Printing Solutions; EPL2; Web View and Warnings, ZBI 2.0 (optional)

Options and Accessories
● Peeling—Forward-facing liner, passively peelable, no take-up shaft required
● Peeling—Forward-facing liner, passively peelable—with liner take-up shaft (factory setting only)
● Cutter—Forward-facing guillotine cutter
● Real-time clock (RTC)
● Keyboard display unit (KDU)

Zebra ZT210 thermal transfer industrial printer.Print head and other accessories are available in large quantities.

Zebra ZT210 Industrial Barcode Printer User Manual

The Zebra ZT200 Series is designed with the broadest range of customer feedback, diverse printing applications, evolving business needs, and various operational challenges in mind.

Whether you’re adopting barcode technology for the first time or upgrading an existing printer model, the ZT200 Series is ideal for a variety of label applications. These innovative new printers offer users numerous advantages. The ZT200 Series is characterized by ease of use, comprehensive functionality, and exceptional value.

The Zebra ZT200 series features a streamlined design and compact size, taking up less physical space than the Stripe and S4M models. Operators can become proficient in using the ZT200 series printers with virtually no training, thanks to the tool-free standard parts maintenance and durable design, minimizing maintenance work. Backward compatibility will be a major plus for your IT staff, as it ensures that new printers can operate smoothly while minimizing downtime.

The Zebra ZT210 is designed specifically for the Chinese market. It is easy to operate with a three-button user interface; supports 300-meter ribbon capacity; features a simplified Chinese user interface and a pre-loaded SimSun Chinese font; is compact and robust with a durable metal construction; and is ideal for barcode label applications that do not require frequent label changes.

Zebra ZT210 Product Advantages:
◆ Space Saving
* Compact and streamlined design easily fits into even the most limited spaces.
* Elegant compact design with a unique folding door (requires 102 mm/4 inch open space) easily blends into tight spaces and maximizes effective workspace.
◆ Quick Installation and Integration
* Ideal replacement for older Stripe and S4M models.
* Multiple connectivity options: parallel, 10/100 Ethernet, 802.11a/b/g/n wireless.
◆ Intuitive, Easy Media Loading
* Side-mounted media loading design effectively eliminates complicated consumable wires.
* Color-coded cues provide new users with an intuitive guide to loading ribbons and media.
* Illuminated movable sensors are visible throughout the media, enabling trouble-free sensor position adjustment
. ◆ Print Quality
* Designed for greater print precision with fine-tuning capabilities.
* Clean and crisp text and barcodes—even on narrow media.
◆ Inherent Reliability and Durability of Zebra Products
* Built for light industrial and commercial environments .
* Energy Star compliant
. Employing a drive system for optimal performance with minimal maintenance:
◆ Simplified Maintenance
* Easy to maintain; impression cylinders and printheads can be disassembled without tools, making cleaning and replacement very easy.
* Simple interchangeable connection options support quick printer replacement and upgrades.
* Basic maintenance can be achieved with just three common tools
. ◆ Applicable Scenarios
* Manufacturing/Work-in-process, Product ID/Serial Number, Packaging Labels, Receiving/Ordering Labels
* Transportation and Logistics/Order Sorting/Packaging, Shipping/Receiving, Direct Delivery, Compliance Labels
* Healthcare/Work Orders, Sample Labels, Asset Tracking, Dosage Labels
* Retail/Shelf Labels, Shipping, Returns, Item Labels
* Government Agencies/Asset Tracking, Logistics Labels, Warehousing

Zebra ZT210 Detailed Specifications

Standard Features
● Printing Method: Thermal or Thermal Transfer
● Frame Structure: Metal Frame
● Media Folding Door with Transparent Window
● Side-mounted Consumable Loading for Simplified Media and Ribbon Loading
● Excellent Print Quality with Element Energy Equalizer (E3) Technology
● Dual-Color LEDs for Quick Printer Status Monitoring
● USB 2.0 and RS-232 Serial Ports
● Simple Three-Button User Interface
● Energy Star Compliant
● Chinese Font Set—Simplified SimSun (ZPL)

Print Specifications
● Resolution: 203dpi (8 dots/mm), 300dpi (12 dots/mm) (optional)
● Memory: Standard: 128MB RAM (4MB available to users), 128MB Flash (58MB available to users)
● Maximum Print Width: 104mm
● Maximum Print Length: 203dpi: 3988mm; 300dpi: 1854mm
● Maximum Print Speed: 6 inches/second (152 mm/second)
● 32-bit RISC Processor
● Media Sensors: Transmissive and Reflective
● Media Characteristics: Maximum Label and Backing Width: 114mm; Maximum Length of Non-continuous Labels: 991mm
● Media Width: 19.4mm to 114mm
● Maximum Media Roll Size: Outer Diameter 203mm, Core Inner Diameter 76mm; or, Outer Diameter 152mm, Core Inner Diameter 25mm
● Media Thickness: 0.076mm to 0.25mm
●Media Type: Continuous paper, die-cut paper, label paper, black label paper
●Ribbon outer diameter: 81.3mm, core inner diameter: 25mm
●Standard ribbon length: 300 meters
●Ribbon width: 40mm to 110mm
●Ribbon setup: Ink side of the ribbon is facing outwards, core to core.

Operating Parameters
● Operating Temperature: 40°F/5°C – 105°F/41°C
● Storage/Transportation Ambient Temperature: -40°F/-40°C – 140°F/60°C
● Operating Humidity: 20-85%, non-condensing
● Storage Humidity: 5-85%, non-condensing

Electrical Parameters
● Universal Auto-Range Power Supply (PFC compliant) 100-240 VAC, 47-63 Hz
● Compliant with Energy Star

Physical parameters
: ● Dimensions: 277mm*242mm*432mm
● Weight: 9.1kg

Fonts/Graphics/Symbols
● Seven bitmap fonts and one smooth vector font (CG Triumvirate™ Bold Compressed Font) including Agfa Monotype Corporation’s UFST for the EMEA character set. Pre-loaded with Unicode-compliant scalable fonts.
● Supports the following international character sets: IBM Code Page 850.
● Supports user-defined fonts and graphics—including custom logos
. ● ZPL II drawing commands—including boxes and lines.

Barcode Types:
● Linear Barcodes: Code 11, Code 39, Code 93, Code 128 with A/B/C subsets and UCC Case Codes, ISBT-128, UPC-A, UPC-E, EAN-8, EAN-13, 2-digit or 5-digit extensions of UPC and EAN, Plessey, Postnet, Standard 2-of-5, Industrial 2-of-5, Interleaved 2-of-5, Logmars, MSI, Codabar, Planet Code
● Two-Dimensional Barcodes: Aztec, Codablock, PDF417, Code 49, Data Matrix, MaxiCode, QR Code, MicroPDF417, TLC 39, RSS-14 (and additional codes)

ZebraLink Solutions
● Optional Software: ZebraDesigner Pro; ZebraNet Bridge Enterprise; ZebraNet Setup Utilities v 7.0; ZBI 2.0 ZBI-Developer
● Optional Connectivity: ZebraNet b/g/n Wireless Print Server (built-in); ZebraNet 10/100 Print Server (built-in or external); Centronics Parallel Port (built-in)
● ZPL II; Zebra Global Printing Solutions; EPL2; Web View and Warnings, ZBI 2.0 (optional)

Options and Accessories
● Peeling—Forward-facing liner, passively peelable, no take-up shaft required
● Peeling—Forward-facing liner, passively peelable—with liner take-up shaft (factory setting only)
● Cutter—Forward-facing guillotine cutter
● Real-time clock (RTC)
● Keyboard display unit (KDU)

Zebra ZT210 Industrial Barcode Printer User Manual

I. Introduction to the Zebra ZT210 Barcode Printer
Note: Components in the printer are color-coded
 ● Touch points that require operation are gold.
● Components related to the ribbon system are black plastic, and media-related components are gray. These components, along with other components, are shown in light blue in this manual.
1.1 Printer Components


Component serial numberComponent NameComponent serial numberComponent Name
1control Panel6Medium supply guide plate
2Medium gate7Medium tension regulating assembly
3ribbon pickup axis8Print head opening lever
4ribbon supply shaft9Printing device
5Media supply rack10Printing roller

1.2 Control Panel
The control panel displays the printer’s current status and allows users to control basic printer operations.


Panel serial numberPanel Name
1Status indicator light
2“Pause” indicator light
3“Data” indicator light
4“Consumables” indicator light
5“Network” indicator light
6Pressing the PAUSE button will start or stop the printer operation.
7Pressing the FEED button each time forces the printer to feed a blank label.
8When the printer is paused, the CANCEL button can cancel label formatting.
● Press once to cancel the formatting of the next label
. ● Press and hold for 2 seconds to cancel all label formatting.

1.3 Media Types
The ZT210 printer can use various media types:
● Standard Media – Most standard media use an adhesive material that allows multiple individual labels or continuous labels of a certain length to be pasted onto a backing. Standard media is available in media rolls or folded stacks.
● Cardboard Tags – Tags are usually made of thick paper. The label material has no adhesive or backing and usually has pre-perforated holes between each cardboard tag. Cardboard tag media may be available in media rolls or folded stacks.

1.4 Ribbon Introduction
A ribbon is a thin film coated with wax, resin, or wax resin on one side. During the heat transfer process, the wax or wax resin can be transferred to the media. The media determines whether a ribbon is needed and what width of ribbon must be used.
If a ribbon is used, its width must be greater than or equal to the width of the media. If the ribbon is narrower than the media, parts of the printhead will wear out prematurely due to lack of protection.
Heat transfer media require a ribbon to print, while thermal media do not. To ensure whether a ribbon must be used for a specific media, a media scratch test can be performed.

II. Zebra ZT210 Barcode Printer Setup and Operation
2.1 Selecting a Data Communication Interface
Connect the printer to one or more available connections. The ZT210 printer may also be equipped with the ZebraNet wired or wireless print server option or a parallel port.
Caution: Ensure the printer is powered off before connecting the data communication cable. Continuously connecting the data communication cable when the power is on may damage the printer.

interfaceStandard parts or optional partsillustrate
RS-232 serial portStandard partsLimitations and Requirements:
● Maximum cable length: 15.24 meters
● Printer parameters must be changed to match the host computer
● If using a standard modem cable, a blank modem must be connected to the printer.
The connection and configuration of
baud rate, data and stop bits, parity, and XON/XOFF or DTR control must be matched with the host computer.
USBStandard partsLimitations and Requirements:
● Maximum cable length: 5 meters
● Can be paired with the host computer without changing printer parameters

No additional configuration is required for connection and setup.
8-bit parallel data interfaceOptionsLimitations and Requirements:
● Maximum cable length: 3 meters
● Recommended cable length: 1.83 meters
● Wired or wireless Ethernet print server (if installed) will occupy this port on the printer
● No printer parameter changes are required for compatibility with the host computer

No additional configuration is required for connection and setup.
Wired Ethernet print serverOptionsLimitations and Requirements:
● Printing can be done from any computer on the user’s local area network (LAN )
. ● Communication with the printer can be achieved via the printer’s web interface.
● The printer must be configured to use a LAN.
● Parallel connections or wireless Ethernet print servers (if installed) will occupy this port on the printer.
Caution: Do not plug a USB cable into the printer’s wired Ethernet print server interface, as this may damage the interface.
Connection and configuration
require configuring parameters such as network IP.
Wireless print serverOptionsLimitations and Requirements:
● Printing can be done from any computer on a wireless LAN (WLAN).
● Communication with the printer can be achieved via the printer’s web interface
. ● The printer must be configured to use a wireless LAN.
● Parallel connections or wired Ethernet print servers (if installed) will occupy this port on the printer.
Caution: Do not plug a USB cable into the printer’s wired Ethernet print server interface, as this may damage the interface.
Connecting and configuring
requires configuring parameters such as the wireless network IP address.

All necessary interface cables must be provided for the specific situation. Ethernet cables do not require shielding, but other data cables must be fully shielded and equipped with metal or metallized connector housings. Using unshielded cables will result in electromagnetic radiation levels exceeding regulatory limits. To minimize the level of electrical noise pickup in the cables, the following should be done:
● Use the shortest possible data cables
● Do not tightly bundle data cables and power cables together
● Do not tie data cables to power cable conduits

2.2 Select Printing Mode

Printing modeWhen to use/required printer optionsPrinter operation
Tear paper (default setting)Suitable for most applications, this mode is available for any printer option and most media types.The printer prints the label upon receiving the label format, and the printer operator can remove the label at any time after printing is complete.

peelingUse only when the printer is equipped with the peel-off option.The printer peels the label off the backing during printing and pauses after the label is removed, with the backing retracting from the front of the printer.
● In “Peel” mode, the backing is ejected from the front of the printer .
Paper cutterIf the printer has a paper cutter option and the user wants to cut off the labels, this option can be used.The printer prints the label, then cuts it off.

2.3 Loading the Ribbon
The ribbon is for thermal transfer labels only. To print labels using thermal printing, do not load the ribbon into the printer.
Important: To protect the printhead from wear, use a ribbon wider than the media, and the ribbon coating must be on the outer side.
To load the ribbon, complete the following steps:
(1) Rotate the printhead release lever counterclockwise to loosen the printing unit.
(2) Rotate the release lever clockwise to adjust the ribbon position.
(3) Load the ribbon onto the ribbon supply shaft, pushing the paper roll back as far as possible.
(4) Before shipping, the printer has an empty ribbon core on the ribbon pickup shaft. If this ribbon core is missing, place an empty ribbon core on the ribbon pickup shaft and push the paper roll back as far as possible.
(5) Pass the ribbon under the printing unit assembly.
(6) Wind the ribbon clockwise onto the ribbon core on the ribbon pickup shaft, rotating the pickup shaft several times to allow the ribbon to wind around it a few times.
(7) If media is already loaded, rotate the printhead opening lever clockwise until the printhead is locked in place.
(8) Close the media door.
(9) Press the pause button if necessary to start printing.

2.4 Loading Media
(1) Rotate the printhead opening lever counterclockwise to release the printhead mechanism.
(2) Insert the media into the printer, performing the operation as needed for roll media and folded media.
(3) Slide the outer media guide fully out.
(4) Let the media slide under the media tension adjustment assembly and printing mechanism, pulling the end of the media out from the front of the printer.
(5) Ensure the media has passed through the hole on the media projection sensor and reached below the inner media guide; the media should just touch the back of the media projection sensor slot.

(6) Load the media according to the printer mode.
(7) Slide the outer media guide in until it just touches the edge of the media.
(8) Rotate the printhead opening lever clockwise until the printhead is locked in place.
(9) Close the media door.
(10) Pressing pause will exit pause mode and start printing. Depending on user settings, the printer may perform label calibration or feed a label.
(11) A self-test can be performed as needed to check if the printer is printing correctly.

III. Zebra ZT210 Barcode Printer Configuration and Adjustment
3.1 Changing Printer Settings
This section lists the printer settings that users can change, as well as the tools used to change these settings, including the following functions:
● ZPL and Set/Get/Do (SGD) commands
● If the printer has an available wired or wireless print server connection, the printer’s web page.
3.1.1 Printer Settings

Settingsillustrate
Printing depthSet the depth to the lowest value that provides the best print quality. If the depth value is set too high, the label image may not print clearly, the barcode may not scan correctly, the ribbon may burn through, or the print head may wear out prematurely.
Accepted values:0.0-30.0
Related ZPL commands^MD, ~SD
SGD command usedprint.tone
Printer webpageView and modify printer settings > General settings > Depth
Printing speedChoose the label printing speed (in inches per second); lowering the printing speed usually results in higher print quality.
Accepted values:2, 3, 4, 5, 6
Related ZPL commands:^PR
SGD commands used:media.speed
Printer webpagenot applicable
Media typeSelect the media type to use.
● If you select “Continuous Media”, you must include the label length instruction in the label format (if using the ZPL language, the command is ^LL).
● If you select “Gap/Notch” or “Mark” for different types of non-continuous media, the printer will feed the media to calculate the label length.
Accepted values:● Continuous; ● Gap/Gap; ● Marking
Related ZPL commands:^MN
SGD commands used:ezpl.media_type
Printer webpageView and modify printer settings > Media settings > Media type
Printing methodSpecify whether the printer uses “thermal” mode (no ribbon) or “thermal transfer” mode (using thermal transfer media and ribbon).
Accepted values:● Thermal transfer printing; ● Thermal printing
Related ZPL commands:^MT
SGD commands used:ezpl.print_method
Printer webpageView and modify printer settings > Media settings > Print method
Tear positionAdjust the media’s position on the cutter bar as needed after printing:
● A higher number indicates the media has moved out, meaning the tear line is closer to
the next label. ● A lower number indicates the media has moved in, meaning the tear line is closer to the label that was just printed.
Accepted values:-120 to 120
Related ZPL commands:~TA
SGD commands used:ezpl.tear_off
Printer webpageView and modify printer settings > General settings > Tear paper
Print widthSpecify the label width to use. The default value is the printer’s maximum width, depending on the printhead DPI value.
Note: Setting the width too narrow may cause some label formats to fail to print on the media. Setting the width too wide will waste format memory and cause labels to print out of bounds or onto the print roller. This setting will affect the horizontal position of the label format if the image is flipped using the ^POI ZPLII command.
Accepted values:0000 to 1248
Related ZPL commands:^PW
SGD commands used:ezpl.print_width
Printer webpageView and modify printer settings > Media settings > Print width
Printing modeSelect the printing mode compatible with the printer options.
Accepted values:● Paper tearer; ● Paper cutter; ● Peel
Related ZPL commands:^MM
SGD commands used:media.printmode
Printer webpageView and modify printer settings > General settings > Print mode
Left side of the labelAdjust the horizontal printing position of the label as needed. Positive numbers will move the left edge of the image towards the center of the label by the selected number of points, while negative numbers will move the left edge of the image towards the left side of the label.
Accepted values:-9999 to 9999
Related ZPL commands:^LS
SGD commands used:zpl.left_position
Printer webpageView and modify printer settings > Advanced settings > Left side
Reprint modeIf reprint mode is enabled, press and hold the PAUSE+CANCEL buttons on the printer control panel to reprint the previously printed label.
Accepted values:● Open; ● Close
Related ZPL commands:^JZ
SGD commands used:ezpl.reprint_mode
Printer webpagenot applicable
Maximum tag lengthThe maximum label length should be set to be at least 25.4 mm longer than the actual label length plus the label spacer. If this value is set to less than the label length, the printer will assume that continuous media is loaded and will be unable to calibrate.
For example, if the label length including the label spacer is 152 mm, the parameter should be set to at least 178 mm.
Accepted values:The printer supports label lengths from 0 to the maximum.
Related ZPL commands:^ML
SGD commands used:ezpl.label_length_max
Printer webpageView and modify printer settings > Media settings > Maximum length

3.1.2 Calibration and Diagnostic Tools

Calibration and diagnostic toolsillustrate
Print informationPrint specified information on one or more labels.
Received value:● Settings—Prints the printer’s configuration label
. ● Network—Prints settings values ​​for the installed print server.
● Format—Prints available formats stored in printer memory, flash memory cards, or other optional memory cards.
● Image—Prints available images stored in printer memory, flash memory cards, or other optional memory cards.
● Font—Prints available fonts in the printer, including standard printer fonts and any optional fonts. Fonts can be stored in RAM or flash memory.
● Barcode—Prints available barcodes in the printer; barcodes can be stored in RAM or flash memory.
● All—Prints the first six labels.
● Sensor Chart—Displays settings values ​​compared to actual sensor readings.
Related ZPL commands:Settings: ~WC; Network: ~WL; Sensor Charts: ~JG; Other: ^WD
SGD command usednone
Control Panel KeySetup and Network: Perform one of the following actions:
● Press and hold the CANCEL button while the printer is powered on.
● While the printer is in the “Ready” state, press and hold the FEED+CANCEL buttons for 2 seconds.
Sensor Chart: Press and hold the FEED+CANCEL buttons while the printer is powered on.
Printer webpageView and modify printer settings > Print list on labels
Power-on operationThe Power-On Setup
specifies the actions the printer will perform when powered on:
● Calibration: Adjusts sensor levels and thresholds to determine label length and feeds media to the next halftone.
● Feed: Feeds the label to the first alignment point.
● Length: Uses the current sensor value to determine the label length and feeds media to the next halftone.
● No Movement: Instructs the printer not to move the media. You must manually confirm that the halftone is correctly positioned. Alternatively, you can press the Feed button to position the next halftone.
● Short Calibration: Sets the media and halftone thresholds without adjusting sensor gain, determines the label length, and feeds media to the next halftone.
Received value:● Calibration
● Paper Feed
● Length
● No Movement
● Brief Calibration
Related ZPL commands:^MF
SGD command usedezpl.power_up_action
Printer webpageView and modify printer settings > Calibration
Printhead closing operationThe printhead shutdown setting
configures the actions the printer performs when the printhead is closed:
● Calibration: Adjusts sensor levels and thresholds to determine label length and feeds media to the next shim.
● Feed: Feeds the label to the first alignment point
. ● Length: Uses the current sensor value to determine the label length and feeds media to the next shim.
● No Movement: Notifies the printer not to move the media. You must manually confirm that the shim is correctly positioned. Alternatively, you can press the feed button to position the next shim.
● Short Calibration: Sets the media and shim thresholds without adjusting sensor gain, determines the label length, and feeds media to the next shim.
Received value:● Calibration
● Paper Feed
● Length
● No Movement
● Brief Calibration
Related ZPL commands:^MF
SGD command usedezpl.head_close_action
Printer webpageView and modify printer settings > Calibration
Load default valuesReset printer or print server settings to default values:
● Factory—Restores all printer settings except network settings to factory defaults. Be careful when resetting defaults, as you will need to reset any settings you have manually changed.
● Network—Reinitializes the printer’s wired or wireless print server. When using a wireless print server, the printer will also reconnect to the wireless network.
● Load Last Saved Values—Loads the last permanently saved settings.
Received value:● Factory
● Network
● Last saved value
Related ZPL commands:Factory: ^JUF; Network: ^JUN; Last saved value: ^JUR
SGD command usednone
Control Panel Key● Factory: Press and hold the FEED + PAUSE buttons while the printer is powered on to reset the printer parameters to factory values.
● Network: Press and hold the CANCEL + PAUSE buttons while the printer is powered on to reset the network parameters to factory values.
● Last saved value: Not applicable.
Printer webpage● Factory: View and modify printer settings > Restore default configuration
● Network: Print server settings > Reset print server
● Last saved value: View and modify printer settings > Restore saved configuration
Media and ribbon sensor calibrationCalibrate the printer and adjust the sensitivity of the media and ribbon sensors.
Received value:not applicable
Related ZPL commands:^JC
SGD command usedezpl.manual_calibration
Control Panel KeyPress and hold the PAUSE+FEED+CANCEL buttons for 2 seconds to initiate the calibration process.
Printer webpageUnable to initiate calibration steps via webpage
Communication diagnostic modeThis diagnostic tool allows the printer to output hexadecimal values ​​for all data received by the printer.
Received value:● Disable
● Enable
Related ZPL commands:~JD is used to start; ~JE is used to stop.
SGD command useddevice.diagnostic_print
Control Panel KeyWith the printer in the “Ready” state, press and hold the PAUSE + FEED buttons for 2 seconds.
Printer webpagenot applicable

3.1.3 Network Settings

Network settingsillustrate
IP addressView or set the printer’s IP address
. View and change the printer’s IP address as needed.
Changes to this setting are only saved if the IP PROTOCOL protocol is set to PERMANENT. To make saved changes take effect, the print server should be reset.
Received value:000 to 255 are used for each field
Related ZPL commands:^ND
SGD command usedWired: internal_wired.ip.addr; Wireless: ip.addr, wlan.ip.addr
Printer webpageView and modify printer settings > Network communication settings > TCP/IP settings
Subnet maskView or set the subnet mask
. View and change the subnet mask as needed.
This menu item is only displayed if a wired or wireless print server is installed on the printer. To save changes to this setting, set the IP PROTOCOL protocol to PERMANENT and then reset the print server.
Received value:000 to 255 are used for each field
Related ZPL commands:^ND
SGD command usedWired: internal_wired.ip.netmask; Wireless: wlan.ip.netmask
Printer webpageView and modify printer settings > Network communication settings > TCP/IP settings
gatewayView or set the default gateway
. View and change the default gateway as needed.
This menu item only appears if a wired or wireless print server is installed on the printer. To save changes to this setting, set the IP PROTOCOL protocol to PERMANENT and then reset the print server.
Received value:000 to 255 are used for each field
Related ZPL commands:^ND
SGD command usedWired: internal_wired.ip.gateway; Wireless: wlan.ip.gateway
Printer webpageView and modify printer settings > Network communication settings > TCP/IP settings
IP protocolConfigure IP Resolution Method.
This parameter specifies whether the user (permanent) or server (dynamic) should select an IP address. If the dynamic option is selected, this parameter informs the wired or wireless print server how to receive IP addresses from the server.
Received value:● All
● GLEANING Only
● RARP
● BOOTP
● DHCP
● DHCP and BOOTP
● Permanent
Related ZPL commands:^ND
SGD command usedWired: internal_wired.ip.protocol; Wireless: wlan.ip.protocol
Printer webpageView and modify printer settings > Network communication settings > TCP/IP settings
MAC addressTo view the MAC address,
you need to find the Media Access Control (MAC) address of the print server installed in the wired or wireless printer.
Received value:not applicable
Related ZPL commands:none
SGD command usedWired: internal_wired.mac.addr; Wireless: wlan.mac.addr
Printer webpageView and modify printer settings > Network communication settings > Wireless settings
ESSIDThe
Extended Service Set Identifier (ESSID) is an identifier used for wireless networks. This setting cannot be modified from the control panel; it provides the ESSID for the current wireless configuration.
Received value:A 32-character alphanumeric string (default is 125).
Related ZPL commands:none
SGD command usedwlan.essid
Printer webpageView and modify printer settings > Network communication settings > Wireless settings
Reset NetworkThis option can reset the wired or wireless print server. The print server must be reset for changes to the network settings to take effect.
Received value:not applicable
Related ZPL commands:~WR
SGD command useddevice.reset
Printer webpagePrint Server Settings > Print Server Factory Settings

3.1.4 Language Settings

Language settingsillustrate
languageChanging the printer display language as needed
will affect the language of the following information:
● Main menu
● User menu
● Error messages
● Printer configuration label, network configuration label, and other optional labels printed via the user menu.
Received value:English, Spanish, French, German, Italian, Norwegian, Portuguese, Swedish, Danish, Spanish 2, Dutch, Finnish
Related ZPL commands:^KL
SGD command useddisplay.language
Printer webpageView and modify printer settings > General settings > Language
ZPL replacementEnabling ZPL overrides
this menu item, allowing the following commands to replace the printer’s current settings:
● ^MM (Print Mode)
● ^MT (Thermal or Thermal Transfer Printing Method)
● ^MN (Media Type: Non-continuous or Continuous)
Received value:● Disable; ● Enable
Related ZPL commands:none
SGD command usedzpl.zpl_override
Printer webpagenone
command charactersThe format command prefix
is ​​a two-digit hexadecimal value used as a parameter position marker in the ZPL/ZPLII format specification. The printer looks for this hexadecimal character, which indicates the start of a ZPL/ZPLII format instruction.
Set the format command character to match the value in the label format.
Important: The same hexadecimal value cannot be used for the format command prefix, control characters, and separator characters. The printer must use different characters to function correctly. If the user sets the value via the control panel, the printer will ignore the value already in use.
Received value:00 to FF
Related ZPL commands:^CC or ~CC
SGD command usedzpl.caret
Printer webpageView and modify printer settings > ZPL Control
Control charactersSetting the Control Prefix Character Value:
The printer looks for this two-digit hexadecimal character to indicate the start of ZPL/ZPLII control instructions. Set the control prefix character to match the value used in the label format.
Received value:OO to FF
Related ZPL commands:^CT or ~CT
SGD command usedzpl.control_character
Printer webpageView and modify printer settings > ZPL Control
separatorThe separator value is set
to a two-digit hexadecimal value, used as a parameter position marker in the ZPL/ZPLII format specification, to match the value used in the label format.
Received value:OO to FF
Related ZPL commands:^CD or ~CD
SGD command usedzpl.delimiter
Printer webpageView and modify printer settings > ZPL Control
ZPL modeSet ZPL Mode:
Select a mode that matches the values ​​used in the label format. This printer accepts label formats written using ZPL or ZPLII voice; no rewriting of any existing ZPL format is required. The printer operates in the selected mode until the mode is changed using one of the following methods.
Received value:● ZPLII; ● ZPL
Related ZPL commands:^SZ
SGD command usedzpl.zpl_mode
Printer webpageView and modify printer settings > ZPL Control

3.1.5 Sensor Settings

Sensor settingsillustrate
Sensor typeSelect the appropriate medium sensor
for the medium being used by the user. Reflective sensors can be used for all medium types, while transmissive sensors can only be used for simple slit media.
Received value:● Transmissive; ● Reflective
Related ZPL commands:^JS
SGD command useddevice_sensor_select
Printer webpageView and modify printer settings > Media settings
Tag sensorSet the sensitivity of the tag sensor
Received value:0-255
Related ZPL commands:none
SGD command usedezpl.label_sensor
Printer webpageView and modify printer settings > Calibration
Take the labelAdjust the brightness of the indicator light when the tag is removed.
Received value:0-255
Related ZPL commands:none
SGD command usedezpl.take_label
Printer webpageView and modify printer settings > Calibration

3.2 Calibrate the Ribbon and Media Sensors
Use the steps in this section to calibrate the printer. This process adjusts the sensitivity of the media and ribbon sensors.
Important: Strictly follow the calibration process as described in this manual. Even if only one sensor needs adjustment, all steps must be performed. You can cancel the process by pressing CANCEL at any step.
To perform sensor calibration, complete the following steps:
⑴ With the printer in the “Ready” state, initiate media and ribbon calibration using one of the following methods:
◆ Press and hold the Pause + Feed + Cancel button for two seconds.
◆ Send the ezpl.manual_calibration SGD command to the printer.
The printer will do the following:
● The Status and Consumables indicators flash yellow once.
● The Pause indicator lights up yellow.
⑵ Rotate the printhead opening lever counterclockwise to release the printing device.
⑶ Allow the media to extend approximately 203 mm outside the printer.
⑷ Remove the exposed label, leaving only the backing.
⑸ Pull the backing paper into the printer, ensuring only the backing is between the media sensors.
(6) If a ribbon was used, it should be removed.
(7) Rotate the printhead opening lever clockwise until the printhead is locked in place.
(8) Press pause to begin the media calibration process.
◆ The “Pause Indicator” goes out.
◆ The “Consumables Indicator” flashes.
When this process is complete:
◆ The “Consumables Indicator” flashes.
◆ The “Pause Indicator” flashes yellow.
(9) Rotate the printhead opening lever counterclockwise to release the printing device.
(10) Pull the media forward so that the label is below the media sensor. (11
) Reinstall the ribbon (if used).
(12) Close the printhead.
(13) Close the media door.
(14) Press the pause button to start printing.

3.3 Adjusting Printhead Pressure
If the print color is too light on one side, if the media is too thick, or if the media shifts to one side during printing, you may need to adjust the printhead pressure to the lowest printhead pressure that will provide the best print quality.
The printhead pressure adjustment wheel has half-scale increments from 1 to 4.

Inner and outer adjustment wheels

If necessary, the printhead pressure adjustment wheel should be adjusted using the following method:

If the medium…but…
Greater pressure is needed to improve print quality.Increase the position of the two adjusting wheels by one position.
Slide to the left while printingIncrease the outer adjusting wheel by one position, or decrease the inner adjusting wheel by one position.
Slide to the right when printingIncrease the inner adjusting wheel by one position, or decrease the outer adjusting wheel by one position.
The printed content on the left side of the label is too light in color.Increase the size of the inner adjusting wheel by one position.
The printed content on the right side of the label is too light in color.Increase the outer adjustment wheel by one position.

3.4 Adjusting Ribbon Tension
For the printer to function properly, both the ribbon supply shaft and the ribbon pickup shaft must use the same tension setting (normal tension or low tension). For most applications, the normal tension setting should be used. If using a narrow ribbon or encountering specific ribbon issues, low tension may be necessary.
Normal Tension Setting : To position the ribbon shaft in its normal position, forcefully push out the end cap until it extends and locks in place. This setting can be used for most applications.

Normal tension setting

Low Tension Setting : To position the supply shaft in the low tension position, forcefully push in the end cap until it retracts and clicks into place. This setting should only be used when necessary, such as when the ribbon causes the wear indicator to be at the beginning of the ribbon roll, or when normal tension causes the ribbon to stop at the end of the roll.

Low tension setting

IV. Zebra ZT210 Barcode Printer Routine Maintenance
4.1 Cleaning Plan and Procedures
Routine preventative maintenance is an important part of ensuring the printer works correctly. By diligently maintaining the printer, users can minimize the possibility of potential malfunctions and help achieve and maintain the standard print quality they require.
As printing continues, the media or ribbon passing through the printhead will gradually wear down the ceramic protective layer, exposing and eventually damaging the printed elements (dots). Avoid Abrasion:
◆ Clean the printhead regularly.
◆ Optimize the balance between these two by using the lowest possible printhead pressure and burn-in temperature settings.
◆ When using thermal transfer mode, ensure the ribbon width is greater than or equal to the media width to protect the printed elements from exposure to more corrosive label materials.
Depending on the application and media, more frequent cleaning may be required.
Printhead, Method: 95% alcohol solvent, Time Interval: After using one roll of media for thermal mode, after using a perfect ribbon for thermal transfer or after every three rolls of media.
Roller, Method: 95% alcohol solvent, Time interval: After one media roll is used up in thermal mode, after using a Perfect Silk ribbon in thermal transfer, or after every three media rolls.
Media sensor, Method: Air jetting, Time interval: After one media roll is used up in thermal mode, after using a Perfect Silk ribbon in thermal transfer, or after every three media rolls.
Ribbon sensor, Method: Air jetting, Time interval: After one media roll is used up in thermal mode, after using a Perfect Silk ribbon in thermal transfer, or after every three media rolls.
Media path: Method: 95% alcohol solvent, Time interval: After one media roll is used up in thermal mode, after using a Perfect Silk ribbon in thermal transfer, or after every three media rolls.
Ribbon path: Method: 95% alcohol solvent, Time interval: After one media roll is used up in thermal mode, after using a Perfect Silk ribbon in thermal transfer, or after every three media rolls.

4.2 Replacing Printer Components
Printer components such as the printhead and print rollers may wear down over time and can be easily replaced.

V. Troubleshooting Zebra ZT210 Barcode Printer
5.1 Meaning of Indicator Lights
The indicator lights on the control panel are used to display the current status of the printer.

Indicator light statusPrinter status description
When the printer is powered on, the status indicator light remains green (other indicator lights remain yellow for 2 seconds),
indicating that the printer is ready.
The “Pause” indicator light remains consistently yellow, indicating
that the printer is paused.
The “Status” indicator light is consistently red.
The “Consumables” indicator light is consistently red.
The media is low, requiring attention to the printer, but it can continue operating without user intervention.
The “Status” indicator light will remain steadily red.
The “Consumables” indicator light will flash red
, indicating the ribbon is low and the printer needs attention; however, it can continue operating without user intervention.
The “Status” indicator light is steadily yellow.
The “Consumables” indicator light is flashing yellow.
The printer is in “Thermal” mode, which does not require a ribbon, but the ribbon is already installed in the printer.
The “Status” indicator light is steadily red.
The “Pause” indicator light is steadily yellow.
The printhead is open, so you need to pay attention to the printer, but it can continue to work without user intervention.
The status indicator light is consistently showing a yellow
warning, indicating that the printhead temperature is too high.
A flashing yellow indicator light
indicates one of the following conditions:
● Printhead temperature too low; ● Power supply unit temperature too high; ● Main logic board (MLB) temperature too high.
The “Status” indicator light is consistently red.
The “Pause” indicator light is consistently red.
The “Data” indicator light is consistently red.
When changing the printhead, if an original Zebra printhead was not used, simply install an original Zebra printhead to continue operation.
The status indicator light is flashing red, indicating that
the printer cannot read the printhead’s DPI settings.
Printers with ZebraNet wired Ethernet option
The “Network” indicator light is off;
there is no usable Ethernet connection.
The “Network” indicator light remains steadily green,
indicating a 100Base connection has been detected .
The “Network” indicator light is steadily displaying yellow,
indicating a 10Base connection.
The network indicator light is steadily showing red
, indicating an Ethernet error and the printer is not connected to the network.
Printers with ZebraNet wireless Ethernet option
The “Network” indicator light is off.
When power is applied, a radio signal is detected, and the printer attempts to connect to the network. The indicator light flashes red while the printer is establishing a connection. The indicator light flashes yellow while the printer is authenticating with the network.
The “Network” indicator light is steadily displaying green, indicating
a strong and reliable wireless signal. Your network is connected to your network and has been verified.
The flashing “Network” indicator light shows a green
Wi-Fi signal that is associated with your network and has been verified, but the WLAN signal is weak.
The network indicator light is steadily displaying red
, indicating a WLAN error and the printer is not connected to the network.

5.2 Printing Issues
The following lists issues related to printing and print quality, possible causes, and suggested solutions.

questionPossible reasonsRecommended solution
Common print quality issuesIncorrect printer speed settingTo achieve the best print quality, you should set the lowest possible print speed for your application via the control panel, driver, or software.
The incorrect combination of labels and ribbons was selected for your application.1. Switch to different types of media or ribbons to find a compatible combination; 2. Contact MinYong Digital as needed for information and advice.
The printer’s print depth setting is incorrect.To achieve the best print quality, the print depth should be set to the lowest setting suitable for your application.
Dirty printheadClean the print head and print roller
Incorrect or uneven printhead pressureSet the printhead pressure to the minimum value that will yield the best print quality.
The print alignment mark on the label is missing, and the vertical offset of the alignment mark at the top of the form is too large.The printing roller is too dirtyClean the print head and print roller
The dielectric guide plate is not in the correct position.Ensure correct positioning of the media guide plate
Incorrect media type settingConfigure the printer to work with the correct media type (slit/cut, continuous, or marking).
Incorrect media loadingCorrectly load the media
Long, incomplete printing marks appeared on multiple labels.Damaged printing componentsReplace the print head
Colored ribbon foldsSolve according to the methods in “Ribbon Fault”
A thin, slanted gray line appears on the blank label.Colored ribbon foldsSolve according to the methods in “Ribbon Fault”
The entire ribbon is printed too dark or too light.The media or ribbon was not designed for high-speed printing.Replace consumables suitable for high-speed operation
The wrong combination of media and ribbon was selected for your application.1. Switch to different types of media or ribbons to find a compatible combination; 2. Contact MinYong Digital as needed for information and advice.
Users use ribbons for thermal media.Thermal media do not require ribbons; it is necessary to determine whether thermal media has been used.
Incorrect or uneven printhead pressureSet the printhead pressure to the minimum value that yields the best print quality.
The label has stains.The media or ribbon is not designed for high-speed printing.Replace consumables suitable for high-speed operation
Misaligned/Skipped ribbonPrinter not calibratedCalibrate printer
Incorrect label formatCheck your label format and correct it as needed.
One to three labels are misaligned or have printing errors.The printing roller is too dirtyClean the print head and print roller
The medium does not meet specificationsUse media that meet specifications.
Vertical offset of the top position of the labelPrinter not calibratedCalibrate printer
The printing roller is too dirtyClean the print head and print roller
Label or image vertical offsetThe printer uses non-continuous labels, but is configured to work in continuous mode.Set the printer to the correct media type and calibrate the printer as needed.
Incorrect calibration of the medium sensorCalibrate printer
The printing roller is too dirtyClean the print head and print roller
Incorrect printhead pressure settingAdjust the printhead pressure to ensure proper operation.
Incorrect loading of media or ribbonEnsure that the media and ribbon are loaded correctly.
Media incompatibilityMedia that meets the printer’s technical specifications must be used to ensure that the labels are evenly spaced with a gap of 2 to 4 millimeters.
Unable to scan the barcode printed on the labelThe barcode does not meet specifications because it is printed too dark or too light.Adjust the depth or printing speed settings as needed.
There is not enough blank space around the barcode.Leave at least 3.2mm clearance between the barcode and other printed areas on the label, as well as between the barcode and the label edge.
Automatic calibration failedIncorrect loading of media or ribbonEnsure the media and ribbon are loaded correctly.
The sensor did not detect the medium or color band.Calibrate printer
The sensor is too dirty, or the positioning is incorrect.Ensure the sensor is clean and correctly positioned.
Incorrect media type settingSet the printer to use the correct media type.

5.3 Ribbon Failures
The table below lists the ribbon failures that may occur, their possible causes, and suggested solutions.

FaultPossible reasonsRecommended solution
ribbon damaged or meltedThe depth setting is too high.1. Lower the depth setting; 2. Thoroughly clean the printhead.
The ribbon coating is faulty and cannot be used with this printer.Replace with a ribbon that has the correct coating.
The ribbon is slipping or cannot move forward correctly.Incorrect ribbon tension settingChange the tension setting of the ribbon shaft.
Colored ribbon foldsIncorrect ribbon insertionCorrectly load the ribbon
Incorrect burning temperatureTo achieve the best print quality, the print depth should be set to the lowest setting suitable for your application.
Incorrect or uneven printhead pressureSet the printhead pressure to the minimum value that yields the best print quality.
Improper medium feeding caused it to deviate from one side to the other.Ensure the medium is level by adjusting the medium guide plate.
The print head or print roller may be installed incorrectly.Contact Minyong Digital
The printer did not detect that the ribbon was used up.The printer may have been calibrated without a ribbon, and then a ribbon was inserted without performing a user recalibration, or the printer’s default settings may not have been loaded.Now calibrate the printer using the ribbon, or load the printer defaults.
In thermal transfer mode, the printer does not detect the ribbon even though it is correctly loaded.
Even if the ribbon is correctly loaded, the printer still displays “ribbon exhausted”.The printer was not calibrated for the labels and ribbons to be used.Calibrate printer

Label barcode label ribbon

Zebra TLP2844 Desktop Barcode Printer,Print head and other accessories are available in large quantities.

Zebra TLP2844 Desktop Barcode Printer User Manual

The Zebra TLP2844 thermal transfer printer features an OpenACCESS design and supports three interface connection methods.

It is a truly compact and versatile desktop printing solution.

Zebra TLP2844 Printer Specifications:
● Printing Method: Thermal Transfer/Thermal Printing
● Print Resolution: 203 dpi (8 dots/mm)
● Maximum Print Width: 114 mm
● Maximum Print Length: 279 mm
● Print Speed: 102 mm/sec

  Zebra TLP2844 Physical Specifications:
● Width 200 mm × Length 248 mm × Height 173 mm
● Net Weight: 1.81 kg

Zebra TLP2844 Product Features:
● Standard Memory: 256KB SRAM; 512KB Flash
● 32-bit RISC Microprocessor
● Certifications: UL-CUL 1950; FCC (Class B); VCCI (Class B); C-TICK; EN 500082-1; EN 55022 (Class B)
● Software: ELP2 Language

Zebra TLP2844 Barcodes:
● 1D Barcodes: UPC-A, UPC-E, Code 39, UCC/EAN-128, Code 93, Postnet, Code 128 with subsets A/B/C Interleaved 2 of 5, 2D codes, UPC with 2 or 5 digit supplements, Code 128 UCC, Codabar, German Post, Plessey
● 2D Barcodes: PDF417, Maxi Code, QR-Code (requires Asian version printer)

Zebra TLP2844 operating environment:
● Storage temperature: -40℃—60℃

Other specifications of the Zebra TLP2844:
● Communication interfaces: RS232 series, USB, etc.

Zebra TLP2844 Desktop Barcode Printer User Manual

1. Introduction to the Components of the Zebra TLP2844 Barcode Printer
1.1 External Introduction: Paper Feed Button/Status Indicator/Release Button/Power Switch/Power Jack/Interface Connector

1.2 Internal Introduction: Ribbon Feed Shaft/Ribbon Pickup Shaft/Pickup Gear/Ribbon Carrier/Ribbon Sensor/Top Cover Lock/Media Hook/Gap Sensor/Elevation Sensor/Media Guide Rod/Print Roller/Media Guide Rod Adjuster/Print Head/Tear Rod/Fixing Screw/Peeling Option


2. Zebra TLP2844 Barcode Printer Operation Controls Instructions
2.1 Power Switch
Press up to turn on the printer, press down to turn off the printer.
Caution: Always turn off the power before connecting or disconnecting the communication cable and power cord .
2.2 Paper Feed Button
Forces the printer to feed a blank label.
Removes the printer from a “paused” state (the printer enters a “paused” state due to programming commands or error conditions).
Use the paper feed button to view the printer settings and status.
2.3 Status Indicators
Used as printer operation indicators.

3. Zebra TLP2844 Barcode Printer Installation Steps
3.1 Loading Rolled Media
When loading media, the rolled media must be placed on the media hook, and then the media guide lever must be adjusted. The correct media for the required printing type must be used. If printing without a ribbon, thermally sensing media must be used; if using a ribbon, thermal transfer media must be used. The printer’s ribbon sensor detects whether the feed shaft is moving.
Regardless of whether the media is rolled inwards or outwards, it must be loaded into the printer in the same way.
① Open the printer, making sure to pull the release lever towards the front of the printer.
② Remove the outer portion of the media. During transport, the rolled media may become soiled during handling or accumulate dust during storage. Removing the outer portion prevents sticky or unclean media from being dragged between the print head and the print roller.
③ Separate the media hooks and keep them open.
④ Determine the method for rolling the media so that the printing side faces upward as it passes through the printing roller.
⑤ Place the rolled media downward between the hooks, then close the hooks and pass it through the center of the rolled media.
⑥ Turn the guide rod adjuster knob to the back to open the media guide rod.
⑦ Pass the media through the guide rod.
⑧ Turn the guide rod adjuster knob to the front to close the media guide rod. The guide rod should just touch the edge of the media, but should not restrict it.
⑨ If no ribbon is needed, close the top cover. Note that you need to open the top cover lock, lower the top cover, and press it down until the release button clicks into place.
3.2 Loading the Ribbon
When using a ribbon, a heat transfer medium must be used. When loading the ribbon, first install the supply roller and pickup roller, and then tighten the ribbon on the carrier.
① Install the ribbon supply shaft, pass the ribbon through the carrier, press the right end of the supply shaft onto the supply hub, align the slot at the left end of the supply roller, and mount it on the spokes of the left hub.
② Install the pickup roller shaft. Press the right end of the pickup roller onto the pickup hub, align the slot on the left end of the pickup roller, and mount it onto the spokes of the left hub.
③ Connect and tighten the ribbon. The ribbon must be aligned so that it is wound straight onto the pickup roller. Connect the ribbon to the pickup roller, use the tape on the new pickup roller, rotate the ribbon pickup gear counterclockwise, tighten the ribbon, close the top cover, making sure to open the top cover lock, lower the top cover, and press down until the release button clicks into place.
3.3 Media Length Detection
Before connecting the printer to the computer, ensure the printer is in normal operating condition. This allows the printer to perform a media measurement operation and print the status output.
After loading the media, perform the following steps to measure the length of each label.
① Ensure the printer power is off.
② Press and hold the paper feed button . ③
Turn on the printer power.
④ Release the paper feed button when the status indicator light flashes.
⑤ The printer will advance the media, measure and check the length of individual labels, then print a status summary report and remain in diagnostic dump mode.
⑥ To begin normal operation, tap the paper feed button. The printer will then print “out of DUMP” and advance the label.
3.4 Connecting the Printer and Computer
Caution: Turn off the power before connecting the interface cable. Before connecting or disconnecting the communication cable, the through power connector must be inserted into the power jack on the back of the printer.
Interface cable requirements:
① The data cable must be fully shielded and equipped with a metal or metallized connector housing. The shielded cable and connector must prevent radiation and receive electrical noise.
② Minimize the pickup level of electrical noise in the cable.
③ Keep the data cable as short as possible (1.83m recommended).
④ Do not tightly bundle the data cable and power cord together.
⑤ Do not tie the data cable to the power cord conduit.
3.5 Printing in Peel Mode
Using the optional distributor, you can print in “Peel Mode,” where the label backing travels through different channels, and only one label is placed at a time for subsequent placement.

① Remove several labels from the printing backing .
② Open the top cover.
③ Open the distributor door.
④ Turn on the label sensor.
⑤ Insert the backing in front of the peel bar and behind the peel roller.
⑥ Close the distributor door.
⑦ Close the top
cover. ⑧ Press the paper feed button to move the label forward
. During the printing job, the printer will peel off the backing, revealing a single label. Remove the label from the printer so that the printer can print the next label.
3.6 Using the Cutter Option
If the printer is equipped with a baffle with an electric blade, it can dispense one or more media and then automatically cut them off from the media roll. This option can cut continuous paper and label backings in rolls of media, keeping the cutter dry and eliminating the need to use any solutions or solvents to clean the blade.

4. Replacement of Vulnerable Parts in Zebra TLP2844 Barcode Printer
4.1 Replacing the Print Roller
① Disassembly

Open the printer, remove all media, use a pointed tool to release the latches on both sides, then rotate forward to lift the print roller from the bottom of the printer base.
② Assembly
Check that the right bearing is on the print roller shaft, align the print roller with the left gear, place it downwards on the bottom of the printer base, and rotate the latch backwards to lock it in place.
4.1 Replacing the Print Head
Note: Turn off the printer power, unplug the power cord, and then replace the print head.
Prepare a work area to prevent static discharge. The work area must be anti-static. Use a properly grounded conductive shockproof pad to support the printer, and wear a conductive wrist strap.
① Disassembly

Pull the release button forward, then lift the top cover upwards to open the printer and remove the ribbon from the tray. ① Grasp the printhead spring and pull it to the left, then slide it off the carriage. Use the spring to spring the printhead clip away from the right end of the carriage. Pull the printhead and bracket forward. Use a #2 screwdriver to remove the screw securing the ground wire. Disconnect the two bundles of printhead wires from the connector.
② Assembly:
New printheads come with clips and grounding screws. Align the printhead and bracket. Connect the left and right connectors to the black and white wire harness. Connect the ground wire and secure it with the screws. Tighten the screws with a #2 screwdriver. Insert the bracket pin into the left end of the carriage, aligning it with the right end of the bracket. Insert the printhead clip through the right end of the ribbon carriage into the bracket. Slide the left end of the printhead spring into the left end of the ribbon carriage, then slide the right end into the other end of the carriage. The “V” angle should align with the notch at the top of the printhead bracket. Clean the printhead with a cleaning pen. Reload the media and ribbon. Plug in the power cord. Print the status report to ensure it is working properly.

5. Troubleshooting Zebra TLP2844 Barcode Printer
5.1 Diagnosing Faults Based on Status Indicator Lights
■ No color: Check the power connection between the AC power outlet and the printer.
■ Stable amber: Possible causes: ① Top cover opening sensor is active. Press down on the top cover, close it, and lock it in place. ② Printer has syntax or command errors. Check the program and resend the print job.
■ Flashing red: Possible causes: ① Firmware download is in progress. The indicator light will first be red, then green. ② After turning on the printer, a signal to start media length detection is emitted. Release the paper feed button.
■ Stable red: Possible causes: ① Media or ribbon is used up. Load new media and press the paper feed button to continue. ② Power failure. Turn off the power and then turn it on again. ③ The printer is preparing to receive Flash programming during firmware download.
5.2 Diagnosing Printer Faults Based on Operation:
■ Media not moving forward: Possible causes and solutions: ① Check the interface cable connection from the computer to the printer. ② Check if the top cover is closed and locked in place. ③ Check if the label is correct. ④ Check if the printing side of the media is facing upwards. ⑤ When printing with thermal transfer, check if the transfer ribbon is aligned correctly and if the toner edge is facing outwards. ⑥ If the printer has syntax or command errors, check the program and resend the print job.
■ Media moving but not printing: Possible causes and solutions: ① Check if the label type is correct (thermal transfer or thermal sensor). ② Check if the loaded roll of media has the thermal side facing upwards. ③ Clean the print head with a cleaning pen. ④ Check if the top cover is closed and locked in place.
■ Printing The print color is fading or the print quality is poor. Possible causes and solutions: ① Clean the print head with a cleaning pen. ② Adjust the print speed/density in the software. ③ Check the media and ensure the print side is facing upwards. ④ Check if the thermal media used is correct.
■ Only part of the label is printed or the label printing is skipped. Possible causes and solutions: ① Perform media length detection. ② The label is stuck to the print head. ③ The top cover is not fully locked . ④ It may be a software problem
. ■ Printing stops, and the indicator light is amber or red. Possible causes and solutions: ① Perform media length detection. ② It may be a label paper quality problem; use only approved labels. ③ The label may be stuck. ④ Insufficient memory for the label size. ⑤ It may be a software problem.
5.3 Troubleshooting based on media operation
■ Printing continues between labels. Possible causes and solutions: ① Check if the label sensor is open. ② The label sensor is blocked or dirty; remove debris or dust. ③ Continuous media may be set.
■ Printing stops after printing one label. Possible causes and solutions: ① Check if the quantity setting is correct.
5.4 Diagnosing Print Quality Issues
■ No content printed on the label. Possible causes and solutions: ① The correct media for the required printing method must be used. If printing without a ribbon, thermal transfer media must be used. If using a ribbon, thermal transfer media must be used. The printer’s ribbon sensor detects whether the supply shaft is moving. ② Is the media loaded correctly?
■ The printed image appears problematic. Possible causes and solutions: ① The print head is not clean; clean the print head. ② The print head temperature is too low. ③ Adjust the printer density or printing speed. ④ The correct media is incompatible with the printer.
■ Several labels have many blank vertical lines (blank lines). Possible causes and solutions: ① The print head is not clean; clean the print head. ② The print head components are damaged; replace the print head.
■ Printing does not start from the top of the label, or one to three labels have printing errors. Possible causes and solutions: ① The media may not have passed under the media guide. ② The printer needs calibration
. ■ The label format has been sent to the printer, but the printer cannot recognize it. Possible causes and solutions: ① Is the printer in pause mode? If yes, press the paper feed button. ② If the status LED is lit or flashing, determine the fault based on the status indicator light. ③ Check if the data cable is installed correctly. ④ If a communication problem occurs, check if the correct communication port has been selected on the computer.

6. Cleaning the Zebra TLP2844 Barcode Printer:
● Printhead; Interval: As needed or after every five rolls of media; Method: Allow the printhead to cool down for one minute, then use a new cleaning pen to wipe the print elements from start to finish (the fine gray lines on the printhead). If print quality is still poor after cleaning, try using a printhead cleaning film to remove dust.
● Print Roller; Interval: As needed; Method: Manually rotate the print roller and thoroughly clean with 95% alcohol and a cleaning swab, cleaning card, or lint-free soft cloth.
● Peel Bar; Interval: As needed; Method: Thoroughly clean with 95% alcohol and a cotton swab.
● Tear Bar; Interval: As needed; Method: Thoroughly clean with 95% alcohol and a cotton swab.
● Exterior; Interval: As needed; Method: Wet cloth.
● Interior; Interval: As needed; Method: Brush or air jet.
● Cutter; Interval: As needed; Method: Remove debris using tweezers.

7. To update the firmware of your Zebra TLP2844 barcode printer,
download the 2844_V4_70_1A_CHN.prg file from the Zebra website (http://www.zebra.com.cn/), and then copy this file to the port

Zebra 888 Desktop Label Printer,Print head and other accessories are available in large quantities.

The Zebra 888 desktop printer boasts an incredibly compact size and high stability. Based on the mature Zebra 2844 , it adds a Chinese character library and supports thermal transfer/thermal printing. 

The Zebra 888 desktop printer is reasonably priced, easy to load media, simple to operate, and has low maintenance costs. It helps reduce training requirements and operating costs. 

The Zebra 888’s compact design features a double-layer ABS structure, capable of handling the demands of fast media changes and rapid response in busy work environments.

Zebra 888TT product advantages:

■ Fastest First Page Output: Designed for intermittent desktop printing, this desktop printer utilizes next-generation printing technology to achieve the fastest first page output speed.

■ Built-in Chinese character library: Tailored to meet the needs of domestic customers, the hardware incorporates a built-in Chinese character library, enabling efficient printing of Chinese (simplified and traditional) labels.

■ Zebra USA Quality: The entire machine assembly and all parts are made in the USA, inheriting Zebra’s excellent printing quality.

■ Compact and Exquisite Design: The dual-layer ABS shell design combines a compact size with robust durability, embodying a minimalist and aesthetically pleasing office computer design philosophy, making it a flagship desktop PC product in China.

■ 74M ribbon innovation concept: Addressing the wrinkling problem caused by excessively long media and ribbons in desktop printers, scientific optimization and process improvements ensure smooth, wrinkle-free printing and extend the overall lifespan of the printer.

■ Standard configuration includes USB, serial, and parallel ports: Multiple interfaces are supported, avoiding the limitation of “one host can only connect to one printer,” and the USB interface meets the demand for higher transmission speeds.

■ Standard Zebra BarOne software: Allows users to design their own label formats, while providing Zebra printing controls and low-level drivers for easy embedded printer development.

Zebra 888TT product specifications:

■ Maximum printing area: 104 mm wide and 279 mm long

■ Printing method: Thermal transfer / Thermal printing

■ Resolution: 203 dpi (8 dots/mm)

■ Maximum printing speed: 102 mm/s

■ Memory: 512KB Flash Memory, 256KB SRAM

■ Programming Language: EPL2 (Page Mode)

■ Font/Character Set: Chinese Bitmap Font Set – Traditional Chinese KaiTi and Simplified Chinese SongTi

■ Ribbon (TT mode): Width 33.8 mm to 110 mm, length 74 meters

Zebra GK420d Desktop Thermal Barcode Printer,Print head and other accessories are available in large quantities.

Compact Zebra G-Series desktop printers can print media up to 4 inches wide, offering extremely fast printing speeds and top-notch printing performance.

Whether it’s the basic GK model or the feature-rich GX model, G-Series printers consistently demonstrate reliability, ruggedness, and flexibility, meeting virtually all small to medium volume printing applications and budget requirements.

The Zebra GK420d thermal printer is one of the best in its class of basic desktop printers, boasting print speeds up to 5 inches per second, meeting your low to medium-intensity printing needs. The GK420d features a compact and lightweight sleek design, making it ideal for the healthcare and manufacturing industries. If you need to print receipts, coupons, labels, or tags and are looking for a low-cost, space-saving solution, the ultra-compact GK420d direct-heating thermal printer is the perfect choice. In addition to its fast print speeds (up to 5 inches per second), it offers a variety of connectivity options, including USB/serial interfaces and optional 10/100 Ethernet.

Zebra GK420d Detailed Specifications

Standard
● Printing method: Thermal printing
● Resolution: 203 dpi (8 dots/mm)
● Memory: 8MB SDRAM, 4MB Flash
● Maximum print width: 104mm
● Maximum print speed: 5 inches/second (127 millimeters/second)
● 32-bit RISC processor
● 4 MB Flash memory—including 1.5.0 MB of user-available non-volatile memory storage for storing downloadable content

Environmental Parameters
● Operating Temperature: 32°F/0°C – 105°F/40°C (Thermal Printing)
● Storage/Transportation Temperature: -40°F/-40°C – 140°F/60°C
● Operating Humidity: 10-90%, Non-condensing
● Storage Humidity: 5-95%, Non-condensing

Electrical Parameters
● 100-240 VAC, 50-60 Hz universal power supply with power parameter correction
● Serial RS-232 or 10/100 internal Ethernet with automatic detection
● USB 1.1 port

Physical parameters
: ● Dimensions: 171mm*152mm*209mm
● Weight: 1.4kg

Labels and Ribbons
● Maximum Media Roll Size: Outer core diameter 5 inches/127 mm, Inner core diameter 0.5 inches/12.7 mm
● Media Thickness (Labels and Backing Paper): 0.003 inches/0.076 mm to 0.075 inches/0.2 mm
● Media Width (Labels and Backing Paper): 0.75 inches/19 mm to 4.25 inches/108 mm
● Media Length (Labels and Backing Paper): 0.38 inches/9.7 mm to 39 inches/991 mm (using non-continuous paper)
● Media Type: Continuous paper, die-cut paper, or black label paper
● For optimal print quality and printer performance, it is recommended to use sensitive consumables.

Fonts/Graphics/Symbols
● 16 built-in extensible ZPLII bitmap fonts
● 1 built-in scalable ZPL font
● 5 built-in extensible ELP2 fonts ● Supports native OpenType fonts, compatible with multilingual on-demand thermal printers Unicode including Monotype Imaging Inc’s UFST ● Supports user-defined fonts and graphics—including custom logos
● Linear barcodes: Code 11, Code 39, Code 93, Code 128 (with subsets A/B/C and UCC Case C Codes), ISBT-128, UPC-A, UPC-E, EAN-8, EAN-13, UPC and EAN 2 or 5-bit extensions, Plessey, Postnet, Standard 2-of-5, Industrial 2-of-5, Interleaved 2-of-5, Logmars, MSI, Codabar, Planet Code
● Two-dimensional barcodes: Codablock, PDF417, Code 49, DataMatrix, MaxiCode, QR Code, MicroPDF417, TLC39, GS1 DataBar (RSS), Aztec

ZebraLink Solutions
● ZebraDesigner Pro/ZebraDesigner/ZebraNet Utilities v 7.0/ZebraNet Bridge Enterprise/Zebra Universal Driver
● ZebraNet 10/100 Print Server
● ZPL and EPL Programming Languages

Zebra GK420t Desktop Thermal Transfer Barcode Printer,Print head and other accessories are available in large quantities.

Compact Zebra G-Series desktop printers can print media up to 4 inches wide, offering extremely fast printing speeds and top-notch printing performance.

Whether it’s the basic GK model or the feature-rich GX model, G-Series printers consistently demonstrate reliability, ruggedness, and flexibility, meeting virtually all small to medium volume printing applications and budget requirements.

The G-series GK models uphold Zebra’s tradition of durability and reliability, offering the highest value among all basic desktop thermal printers. If you prioritize space efficiency, the smallest 4-inch direct thermal desktop printers (GK420t and GK420d) will meet your needs; if you prioritize time efficiency, the direct thermal/thermal transfer printer (GK420t) with its convenient ribbon loading system is the ideal choice.

The Zebra GK420t direct heating/thermal transfer printer utilizes Zebra’s convenient ribbon-loaded thermal transfer technology, enabling the printing of long-lasting hard label images as well as short-term indoor receipts and labels. Suitable for any industry environment, the GK420t offers fast printing speeds (up to 5 inches per second) and a variety of connectivity options, including USB/serial interfaces and optional 10/100 Ethernet.

Zebra GK420t Detailed Specifications

Standard
● Printing method: Thermal transfer printing or thermal printing
● Resolution: 203 dpi (8 dots/mm)
● Memory: 8MB SDRAM, 4MB Flash
● Maximum print width: 104mm
● Maximum print speed: 5 inches/second (127 millimeters/second)
● 32-bit RISC processor
● 4 MB Flash memory—including 1.5.0 MB of user-available non-volatile memory storage for storing downloadable content

Environmental Parameters
● Operating Temperature: 40°F/5°C – 105°F/40°C (Thermal Transfer Printing) 32°F/0°C – 105°F/40°C (Thermal Printing)
● Storage/Transportation Temperature: -40°F/-40°C – 140°F/60°C
● Operating Humidity: 10-90%, non-condensing
● Storage Humidity: 5-95%, non-condensing

Electrical Parameters
● 100-240 VAC, 50-60 Hz universal power supply with power parameter correction
● Serial RS-232 or 10/100 internal Ethernet with automatic detection
● USB 1.1 port

Physical parameters
: ● Dimensions: 194mm*191mm*254mm
● Weight: 2.1kg

Labels and Ribbons
● Maximum Media Roll Size: Outer core diameter 5 inches/127 mm, Inner core diameter 0.5 inches/12.7 mm
● Media Thickness (Labels and Backing Paper): 0.003 inches/0.076 mm to 0.075 inches/0.2 mm
● Media Width (Labels and Backing Paper): 0.75 inches/19 mm to 4.25 inches/108 mm
● Media Length (Labels and Backing Paper): 0.38 inches/9.7 mm to 39 inches/991 mm (using non-continuous paper)
● Media Type: Continuous paper, die-cut paper, or black label paper
● For optimal print quality and printer performance, it is recommended to use sensitive consumables.
● It is recommended that the ribbon width be at least the same as the media width.
● Ribbon width: 1.33 inches/33.8 mm to 4.3 inches/110 mm
● Standard ribbon length: 244 inches/74 meters; 1:1 media spool to ribbon ratio available
● Ribbon setup: Ink side of the ribbon is wound outwards

Fonts/Graphics/Symbols
● 16 built-in extensible ZPLII bitmap fonts
● 1 built-in scalable ZPL font
● 5 built-in extensible ELP2 fonts ● Supports native OpenType fonts, compatible with multilingual on-demand thermal printers Unicode including Monotype Imaging Inc’s UFST ● Supports user-defined fonts and graphics—including custom logos
● Linear barcodes: Code 11, Code 39, Code 93, Code 128 (with subsets A/B/C and UCC Case C Codes), ISBT-128, UPC-A, UPC-E, EAN-8, EAN-13, UPC and EAN 2 or 5-bit extensions, Plessey, Postnet, Standard 2-of-5, Industrial 2-of-5, Interleaved 2-of-5, Logmars, MSI, Codabar, Planet Code
● Two-dimensional barcodes: Codablock, PDF417, Code 49, DataMatrix, MaxiCode, QR Code, MicroPDF417, TLC39, GS1 DataBar (RSS), Aztec

ZebraLink Solutions
● ZebraDesigner Pro/ZebraDesigner/ZebraNet Utilities v 7.0/ZebraNet Bridge Enterprise/Zebra Universal Driver
● ZebraNet 10/100 Print Server
● ZPL and EPL Programming Languages