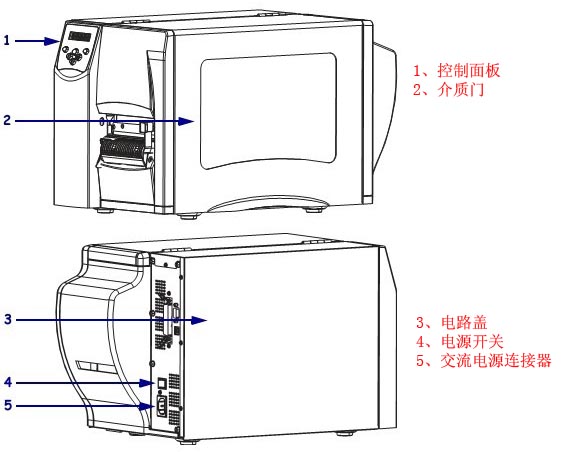
1. Introduction to the Components of the Zebra S4M Barcode Printer
1.1 Control Panel/Media Door/Circuit Cover/Power Switch/AC Power Connector
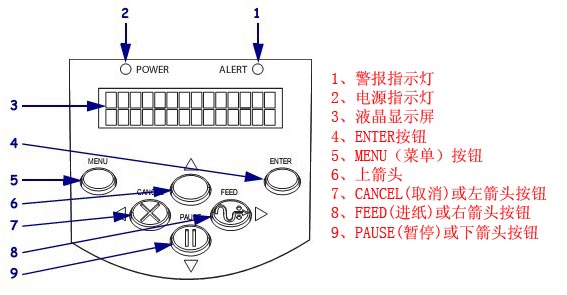
1.2 Alarm Indicator/Power Indicator/LCD Display/ENTER Button/MENU Button/Up Arrow/CANCEL or Left Arrow Button/FEED or Right Arrow Button/PAUSE or Down Arrow Button
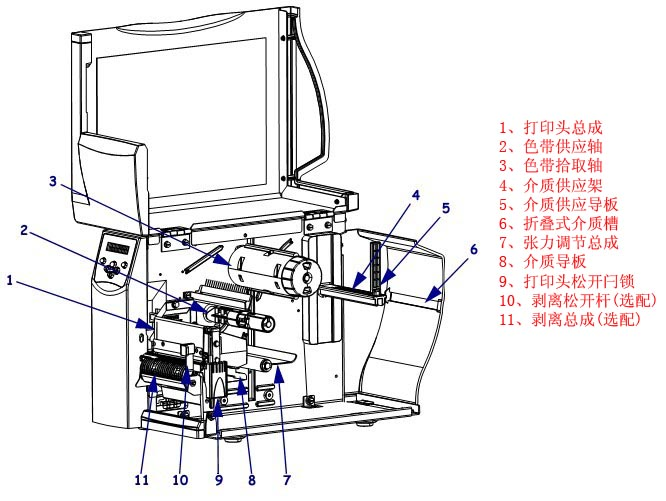
1.3 Printhead Assembly/Ribbon Supply Shaft/Ribbon Pickup Shaft/Media Supply Holder/Media Supply Guide/Folding Media Tray/Tension Adjustment Assembly/Media Guide/Printhead Release Latch/Peel Release Lever (Optional)/Peel Assembly (Optional)
2. Zebra S4M Barcode Printer Control Panel Button and Indicator Light Description
2.1 Control Panel LCD Screen Description
The control panel LCD screen displays different modes depending on the printing mode.
■ In working mode, the LCD screen displays the printer status and sometimes also shows control panel indicator lights. When the printer is receiving data, the control panel displays “DATA” and cycles through dots and blanks.
■ In pause mode, the printer pauses printing.
■ In settings mode, the control panel LCD screen can be used to view or modify printer parameters.
■ In error mode, the LCD screen can display alarms or error messages.
2.2 Control Panel Button Description
The printer has six basic control buttons on the control panel. When the printer is in settings mode, some of these buttons can also be used as navigation keys. The current function of a specific button is determined by the flashing of the indicator light next to it.
| Button | Appearance | Functions/Description |
|---|---|---|
| MENU | Entering and exiting settings mode | |
| ENTER | If you need to select parameters or options in settings mode, press ENTER to select an item. This button is only active when needed. | |
| CANCEL | The CANCEL function is only available in “Pause” mode. Pressing the CANCEL button will have the following effects: ① Cancel the currently printing label format; ② If there is no label format being printed, the next content to be printed will be canceled; ③ If there are no label formats waiting to be printed, the CANCEL command will be ignored. To clear the printer’s entire label format memory, press and hold the CANCEL button. | |
| FEED (Paper Feed) | Feed a blank label. ① If the printer is idle or paused, the label will be fed immediately; ② If the printer is printing, the label will be fed after printing is complete. | |
| PAUSE | Stop and restart the printing process, or clear the error message and clear the LCD screen display. The “Pause” light illuminates when the printer is paused. ① If the printer is idle, it will immediately enter “Pause” mode; ② If the printer is printing, the labels will be completed before the printer pauses. | |
| Left arrow | In settings mode, you can scroll the LCD screen to the previous parameter. | |
| Right arrow | In settings mode, you can scroll the LCD screen to the next parameter. | |
| Up arrow | In settings mode, you can increase the setting value or scroll to the next option. | |
| Down arrow | In settings mode, you can decrease the setting value or scroll to the previous option. |
2.3 Control Panel Indicator Light Description
| indicator lights | Appearance | Functions/Description |
|---|---|---|
| POWER (Power Supply) | Indicates printer power is on. | |
| ALERT | In case of an error or alarm, the “alarm” indicator light will flash. | |
| PAUSE (part of the PAUSE button) | When the printer is in “Pause” mode, the indicator light will flash unless the printer enters “Setup” mode and the down arrow is active. | |
| FEED (part of the FEED button) | During normal printer operation, the printer is instructed to feed blank labels. | |
| CANCEL (part of the CANCEL button) | Open when the uncheck label is an active option. |
3. Zebra S4M Barcode Printer Data Communication Interface Selection
Users can send label formats to the printer through any available data communication interface. All necessary data cables must be provided for the specific situation. Ethernet does not require shielding, but other data cables must be fully shielded and equipped with metal or metallized connector housings. Using unshielded cables will result in electromagnetic radiation levels exceeding regulatory limits.
Minimize cable noise levels:
● Use the shortest possible data cable
● Do not tightly bundle data cables and power cords
● Do not tie data cables to power cord conduits
Data Communication Interface Characteristics:
● RS232 Serial Port (Standard): ① Maximum cable length 15.24 meters; ② Printer parameters need to be changed to match the host computer; ③ If using a standard modem cable, a blank modem needs to be connected to the printer.
● IEEE1284 Bidirectional Parallel Port (Standard): ① Maximum cable length 3 meters; ② Recommended cable length 1.83 meters; ③ No printer parameter changes are required for compatibility with the host computer.
● USB (Standard): Features: ① Maximum cable length 5 meters; ② Compatible with host computer without requiring changes to printer parameters.
● Internal Wired Ethernet Print Server (Optional): Features: ① Prints from any computer on the user’s LAN to the printer; ② Communicates with the printer via its web interface in ZPL mode; ③ The computer must have an Ethernet card; ④ The printer must be configured to use the LAN.
● Wireless Ethernet Print Server (Optional): Features: ① Prints from any computer on a wireless LAN (WLAN) to the printer; ② Communicates with the printer via its web interface in ZPL mode; ③ The printer must be configured to use the WLAN.
Note: Before connecting the data communication cable, ensure the printer is powered off (O). Connecting the data communication cable while the power switch is on (I) may damage the printer.
4. Zebra S4M Printer Calibration and Adjustment Components
4.1 Calibrating the Printer
The printer can be set to automatic or manual calibration.
4.1.1 Automatic Calibration
When the control panel for MEDIA POWER UP or HEAD CLOSE is set to CALIBRATION, the printer will automatically perform calibration when the printhead is powered on or off. During automatic calibration, the printer determines the label length and sensor settings. The results of automatic calibration are stored in the printer’s memory and are not lost even when the printer is powered off. These parameters remain valid until the next calibration.
Note: If the control panel for MEDIA POWER UP or HEAD CLOSE is set to LENGTH, NO MOTION, or FEED, the printer will begin printing without automatic calibration.
4.1.2 Manual Calibration
Performing media and ribbon sensor calibration resets the sensor sensitivity for more accurate media and ribbon detection. If you have changed the ribbon or media type, performing this calibration process will allow your printer to work better.
The sensitivity of the media and ribbon sensors can be adjusted using the following steps:
① Press the SETUP/EXIT button on the control panel.
② Press the plus (+) or minus (-) button to select the “Media and Ribbon Calibration” parameter.
③ Press SELECT to select the parameter.
④ Press the plus (+) button to start the calibration process. The LOAD BACKING prompt will be displayed.
⑤ Open the printhead .
⑥ Peel approximately 203 mm of label off the backing paper and feed the media into the printer, ensuring only the backing paper is between the media sensors.
⑦ Keep the printhead open.
⑧ Press the plus (+) button to continue; the REMOVE RIBBON prompt will be displayed.
⑨ If a ribbon is used, it should be removed.
⑩ Close the printhead.
⑾ Press the plus (+) button to continue; the CALIBRATING PLEASE WAIT message will be displayed. The printer adjusts the signal gain received from the media and ribbon sensors based on the specific media and ribbon combination used. On the sensor graph, this corresponds to the graphical peak that moves up and down to better read your printing application. After calibration, RELOAD ALL will be displayed.
⑿ Open the printhead and push the media forward so that the label is below the media sensor.
⑃ Reload the ribbon (if used).
⑭ Close the printhead
. ⑮ Press the plus sign (+) to continue. The printer performs automatic calibration, during which it checks the media and ribbon readings against a newly established scale to determine the ribbon length and printing mode. To view the readings on the new scale, print a sensor graph
. ⑮ Press SELECT to accept any changes and cancel parameter selection.
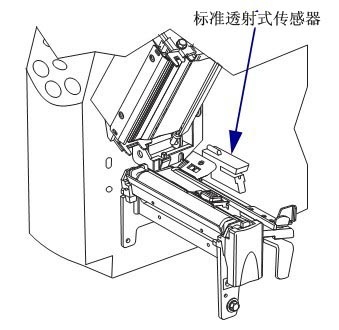
4.2 Selecting or Adjusting the Media Sensor This printer can use two types of media sensors: transmissive and reflective sensors.
4.2.1 Selecting a Transmissive Sensor
The standard transmissive sensor is in a fixed position and can be enabled from the control panel.
4.2.2 Adjusting the Reflective Sensor
The reflective sensor is compatible with most types of media. When using intermittent media, the reflective sensor can detect label start indicators (notches, perforations, black marks, or gaps in die-cut labels). With both continuous and intermittent media, the sensor detects paper shortages. If calibration is difficult with this sensor, use a transmissive sensor.
Position the reflective sensor as follows:
● Directly below notches, perforations, or black marks on these types of labels.
● Any location in the media width direction if there are gaps between labels.
● Any location below continuous media
. The flashing red light through the media can help accurately position the sensor.
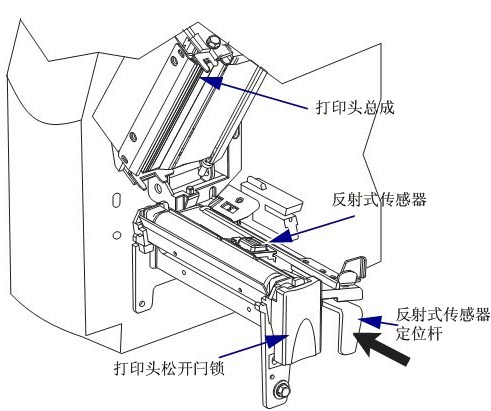
To adjust the reflective sensor, complete the following steps:
① Press the printhead release lever.
② Lift the printhead until the latch opens.
③ Locate the reflective sensor positioning lever.
④ Move the reflective sensor positioning lever laterally across the media to align the reflective sensor with the gap or notch.
⑤ Close the printhead assembly.
4.3 Ribbon Supply Shaft Tension Adjustment
The ribbon supply shaft is a bi-directional tightening type. Most applications require the spindle to be in the normal position. A low-tension position is recommended only when using narrow ribbons or when normal tension affects ribbon movement.
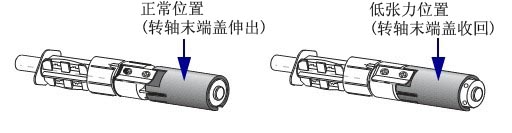
To place the ribbon supply spindle in the normal position, push the spindle end cap out until it extends and locks in place; this setting is suitable for most applications.
To place the ribbon supply spindle in the low-tension position, push the spindle end cap in until it retracts and locks in place; this setting should be used if using narrow ribbons or when normal tension hinders ribbon movement.
4.4 Adjusting Printhead Pressure
If the printed color is too light on one side, if the media is too thick, or if the media shifts to one side during printing, you may need to adjust the printhead pressure.
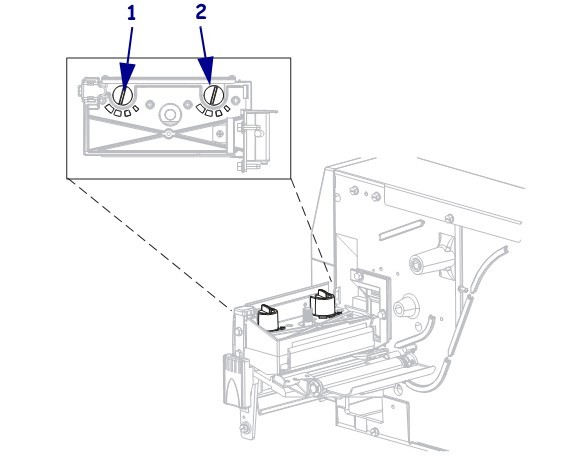
The S4M pressure adjustment wheel has four available settings, indicated by progressively larger embossed markers on the printing unit, with the smallest marker (maximum counter-clockwise rotation) at position 1 and the largest marker (maximum clockwise rotation) at position 4.
Adjust the positions of the inner adjusting wheel 2 and the outer adjusting wheel 1 according to the media width:
● Media width 25.4mm: Inner adjusting wheel at position 3, outer adjusting wheel at position 1.
● Media width 51mm: Inner adjusting wheel at position 4, outer adjusting wheel at position 1.
● Media width 76mm: Inner adjusting wheel at position 3, outer adjusting wheel at position 2.
● Media width ≥ 89mm: Inner adjusting wheel at position 3, outer adjusting wheel at position 4.
If the pressure adjusting wheel needs to be adjusted due to media thickness or other factors, it can be adjusted as follows:
● If the media requires higher pressure to improve print quality, increase the position of both adjusting wheels by one position
. ● If the media slides to the left during printing, increase the position of the outer adjusting wheel by one position, or decrease the position of the inner adjusting wheel by one position.
● If the media slides to the right during printing, increase the position of the inner adjusting wheel by one position, or decrease the position of the outer adjusting wheel by one position
. ● If the printed content on the left side of the media label is too light, increase the position of the inner adjusting wheel by one position.
● If the printed content on the right side of the media label is too light, increase the position of the outer adjusting wheel by one position.
5. Zebra S4M Barcode Printer Configuration
5.1 Entering and Exiting Setup Mode
After installing the media and ribbon and performing a power-on self-test, the control panel will display “PRINTER READY.” Now you can use the control panel LCD screen and the buttons below it to set printer parameters for your printing applications.
Important Note: Some specific printing situations may require adjusting printing parameters such as print speed or ink depth. These situations include: ① High-speed printing; ② Peel-off media; ③ Using very thin composite coated labels with small areas.
Because print quality is affected by the above or other factors, it is necessary to print test samples to determine the printer settings best suited for your printing applications. Inappropriate settings may affect print quality or print speed, and may also prevent the printer from working properly in the required printing modes.
5.1.1 Entering Setup Mode
① Press MENU.
② Use the left and right arrow keys to scroll through the parameters.
5.1.2 Exiting Setup Mode
You can exit setup mode at any time. When exiting “Setup” mode, you can choose to save or discard the changes made, or return to your previous position in setup mode.
① Press MENU. The printer will display SAVE CHANGES. Press ENTER.
② Do you want to save the changes made after entering setup mode?
| If you want… | but… |
|---|---|
| Save changes | ① Select YES (Yes) using the up and down arrows as needed; ② Press ENTER to save the changes and exit the settings mode. |
| Abandon the change | ① Use the up and down arrows to select NO; ② Press ENTER to discard the changes and exit the settings mode. |
| Return to settings mode | Press one of the following buttons: ① MENU (return to the same parameter); ② The left arrow will take you to the previous parameter; ③ The right arrow will take you to the next parameter. |
5.2 Password Protection for Parameters
The printer has four password levels. When entering setup mode from the control panel, only parameters without password protection are displayed. To view more parameters, you must enter the corresponding password at the ADVANCED SETUP prompt. After entering the correct password, you do not need to enter it again before leaving and re-entering setup mode.
When prompted for a password, enter the password for the desired display level or a higher level. Entering a higher-level password will remove password protection for the parameters at that level and for all parameters at the following levels (for example, removing password protection for level 4 also removes password protection for levels 1, 2, and 3).
| Password Level | Controlled functions | Default password |
|---|---|---|
| 4 | All functions including sensor adjustment and other sensitive parameters | For advanced users only |
| 3 | Installation and reconfiguration. This password is also used for the printer’s anilox interface. | 1234 |
| 2 | Tag configuration operations (media type, tag delivery method, tag length) | 0000 (No protection) |
| 1 | Color depth, paper cutting position, label top | 0000 (No protection) |
To enter a password when prompted, complete the following steps:
① When the printer displays ADVANCED SETUP X, press ENTER. The printer displays PASSWORD and the number 0000.
② Enter a four-digit password for the displayed password level or higher.
● You can use the left and right arrow keys to change the position of the selected digits.
● You can use the up and down arrow keys to change the selected digit value.
③ After entering the password, press ENTER.
Note: When you enter a password at the ADVANCED SETUP prompt, the first parameter you see depends on whether you press the left or right arrow key to enter the ADVANCED SETUP prompt:
■ If you use the right arrow key, the first parameter you see depends on the password level prompted by the printer.
| The advanced settings level was prompted. | Password level entered | I saw the first parameter |
|---|---|---|
| 1 | 1, 2, 3 or 4 | DARKNESS (Level 1 Top) |
| 2 | 2, 3 or 4 | MEDIA TYPE (Level Type) (Level 2 Top) |
| 3 | 3 or 4 | PRINT OUT (Level 3, top) |
| 4 | 4 | LABEL LEVEL (Level 4, Top) |
■ If you use the left arrow, the first parameter you see depends on the password you enter at the prompt, and is not related to the password level prompted by the printer.
| The advanced settings level was prompted. | Password level entered | I saw the first parameter |
|---|---|---|
| 1 | 1 | LABEL TOP (Level 1, Bottom) |
| 1,2 | 2 | LENGTH (Level 2, bottom) |
| 1,2,3 | 3 | LANGUAGE (Level 3 bottom) |
| 1, 2, 3 or 4 | 4 | LANGUAGE (Level 4 bottom) |
5.3 Standard Control Panel Parameters
Use the LCD screen on the control panel to adjust printer settings.
Note: Label printing software or printer drivers may override adjustments made through the control panel.
5.3.1 Password Level 1 and 2 Parameters
■DARKNESS: Adjusts the print depth. The optimal depth setting depends on various factors, including ribbon type, label, and printhead condition. Stable, optimal print quality can be achieved by adjusting the density.
Note: Set the depth to the lowest value that provides the best print quality. If the density is set too high, the ink will spread, the ribbon will burn through, and the printhead will wear out prematurely.
If the printed content is too light or there are blank areas in the printed area, the print density should be increased.
If the printed color is too dark, or if the print ink spreads or bleeds, the print density should be decreased.
Default: +10, Range: 00 to +30
■TEAR OFF: Adjusts the paper cutting position. This parameter sets the position of the media on the cutter/peel bar after printing.
Increasing the number moves the media outward (the cutting line moves to the leading edge of the next label), while decreasing the number moves the media inward (the cutting line moves towards the edge of the printed label).
Default: 0, Range: -120 to +120
■LABEL TOP (Label Top): Adjusts the top position of the label. This parameter adjusts the vertical printing position of the label. A positive number moves the top of the label down (away from the print head) by a specified number of dots, while a negative number moves the label down (towards the print head) by a specified number of dots.
Default: +000, Options: Range: -120 to +120
■LEFT POSITION: Adjusts the left-side position of the label. This parameter adjusts the horizontal printing position of the label. A positive number moves the left edge of the image towards the center of the label, while a negative number moves the left edge of the image towards the left side of the label.
Default: +000, Options: Range: -9999 to +9999
■MEDIA TYPE (Media Type): Sets the media type. This parameter informs the printer which type of parameters you are using. If Option Media is selected, a label length instruction must be included in the label format. If Non-Continuous Media is selected, the printer feeds the media to calculate the label length (the distance between two alignment points identified on the label gap, weave, alignment notch, or cut).
Default: Gap/Cut; Options: Gap/Cut, Marking, Continuous
■SENSOR SELECT: Select the media sensor. Use the setting that provides the best performance. Reflective sensors can be used for most media.
REFLECTIVE – For media marked in black and most other media types.
TRANSMISSIVE – Can be used for any media where reflective sensors don’t work well (except for media marked in black). To use a transmissive sensor for media with perforations or notches, check that the perforation or notch passes through the sensor for detection. If the perforation or notch does not pass through the sensor, a reflective sensor should be used.
Default: REFLECTIVE
■REMOVAL (Retrieval Method): Select the label delivery method. The label delivery method must correspond to the printing mode. Ensure that the label delivery method supported by the hardware configuration is selected, as some displayed options are optional printing functions.
Default: TEAR; Options: TEAR, PEEL, CUTTER, REWIND, DELAYED CUT
■PRINT SPEED: Adjusts the print speed. Lowering the print speed usually results in higher print quality. Changes to the print speed take effect upon exiting “Setup” mode.
Default: 2 IPS, Range: 2 to 6 IPS
■PRINT WIDTH: Sets the print width, which determines the printable area within the label’s width range.
Note: Setting the width too narrow may prevent some label formats from printing on the media; setting it too wide will waste formatting memory, causing labels to print outside the lines or onto the print roller. If using flipped images, this setting will affect the horizontal position of the label format.
Default: 832 (203 dpi), 1248 (300 dpi); Range: 2 to 832 (203 dpi), 2 to 1248 (300 dpi)
■KDU MODE: Enables KDU, allowing the S4M printer to use the “Keyboard Display Unit”.
Default: OFF; Options: ON, OFF
■LENGTH: Sets the maximum label length. This parameter is used during the media portion of the calibration process. The maximum label length should be set to at least 25.4 mm longer than the actual label length. If this value is set to less than the label length, the printer will assume continuous media is loaded and will be unable to calibrate.
Default: AUTO; Options: AUTO, this value can be adjusted in 25.4 mm increments.
5.3.2 Password Level 3 Parameters
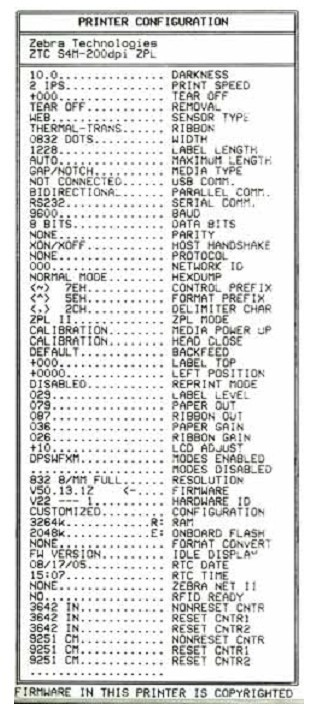
■PRINT OUT: Prints the selected label. This parameter allows the user to print a specific label type using information about the printer.
SETTINGS: Prints a printer configuration label. FONTS: Prints a label listing the fonts available in the printer, including standard printer fonts and any optional fonts. Fonts can be stored in RAM, flash memory, an optional memory card, or a field card.
FORMATS: Prints a label listing the available formats stored in the printer’s RAM, flash memory, or an optional memory card.
BARCODES: Prints a label listing the barcodes available in the printer.
ALL: Prints a label listing the available fonts, barcodes, graphics, formats, and the current printer and network configuration.
NETWORK: Prints a network configuration label.
■PARALLEL COMM. (Parallel Communication): Configures parallel communication by selecting a communication port that matches the computer host’s settings.
Default: UNIDIRECTIONAL; Options: UNIDIRECTIONAL, BIDIRECTIONAL
■BAUD (Baud Rate): Sets the baud rate. This setting is only applicable when using a serial port. For accurate communication, the computer host’s baud rate setting must match the printer’s baud rate setting. Select a value that matches the settings used by the computer host.
Default: 9600, Options: 300, 600, 1200, 2400, 4800, 9600, 14400, 19200, 28800, 38400, 57600, 115200
■DATA BITS: Sets the number of data bits. This setting is only applicable when using a serial port. For accurate communication, the computer host’s data bit setting must match the printer’s data bit setting. Select a value that matches the settings used by the computer host.
Default: 8 bits; Options: 7 bits, 8 bits.
■PARITY (Parity): Sets the parity. This setting only applies when using a serial port. For accurate communication, the computer host’s parity setting must match the printer’s parity setting. Select a value that matches the parity used by the computer host.
Default: NONE, Options: ENVEN (Even), ODD (Odd), NONE (None)
■HOST HANDSHAKE: Configures the host handshake. This setting is only applicable when using a serial port. For accurate communication, the computer host’s handshake protocol must match the printer’s handshake protocol. Select a handshake protocol that matches the settings used by the computer host.
Default: XON/XOFF; Options: XON/XOFF, DSR/DTR, RTS/CTS
■CONTROL CHAR (Control Character): Sets the control character. The printer looks for this two-digit hexadecimal character to indicate the start of the ZPL control specification.
Note: Do not use the same hexadecimal value for the control, format, and delimiter characters. The printer must use different characters to function correctly.
Default: 7E, Range: 00 to FF
■COMMAND CHAR (Command Character): Sets the command character. The command prefix is a two-digit hexadecimal value used as a parameter position marker in the ZPL format specification. The printer looks for this hexadecimal character, which indicates the start of a ZPL format instruction.
Note: Do not use the same hexadecimal value for the control, format, and delimiter characters; the printer must use different characters to function correctly.
Default: 5E, Range: 00 to FF
■DELIM.CHAR (Delimiter Character): Sets the delimiter, which is a two-digit hexadecimal value used as a parameter position marker in the ZPL format specification.
Note: Do not use the same hexadecimal value for the control, format, and delimiter characters; the printer must use different characters to function correctly.
Default: 2C, Range: 00 to FF
■HEXDUMP, Hexadecimal Dump. Hexadecimal dump mode is a troubleshooting tool that can be used to check the interconnection between the printer and the host computer.
Default: NO; Options: NO, YES
■REPRINT MODE: Sets the reprint mode. If enabled, users can issue the ~PR command or press the minus (-) button on the control panel to reprint the previously printed label.
Default: DISABLED, Options: ENABLED, DISABLED
■CHANGE RTC DATE (Real-Time Clock Date): Sets the Real-Time Clock (RTC) date. This parameter allows users to set the date according to the specifications listed in IDLE DUSPLAY (Standby Display).
■CHANGE RTC TIME (Real-Time Clock Time): Sets the real-time clock (RTC) time. This parameter allows users to set the time according to the specifications listed in IDLE DUSPLAY (Standby Display).
■LOAD DEFAULTS: Loads factory default values, restoring all parameters to their factory default settings.
Important: Use this command with caution. This command resets all printer parameters to factory default values. If possible, print a configuration label as a record of the printer settings before loading the defaults.
■DEFAULT NET (Default Network Settings): Resets network parameters to factory default values.
■INIT FLASH MEM (Initialize Flash Memory): Initializes the flash memory. This parameter allows you to erase the printer’s flash memory.
■RIBBON (ribbon): Configures ribbon usage. This parameter is only displayed on printers with the “Heat Transfer” option installed.
Default: YES; Options: YES, NO
■ZPL OVERRIDE (ZPL Override): Overrides specific ZPL commands, allowing the following ZPL commands to replace user settings:
^MM (Media Mode)
^MT (Media Type: Thermal or Thermal Transfer)
^MN (Media: Non-continuous or Continuous)
Default: YES (Allows the printer to accept the listed ZPL commands); Options: YES (Allows the printer to accept the listed ZPL commands), NO (Instructs the printer to ignore the listed ZPL commands)
■SENSOR PROFILE (Sensor Profile): Prints a sensor profile. Media sensor profiles can be used to resolve alignment problems caused by the media sensor detecting a pre-printed area on the media or being unable to determine the position of the pattern.
■MEDIA/RIBBON CALIBRATE (Media and Ribbon Calibration): To calibrate the sensitivity of the media and ribbon sensors, follow these steps:
① Press ENTER to begin the calibration process. The prompt “LOAD BACKING/REMOVE RIBBON” will appear.
② Open the printhead .
③ Peel approximately 203 mm of label from the backing paper and feed the media into the printer, ensuring only the backing paper is between the media sensors.
④ If a ribbon was used, remove it.
⑤ Close the printhead.
⑥ Press ENTER. The message “CALIBRATING PLEASE WAIT” will appear. The printer adjusts the level (gain) of the signal received from the media and ribbon sensors. On the sensor graph, this corresponds to the graphical peak that moves up and down to better read your printing application. “RELOAD ALL” will appear.
⑦ Open the printhead and push the media forward until the label is below the media sensors.
⑧ Reload the media and ribbon (if used).
⑨ Close the printhead
⑩ Press ENTER. The message “CALIBRATING PLEASE WAIT” will be displayed. The printer will perform calibration. During this process, the printer will determine the label length. To view the reading on the new ruler, you can print a sensor chart.
■LANGUAGE (Language): Select the display language. This parameter allows the user to display control panel content in the selected language.
6. Zebra S4M Barcode Printer Routine Maintenance
Important Note: Zebra is not responsible for damage caused by the use of cleaning solutions on this printer.
6.1 Recommended Cleaning Schedule
Depending on the application and media, more frequent cleaning may be required.
Printhead, Method: 95% alcohol solvent, Interval: After one media roll in thermal mode, after using a Perfect Silk ribbon for thermal transfer, or after every three media rolls.
Rollers, Method: 95% alcohol solvent, Interval: After one media roll in thermal mode, after using a Perfect Silk ribbon for thermal transfer, or after every three media rolls.
Media Sensor, Method: Air jetting, Interval: After one media roll in thermal mode, after using a Perfect Silk ribbon for thermal transfer, or after every three media rolls.
Ribbon Sensor, Method: Air jetting, Interval: After one media roll in thermal mode, after using a Perfect Silk ribbon for thermal transfer, or after every three media rolls.
Media Path, Method: 95% alcohol solvent, Interval: After one media roll in thermal mode, after using a Perfect Silk ribbon for thermal transfer, or after every three media rolls.
Ribbon Path: Method: 95% alcohol solvent, Time Interval: After using one media roll in thermal mode, after using a perfect silk ribbon in thermal transfer or after every three media rolls.
6.2 Cleaning Steps
6.2.1 Cleaning the Printer Housing
The printer’s outer surface can be cleaned with a lint-free cloth and a small amount of neutral detergent. Do not use abrasive cleaners or solvents.
6.2.2 Cleaning the Printhead and Roller Printhead
wear can be minimized and print quality maintained through routine maintenance. As printing continues, the media or ribbon passing through the printhead will continuously wear down the ceramic protective layer, constantly exposing and eventually damaging the printed elements. To prevent corrosion:
◆ Clean the printhead frequently and use a backed and fully lubricated thermal transfer ribbon to reduce friction.
◆ Optimize the balance between the two by using the lowest possible printhead pressure and burn-in temperature settings.
◆ Ensure the thermal transfer ribbon width is greater than or equal to the label media width to protect the printed elements from exposure to more corrosive label materials.
For best results, clean the printhead after each ribbon roll change. Unstable print quality, such as blank spaces in printed barcodes or graphics, may indicate a dirty printhead.
Caution: When performing tasks involving close proximity to the exposed printhead, remove all rings, watches, long necklaces, ID cards, and other metal objects that may come into contact with the printhead.
Caution: The printhead can get very hot and may cause severe burns; allow it to cool completely. Caution:
Before touching the printhead assembly, touch the printer’s metal frame or use an anti-static wrist strap or pad to discharge any accumulated static electricity. To
clean the printhead and rollers, follow these steps:
① Open the printhead assembly .
② Remove the media and ribbon
. ③ Use a cleaning swab to wipe the brown strip on the printhead assembly from one end to the other.
④ While manually rotating the pressure roller, thoroughly clean it with a cotton swab to allow the solution to evaporate completely.
⑤ Reinstall the media and ribbon and close the printhead assembly.
Note: If print quality does not improve after performing the above steps, try cleaning the printhead with the Save-a-Printhead cleaning film. This is a material with a special coating that removes accumulated dirt without damaging the printhead.
6.2.3 Cleaning the Media Tank and Sensors
To clean the media tank and sensors, complete the following steps:
① Use a brush or vacuum cleaner to remove accumulated paper scraps and dust from the media and ribbon path.
② Use a brush or vacuum cleaner to remove paper scraps and dust from the sensors.
7. Troubleshooting Zebra S4M Barcode Printer
7.1 Troubleshooting Checklist
7.1.1 Is an error message displayed on the LCD screen? If so, please check the LCD screen error message in the table below.
| LCD screen/printer conditions | Possible reasons | Recommended solution |
|---|---|---|
The printer stopped and the ALERT light flashed. | In heat transfer mode, the ribbon is not loaded or is loaded incorrectly. | Correctly load the media |
| In heat transfer mode, the ribbon sensor did not detect the ribbon. | ① Correctly load the medium; ② Calibrate the sensor. | |
| In thermal transfer mode, the medium blocks the ribbon sensor. | ① Correctly load the medium; ② Calibrate the sensor. | |
| In thermal transfer mode, the printer does not detect the ribbon even though it is correctly loaded. | ① Print sensor charts; ② Calibrate the sensor or load printer defaults. | |
| If using thermal media, the printer will wait for the ribbon to be loaded because it has been incorrectly set to thermal transfer mode. | Set the printer to thermal mode. | |
The color strip light is on, the ERROR indicator light is flashing, and the ALERT indicator light is flashing. | The ribbon is loaded, but the printer is set to thermal mode. | Thermal media does not require a ribbon. If you wish to use thermal media, you should remove the ribbon. This operation will not affect printing. |
| If you want to use thermal transfer media that requires a ribbon, you should set the printer to thermal transfer mode. | ||
The printer stopped and the ALERT light flashed. | Media not loaded, or media loaded improperly. | Correctly load the media |
| Medium sensor misalignment | Check the position of the medium sensor | |
| The printer is set to use non-continuous media, but continuous media has been loaded. | Install the correct media type, or reset the printer to the current media type and perform calibration. | |
The printer stopped and the ALERT light flashed. | The print head did not close completely. | Completely close the print head |
| The printhead opening sensor is malfunctioning. | Replace sensor | |
The ERROR indicator light is flashing. | The printhead has a faulty thermistor. | Replace the print head |
The printer stops, and the ERROR indicator light illuminates: the printer displays these three messages in a loop. | The printhead data cable was not connected correctly. | Before performing this step, the printer power should be turned off, otherwise the print head may be damaged. Ensure the cable connector is fully inserted into the printer connector. |
| The printhead has a faulty thermistor. | Replace the print head | |
The printer is printing, and the ALERT light is flashing. | The printhead temperature is approaching its minimum operating limit. | Continue printing once the printhead reaches the correct operating temperature. If errors persist, the ambient temperature may be too low for proper printing. The printer should be placed in a warmer environment. |
| The printhead data cable was not connected correctly. | Before performing this step, the printer power should be turned off, otherwise the print head may be damaged. Ensure the cable connector is fully inserted into the printer connector. | |
| The printhead has a faulty thermistor. | Replace the print head | |
The printer stopped and the ALERT light flashed. | Print head overheating | The printer should be allowed to cool down sufficiently. Printing will automatically resume when the printhead components have cooled to an acceptable operating temperature. |
Printer stopped | Printhead not installed, printhead data cable not connected, printhead damaged. | Before performing this step, the printer power should be turned off, otherwise the printhead may be damaged. Ensure the cable connector is fully inserted into the printer connector. If the problem persists, the printhead should be replaced. |
Printer stopped | The printer is performing memory defragmentation. | Caution: Do not turn off the printer power during the defragmentation process, otherwise it will damage the printer. |
The printer stopped and the ALERT light flashed. | The paper cutter blade is located in the media path. | Turn off the printer and check the paper cutter module for debris; clean it if necessary. |
7.1.2 Are non-continuous labels being treated as continuous labels? If so, please calibrate the media and ribbon sensor.
7.1.3 With the ribbon correctly loaded, is the CHECK RIBBON light illuminated? If so, please calibrate the media and ribbon sensor.
7.1.4 Are you experiencing any print quality issues? If so, please check the print quality issue categories in the table below:
| Fault | Possible reasons | Recommended solution |
|---|---|---|
| Common print quality issues | Incorrect printer speed setting | To achieve the best print quality, you should set the minimum possible print speed for your application via the control panel, driver, or software. |
| The incorrect combination of labels and ribbons was selected for your application. | ① Switch to different types of media or ribbons to find a compatible combination; ② Contact MinYong Digital for information and advice as needed. | |
| The printer’s print depth setting is incorrect. | To achieve optimal print quality, you should set the lowest possible depth setting for your application via the control panel, driver, or software. The ideal depth setting can be determined by performing a “Paper Feed Self-Test.” | |
| Dirty printhead | Clean the print head | |
| Incorrect or uneven printhead pressure | Set the printhead pressure to the minimum value that yields the best print quality. | |
| Print head not properly balanced | Call Minyong Service Engineer | |
| Long, incomplete printing marks appeared on multiple labels. | Damaged printing components | Call a Minyong service engineer to replace the printhead. |
| Colored ribbon folds | Adjust the corresponding components | |
| Colored ribbon folds | Improper feeding of ribbon into the ribbon system | Correctly load the ribbon |
| Incorrect burning temperature | Set the color depth to the lowest value for optimal print quality. | |
| Incorrect or uneven printhead pressure | Set the pressure of the proposal to the minimum value that yields the best print quality. | |
| Improper medium feeding caused it to deviate from one side to the other. | Ensure the medium is level by adjusting the medium guide plate. | |
| Print head not properly balanced | Call Minyong Service Engineer | |
| A thin, slanted gray line appears on the blank label. | Colored ribbon folds | Please refer to the solution for ribbon wrinkles. |
| The entire label is printed too dark or too light. | The media or ribbon was not designed for high-speed printing. | Replace consumables for high-speed printing operations |
| The wrong combination of media and ribbon was selected for your application. | ① Switch to different types of media or ribbons to find a compatible combination; ② Contact MinYong Digital for information and advice as needed. | |
| Users use ribbons for thermal media. | Thermal media do not require ribbons; check whether thermal media has been used. | |
| Incorrect or uneven printhead pressure | Set the pressure to the desired minimum value. | |
| The label has a stain mark | The media or ribbon was not designed for high-speed printing. | Replace consumables for high-speed printing operations |
| Improper alignment/skipped labels | Printer not calibrated | Recalibrate the printer |
| Incorrect label format | Use the correct label format | |
| One to three labels are misaligned or have printing errors. | The printing roller is too dirty | Clean the printing roller shaft |
| The medium does not meet specifications | Use media that meet specifications. | |
| Adjust vertically to the top of the form | Printer not calibrated | Recalibrate the printer |
| Note on normal tolerances for mechanical parts and printer patterns : Vertical offset of ±4 to 6 lines (approximately 0.5 mm) is within the normal tolerance range. | ① Calibrate the printer; ② Adjust the label top position setting. | |
| The printing roller is too dirty | Clean the printing roller shaft | |
| Label or image vertical offset | The printer uses non-continuous labels, but is configured to work in continuous mode. | Configure the printer to operate in non-continuous mode and run calibration routines as needed. |
| Incorrect calibration of the medium sensor | Calibration media and ribbon sensor | |
| The printing roller is too dirty | Clean the printing roller | |
| Printhead pressure setting incorrect (switch) | Adjust the printhead pressure to ensure it works properly. | |
| The ribbon or media was not loaded correctly. | Check if the printer is loaded correctly. | |
| Media incompatibility | Ensure that the label spacing or gaps are evenly distributed between 2 and 4 mm, and that the medium does not exceed the minimum size specified for the operating mode. | |
| Unable to scan the barcode printed on the label | The barcode is out of specification because it was printed too dark or too light. | Perform a “paper feed self-test” and adjust the depth or printing speed settings as needed. |
| There is not enough blank space around the barcode. | Leave at least 3.2mm clearance between the barcode and other printed areas on the label, as well as between the barcode and the label edge. |
7.1.5 Have you encountered any communication problems? If so, please check the communication fault categories in the table below:
| Fault | Possible reasons | Recommended solution |
|---|---|---|
| The label format has been sent to the printer, but it is not recognized. | Incorrect communication parameters | Check printer driver or software communication settings. |
| If you are to use serial communication, ensure that you are using a blank modem cable or a blank modem adapter. | ||
| If using a driver, you should check the driver communication settings related to the connection. | ||
| The label format has been sent to the printer, but after printing multiple labels, the printer skips labels, misplaces them, loses images, or distorts the images. | Incorrect serial communication settings | Ensure that flow control settings are matched. |
| Check the length of the communication cable | ||
| Check printer driver or software communication settings. | ||
| The label format has been sent to the printer, but it is not recognized and will not print. | The prefix and separator character sets in the printer do not match the character sets in the label format. | Check prefix and separator characters |
| Incorrect data is being sent to the printer. | Check the communication settings on the printer to ensure they match the printer’s settings. | |
| Ensure that the label format you use matches the printer’s operating language. | ||
| If the problem persists, check the label format. |
7.1.5 Calibration Failure
| Fault | Possible reasons | Recommended solution |
|---|---|---|
| The print alignment mark on the label is missing, and the vertical offset of the alignment mark at the top of the form is too large. | The printing roller is too dirty | Clean the printing roller |
| The dielectric guide plate is not in the correct position. | Ensure correct positioning of the media guide plate | |
| Incorrect media type setting | Configure the printer to work with the correct media type (slit/cut, continuous, or marking). | |
| The wrong sensor was used for the media type. | Manually select and use the correct sensor | |
| Automatic calibration failed | Incorrect loading of media or ribbon | Ensure that the media and ribbon are loaded correctly. |
| The sensor did not detect the medium or color band. | Manually calibrate the printer | |
| The sensor is too dirty or the medium is not positioned correctly, so the sensor cannot detect anything. | Ensure the sensor is clean and the medium is in the correct position. |
7.1.6 Ribbon Failure
| Fault | Possible reasons | Recommended solution |
|---|---|---|
| The printer did not detect that the ribbon was used up. | The printer was calibrated without a ribbon, and then the ribbon was inserted without performing a user recalibration or loading the printer’s default settings. | Now calibrate the printer using the ribbon, or load the printer defaults. |
| If the RIBBON parameter is set to YES, the printer will remain in thermal mode (this mode is displayed on the printer configuration label) even if the ribbon is correctly loaded into the printer. | ||
| ribbon damaged or melted | The depth setting is too high. | ① Reduce the depth setting; ② Thoroughly clean the printhead. |
| Even if the ribbon is correctly loaded, the printer still displays “ribbon exhausted”. | No calibration was performed for the labels and ribbons to be used. | Perform calibration of media and ribbon sensors |
7.1.7 Other printer malfunctions
| Fault | Possible reasons | Recommended solution |
|---|---|---|
| The LCD screen displayed an unreadable language. | Change language parameters via control panel or firmware commands | Change language parameters |
| LCD screen characters or partial characters are missing | The LCD screen may need to be replaced. | Call a Minyong service engineer to replace the LCD screen. |
| The changed parameter settings did not take effect. | Incorrect parameter settings | ① Set the parameters and save them permanently; ② Turn off the printer power and then turn it back on. |
| Firmware commands have disabled the ability to change parameters. | Call Minyong Service Engineer | |
| The firmware command has changed the parameter back to the previous setting. | Call Minyong Service Engineer | |
| If the problem persists, the main logic circuit board may be faulty. | Call Minyong Service Engineer | |
| Even when the switch is switched to “Peel Function Off”, the printer remains in “Peel Mode”. | If the printer is powered on with the peeling assembly open, the printer will not recognize the label pickup sensor and will not be able to operate in “peel” mode until the sensor is recognized. | ① Close the peel assembly; ② Ensure no labels protrude from the cutter/peel bar; ③ Use the control panel to set the printer to “Peel Function Off” mode and save the changes; ④ Turn off the printer power and then turn it back on. |
| The printer cannot calibrate or detect the top of the label. | No printer was calibrated for the label to be used. | Perform calibration of media and ribbon sensors |
| Configure the printer to use continuous media. | Set the media type to discontinuous media. | |
| Incorrect driver or software configuration settings. | Commands issued by the driver or software settings can override printer configuration; check the relevant settings of the driver or software media. | |
| Treat non-continuous tags as continuous tags | No printer was calibrated for the media to be used. | Perform calibration of media and ribbon sensors |
| All indicator lights are on, but the LCD screen is blank, and the printer is stuck. | Internal electrical component or firmware failure | Call Minyong Service Engineer |
| The printer freezes during the power-on self-test. | Main logic board failure | Call Minyong Service Engineer |
7.2 Printer Diagnostics
Self-tests and other diagnostic methods provide specific information about the printer’s status. Self-tests can provide sample printouts and offer specific information to help determine the printer’s operating condition. The most commonly used are the “Power-On” self-test and the “CANCEL” self-test.
Important Note: Use full-width media when performing self-tests. If your media is not wide enough, the test label will print on the print roller.
With the printer powered on, press the specific control panel button or button combination to activate each self-test. Press and hold the button until the first indicator light goes out. The selected self-test will automatically start after the “Power-On” self-test is complete.
Note: ① Do not send data from the host to the printer while these self-tests are performing; ② If the media is shorter than the label to be printed, the test will continue printing on the next label; ③ If you cancel a self-test before it is actually completed, you can reset the printer by turning off the power and then turning it back on.
7.2.1 Power-On Self-Test
A power-on self-test will be performed each time the printer is powered on. During this self-test, the control panel indicator lights will turn on and off to ensure correct operation. At the end of the self-test, only the power indicator light will be on. When the power-on self-test is complete, the media will be fed into the correct position.
7.2.2
CANCEL Self-Test
To perform the “CANCEL self-test,” complete the following steps:
① Turn off the printer power.
② With the printer power on, press and hold the CANCEL button until the first control panel light goes out. A printer configuration label will be printed, as shown below.
7.2.3 PAUSE Self-Test
This self-test can be used to provide a necessary checklist when adjusting the printer’s mechanical components or determining whether the printhead components are working properly.
To perform the PAUSE self-test, complete the following steps:
① Turn off the printer power
. ② With the printer power on, press and hold the PAUSE button until the first control panel light goes out.
● During the initial self-test, the printer prints 15 labels at its lowest speed, then automatically pauses. Each press of the PAUSE button will print an additional 15 labels.
● While the printer is paused, pressing CANCEL will change the self-test; each press of PAUSE will print 15 labels at 152 mm/s.
● While the printer is paused, pressing CANCEL again will change the self-test; each press of PAUSE will print 50 labels at the lowest speed.
● While the printer is paused, pressing CANCEL again will change the self-test a third time; each press of PAUSE will print 50 labels at 152 mm/s.
● While the printer is paused, pressing CANCEL again will change the self-test a fourth time; each press of PAUSE will print 15 labels at the highest speed.
● Holding down CANCEL will exit the self-test at any time.
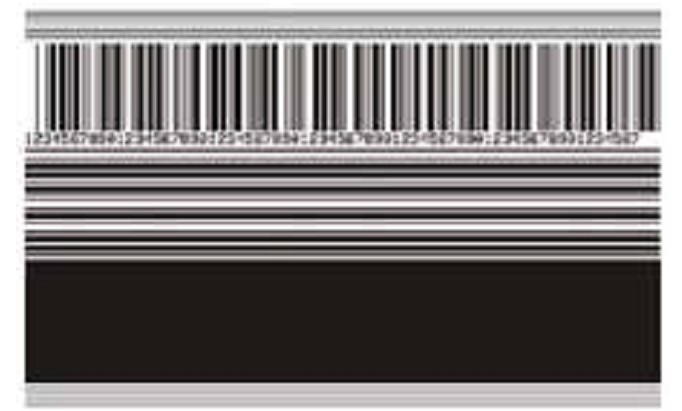
7.2.4 FEED Self-Test
Different types of media may require different depth settings. During the FEED self-test, labels are printed at two different printing speeds with different depth settings. Each label will be printed at a relative depth and printing speed. ANSI grading can be performed on the barcodes on these labels to check print quality.
The depth value starts below the printer’s current depth value (relative depth 3) and increases to a depth three depth settings above the current depth value (relative depth + 3).
To perform a FEED self-test, complete the following steps:
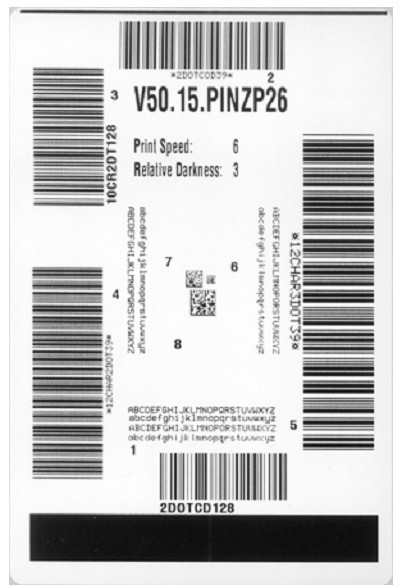
① Print a configuration label to display the printer’s current configuration.
② Turn off the printer power.
③ With the printer power on, press and hold the FEED button until the first control panel light goes out. The printer will print a series of labels at different speeds and depths above and below the depth value shown in the configuration label.
④ Check the test labels using the diagram below to determine which label has the best print quality for your application. If you have a barcode detector , you can use it to measure the barcode/blank and calculate the print contrast. If you do not have a barcode detector, you can use a visual method or a system scanner to select the optimal depth setting based on the labels printed in this self-test.
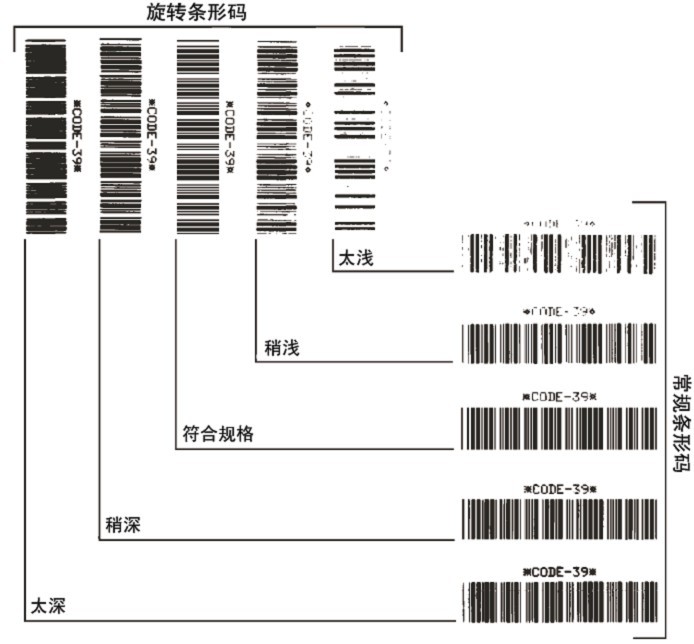
■ Too Dark: The label is too dark and obvious. It is readable but does not conform to specifications. This manifests as an enlarged size of the regular barcode, with ink filling the spaces for small alphanumeric characters. Rotating the barcode results in crowded spaces.
■ Slightly Dark: The label is slightly darker and not very noticeable. This is a standard barcode with slightly thickened small alphanumeric characters, appearing somewhat crowded. Rotating barcodes have less space compared to standard barcodes, potentially making the code unreadable.
■ Conforms to Specifications: This type of barcode can only be verified using a barcode detector, but it still has some visual characteristics. Regular barcodes have complete, balanced bars and clear, distinct gaps; rotating barcodes also have complete, balanced bars and clear, distinct gaps. While not as visually appealing as slightly darker barcodes, these barcodes conform to specifications. In both regular and rotating styles, small alphanumeric characters appear more complete.
■ Slightly Lighter: In some cases, for “conforms to specifications” barcodes, slightly lighter labels are more effective than darker ones. The results show that both regular and rotating barcodes conform to specifications, but small alphanumeric characters may be incomplete.
■ Too light: The label color is too light and not clearly visible. This manifests as incomplete regular and rotating barcodes, and small alphanumeric characters are unreadable.
⑤ Pay attention to the relative depth value and printing speed on the label that produces the best results.
⑥ The relative depth value can be added to or subtracted from the depth value specified on the configuration label; the resulting numerical value is the optimal depth value for a specific label/ribbon combination and printing speed.
⑦ If necessary, the depth value should be changed to the depth value on the label that produces the best results.
⑧ The printing speed should be changed to the same speed as the label that produces the best results, as needed.
7.2.5 FEED and PAUSE Self-Test
Performing this self-test can temporarily reset the printer to factory defaults. Unless these values are retained in memory, they will only take effect after the power is turned off. If the factory defaults are permanently retained, a media calibration procedure must be performed.
To perform the FEED and PAUSE self-test, complete the following steps:
① Turn off the printer power.
② With the printer power on, press and hold the FEED (Paper Feed) and PAUSE (Pause) buttons.
③ Press and hold the FEED and PAUSE buttons until the first control panel light goes out. The printer configuration is temporarily reset to factory defaults, and no labels are printed when the test is complete.
7.2.6 Sensor Charts
Use sensor chart labels to diagnose the following fault types:
● If the media sensor malfunctions, the gap (mesh) between two labels cannot be determined.
● If the media sensor cannot correctly identify the pre-printed area on the label as a gap (mesh).
● If the ribbon sensor cannot detect the ribbon.
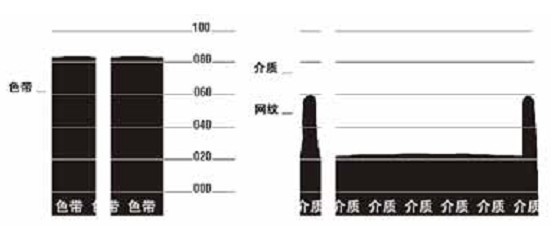
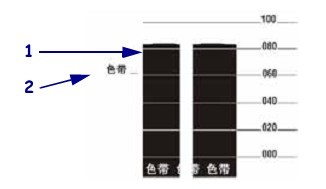
① Ribbon Sensor Chart
The bars (1) on the sensor chart indicate the ribbon sensor reading. The ribbon sensor threshold is indicated by the word RIBBON (ribbon) (2). If the ribbon reading is below the threshold, the printer cannot confirm that the ribbon is loaded.
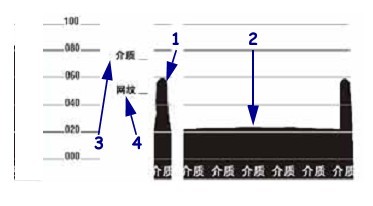
② Media Sensor Chart
The media sensor reading is displayed as bars and horizontal areas on the sensor chart. The bars (1) represent the gaps in the middle of the label (mesh), and the area below (2) indicates the location of the label. If the sensor chart is printed and compared with the blank length of the media, the gaps on the media should be the same distance between the two bars. If the distances are different, the printer may not be able to determine the gap location.
The media sensor threshold setting is indicated by MEDIA (3) for the media threshold and WEB (4) for the mesh threshold. The digital reading is compared with the sensor setting using the number to the left of the sensor reading.
8. Zebra S4M Barcode Printer Specifications
8.1 Media Specifications
| Tag length | Minimum value (paper cutting) | 0.7 inches | 17.8mm |
| Minimum value (stripping) | 0.5 inches | 12.7mm | |
| Maximum value | 39 inches | 991mm | |
| Tag width | Minimum value | 0.75 inches | 19mm |
| Maximum value | 4.5 inches | 114mm | |
| Total thickness (including backing) | Minimum value | 0.003 inches | 0.076mm |
| Maximum value | 0.01 inches | 0.25mm | |
| Maximum outer diameter of the dielectric roll | 76mm dielectric core | 8 inches | 203mm |
| 25mm dielectric core | 6 inches | 152mm | |
| Label internal gap | Minimum value | 0.079 inches | 2mm |
| Recommended value | 0.118 inches | 3mm | |
| Maximum value | 0.157 inches | 4mm | |
| Notch size for tickets/labels (width × length) | 0.25 inches × 0.12 inches | 6mm×3mm | |
| aperture | 0.125 inches | 3mm | |
| Location of the cut or notch (distance from the center to the inner edge of the medium) | Minimum value | 0.15 inches | 3.8mm |
| Maximum value | 2.25 inches | 57mm | |
| Density expressed in optical density units (marked in black) | >1.0 ODU | ||
| Maximum dielectric density | ≤0.5 ODU | ||
| Transmission sensor | Fixed display | The distance to the inner edge is 11mm (7/16 inches). |
8.2 Ribbon Specifications
| Ribbon width (It is recommended that the ribbon width be at least the same as the media width to protect the print head from wear). | Minimum value | 2 inches | 51mm |
| Maximum value | 4.3 inches | 109mm | |
| Standard length | The ratio of medium to ribbon shaft is 2:1 | 984 inches | 300 meters |
| The ratio of medium to ribbon shaft is 3:1 | 1476 inches | 450 meters | |
| inner diameter of ribbon core | 1 inch | 25.4mm |