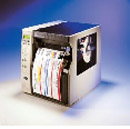
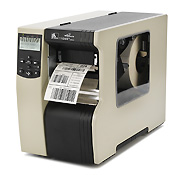
The Zebra 140Xi III barcode label printer boasts a print speed of up to 12 feet per second, making it the fastest in the Zebra Xi III series.
Its powerful features and reliable performance make it ideal for industrial applications requiring continuous 24-hour workloads.
Zebra 140xiiiii Product Specifications
Zebra 140xiiii Printer Specifications Printing Method: Thermal Transfer/Thermal Printing Print Resolution: 203 dpi (8 dots/mm) Maximum Print Width: 128 mm Maximum Print Length: 991 mm Print Speed: 305 mm/sec
Zebra 140XII physical properties Dimensions: 283.2 mm (W) × 495 mm (L) × 393.7 mm (H) Net Weight: 25 kg
Zebra 140xiiii Features Standard Memory: 16 MB SDRAM; 4 MB non-volatile Flash memory 32-bit RISC microprocessor Zebra’s E3 print element control technology Pass-through sensor for automatic paper feeding Certifications: Bi-National UL 60950 3rd edition/CSA CAN/CSA-C22.2 No. 60950-00 Third Edition; IEC 950/EN60950: 1992 W/amendments 1 thru 4 (CB Scheme); EN55022: 1998 Class B; EN55024: 1998; EN61000-3-2,3 W/amendment A12; Canadian ICES-003, Class B; FCC Class B; Argentina 92/98 Phase 3; Australia AS/NZS 3548; ROC CNS 13438 Software: ZPL II. Programming Languages
Zebra 140xiiii Barcodes One-dimensional barcodes: Code 11, UPC-A, UPC-E, Industrial 2 of 5, Code 39, EAN-8, EAN-13, LOGMARS, Code 93, Plessey, Postnet, Code 128 with subsets A/B/C and UCC Case Codes, Interleaved 2 of 5, EAN and UPC with 2 or 5 digits supplements, Codabar, Standard 2 of 5, MSI, ISBT 128, Planet Code, LOGMARS, Industrial 2 of 5, RSS Two-dimensional barcodes: CODABLOCK, PDF417, Code 49, Maxi Code, Data Matrix, QR Code, TLC39 (with x.11), Codablock
Zebra 140XII Other Parameters Electrical Parameters: Built-in automatic power supply 90V-264VAC 48-62Hz ; Communication Interface: RS232/422/485 interface and standard parallel port; IEEE1284 bidirectional parallel port, quasi-parallel port, etc. Label: Width: 40 mm – 143 mm Maximum Diameter: Outer diameter 203 mm, Inner diameter 76 mm ; Thickness: 0.076-0.305 mm ; Carbon Ribbon: Standard Length: 300m, 450m, 2:1 or 3:1 label rolls available Width: 40mm – 130mm ; Reel Inner Diameter: 25.4mm; Maximum Reel Diameter: 81.3mm
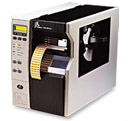
The Zebra 110XiIII Plus is designed for harsh industrial environments with dust, pollution, and high temperatures.
Its superior performance and all-metal casing ensure continuous 24/7 operation, making it particularly suitable for high-volume barcode label printing.
ZebraLink proactive notifications allow you to easily monitor printer status and make timely adjustments, regardless of your location.
Three different resolution barcode printers— the Zebra 112XiIII , Zebra 113XiIII , and Zebra 116XiIII— are available to meet your diverse industrial barcode printing needs.
The Zebra 110xiiii PLUS barcode printer is a professionally designed high-end industrial barcode printer. Even for your most demanding applications, you can trust the Zebra 110XiIII to handle your needs. It features up to 4MB of DRAM, allowing for fast flash storage of large amounts of label formats, graphics, and fonts. These printers can withstand continuous 24/7 operation and the harsh conditions of heavy industrial production environments with dust, pollution, and high temperatures. They are compatible with various label media and suitable for printing specialized barcode labels across various industries. Mature technology and professional maintenance provide optimal after-sales service.
Zebra 110xiiii Detailed Specifications Print Resolution: 203 DPI: Zebra 112xiiii Plus; 300 DPI: Zebra 113xiiii Plus; 600 DPI: Zebra 116xiiii Plus Print Speed: 203 dpi: 2.4″ – 10″/sec (61 – 254 mm/sec) 300 dpi: 2.4″ – 8″/sec (61 – 203 mm/sec) 600 dpi: 1.5″ – 4″/sec (38 – 102 mm/sec) Print Width: 203 dpi: 4.09″ (104 mm) 300 dpi: 4.09″ (104 mm) 600 dpi: 3.2″ (81 mm) Paper Width: 203 dpi: 4.09″ (104 mm) 300 dpi: 4.09″ (104 mm) 600 dpi: 3.2″ (81 mm) Print Length: 508mm Printing Method: Thermal Transfer/Thermal Paper Detection Method: Automatic Paper Detection Control Technology: Zebra’s E3 Print Element Control Technology Driver: Printing driver based on Windows 3.X 95/98/NT/2000 Programming Language: ZPL, ZPLⅡ programming languages Label Width: 20.07mm-90mm Maximum Label Diameter: 203mm Paper Reel Diameter: 76mm Label Gap: 2mm-4mm Label Thickness: 0.076-0.3mm Minimum Label Length: 508mm Maximum Ribbon Length/Roll: 450m Ribbon Width: 20-87mm Ribbon Reel Inner Diameter: 25mm Maximum Ribbon Reel Diameter: 81mm Processor: 32-bit RISC and CISC processors Memory: 16MB RAM, 4 flash memory modules Interfaces: RS232/USB2.0 interface and standard parallel port Dimensions (H*W*D): 393*232*495 mm Weight/Structure: Metal structure, 22.7kg
Physical Properties Dimensions: Width 232.4 mm × Length 495 mm × Height 393.7 mm Net Weight: 22.7 kg
Product Features Standard Memory: 16 MB SDRAM; 4 MB non-volatile Flash memory; 32-bit RISC microprocessor; Zebra’s E3 print element control technology Pass-through sensor for automatic paper feeding Certifications: Bi-National UL 60950 3rd edition/CSA CAN/CSA-C22.2No. 60950-00 Third Edition; IEC 950/EN60950: 1992W/amendments 1 thru 4 (CB Scheme); EN55022: 1998 Class B; EN55024: 1998; EN61000-3-2,3 W/amendment A12; Canadian ICES-003, Class B; FCC Class B; Argentina 92/98 Phase 3; Australia AS/NZS 3548; ROCCNS13438 Software: ZPL II programming language
Barcodes One-dimensional barcodes: Code 11, UPC-A, UPC-E, Industrial 2 of 5, Code 39, EAN-8, EAN-13, LOGMARS, Code 93, Plessey, Postnet, Code 128 with subsets A/B/C and UCC Case Codes, Interleaved 2 of 5, EAN and UPC with 2 or 5 digits supplements, Codabar, Standard 2 of 5, MSI, ISBT 128, Planet Code, RSS Two-dimensional barcodes: CODABLOCK, PDF417, Code 49, Maxi Code, Data Matrix, QR Code, TLC39 (with x.11), Codablock
Other Parameters Electrical Parameters: Built-in automatic power supply 90V-265V 48-62Hz ; Communication Interface: RS232/422/485 interface and standard parallel port; IEEE1284 bidirectional parallel port, quasi-parallel port, etc. Label: Width: 20 mm – 91 mm Maximum Diameter: Outer diameter 203 mm, Inner diameter 76 mm ; Thickness: 0.076-0.305 mm ; Carbon Ribbon: Standard Length: 300m, 450m, 2:1 or 3:1 label rolls available Width: 20mm – 90mm; Reel Inner Diameter: 25.4mm; Reel Maximum Diameter: 81.3mm
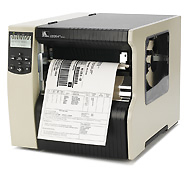
The Zebra 220Xi4 printer is an ideal choice for many customers due to its robust durability, excellent print quality, fast printing speed, long lifespan, and unparalleled reliability in harsh environments.
Built upon traditional features, the 220Xi4 is designed to help users effectively improve operational efficiency – select models can offer up to 40% faster print speeds, significantly improved 10/100 Ethernet connectivity, a more robust pre-notification system to reduce downtime, and a variety of network connectivity options for easier integration, while the ZebraLink solution provides remote printer management capabilities.
The all-metal Zebra 220Xi4 barcode printer boasts exceptional durability and performance, significantly reducing downtime. 1. The Zebra 220Xi4 printer easily meets the needs of high-volume production lines: ● With a print speed of 10 inches/254 mm per second, the 220Xi4 features one of the fastest technologies on the market, effectively improving the efficiency of batch printing and print-to-use production lines. ● High-speed processing power and throughput contribute to increased efficiency. ● Ample memory allows for the storage of more label formats, fonts, and images. ● The durable metal printhead provides excellent print quality even after prolonged use, effectively reducing or avoiding downtime due to printhead replacements. 2. For mission-critical and 24/7 operations, every second of downtime translates to lost money. The Zebra 220Xi4 printer is the best way to maximize uptime. ● The proven Xi platform ensures uninterrupted 24/7 operation . ● A pre-warning system that alerts users when printhead maintenance or ribbon/media replacement is needed, coupled with remote printer management/monitoring capabilities, allows for rapid identification and resolution of printer problems. 3. The Zebra 220Xi4 printer, meeting industrial strength standards, can withstand the most demanding working environments. ● Durability: The high-diameter steel frame and metal internal components effectively withstand impacts. ● Enclosed design prevents dust from entering. ● Trouble-free operation across a wide range of temperatures and humidity levels. 4. The Zebra 220Xi4 flexibly meets the needs of professional label printing.
Zebra 220Xi4 Detailed Specifications
Standard ● Printing Method: Thermal transfer printing or thermal printing ● Resolution: 203 dpi (8 dots/mm), 300 dpi (12 dots/mm) ● Memory: 16 MB SDRAM, 8 MB Flash ● Maximum Print Width: 216 mm ● Maximum Print Speed: 203 dpi: 10 inches/second (254 mm/second); 300 dpi: 6 inches/second (152 mm/second) ● 32-bit 133 MHz RISC processor ● 8 MB Flash memory—including 2.0 MB of user-available non-volatile memory storage for downloadable content ● Built-in real-time clock ● Advanced label/media counter ● Automatic calibration—the printer automatically calibrates upon startup or when the printhead is closed after approximately two labels ● Pre-warning system—alerts are issued via the front panel and ZebraLink warnings for low label/ribbon levels or printhead cleaning ● New multi-function front panel and multilingual widescreen monochrome LCD display—with user-programmable password protection ● Transparent media side door—easily monitor consumable usage without opening the printer system ● With E3 Element Energy Control’s thin-film printheads facilitate superior print quality . Features include: a serial RS-232 port with automatic detection and a bidirectional parallel port ; and dual media sensors—emitting and reflective—selectable via software or the front panel.
Electrical Parameters ● 90-264 VAC, 48-62 Hz universal power supply with power parameter correction ● Serial RS-232 and bidirectional parallel ports with automatic detection ● USB 2.0 port
Labels and Ribbons ● Maximum Media Roll Size: Outer core diameter 8 inches/203 mm, Inner core diameter 3 inches/76 mm ● Media Thickness (Labels and Backing Paper): 0.003 inches/0.076 mm to 0.012 inches/0.305 mm ● Media Width (Labels and Backing Paper): 4.25 inches/108 mm to 8.8 inches/224 mm ● Media Length (Labels and Backing Paper): 39 inches/991 mm to 150 inches/3810 mm (using non-continuous paper) ● Media Type: Continuous paper, die-cut paper, or black label paper ● For optimal print quality and printer performance, it is recommended to use sensitive consumables. ● It is recommended that the ribbon width be at least the same as the media width. ● Maximum media roll size: Outer diameter 3.2 inches/81.3 mm, inner diameter 1 inch/25.4 mm ● Ribbon width: 4.25 inches/108 mm to 8.6 inches/220 mm ● Standard ribbon length: 1,476 inches/450 meters or 984 inches/300 meters; available in 3:1 and 2:1 media roll to ribbon ratios ● Ribbon setup: Ink side of the ribbon is wound outwards
Fonts/Graphics/Symbols ● Bit-matrix fonts A through H and GS symbols can be magnified up to 10 times, with separate scaling for height and width . ● Smooth scalable fonts (CG Triumvirate Bold Condensed) can be magnified point by point, with separate scaling for height and width. ● IBM Code Page 850 international character set. ● Includes UFST from Montotype Imaging, Inc. ● Supports user-defined fonts and graphics—including custom logos. ● Linear barcodes: Code 11, Code 39, Code 93, Code 128 (including subsets A/B/C and UCC Case C Codes), ISBT-128, UPC-A, UPC-E, EAN-8, EAN-13, UPC and EAN 2 or 5-digit extensions, Plessey, Postnet, Standard 2-of-5, Industrial 2-of-5, Interleaved 2-of-5, Logmars, MSI, Codabar, Planet Code. ● Two-dimensional barcodes: Codablock, PDF417, Code 49, DataMatrix, MaxiCode, QR Code, MicroPDF417, TLC39, GS1 DataBar (RSS), Aztec
ZebraLink Solutions ● ZebraDesigner Pro/ZebraDesigner/ZebraDesigner for XML/ZebraNet Utilities v 7.0/ZebraNet Bridge Enterprise/Zebra Enterprise Connector ● ZebraNet Internal Wireless Plus/ZebraNet Wireless Plus Print Server/ZebraNet 10/100 Print Server ● ZPL or ZPL II programming languages—selectable via software or front panel ● XML-enabled printing—direct connection integration facilitates barcode label printing; not only saving on licensing fees and printer server hardware costs, but also reducing customization and programming costs ● Unicode-compatible global printing ● ZBI2.1—allows the printer to run applications, prompt users via control panel commands, and use files stored on the printer as a data source.
Options and Accessories ● Rewinder ● Paper cutter and receiving tray ● Media folding door with transparent panel ● 3-inch/76 mm or 40 mm core media supply shaft ● Labeler interface ● 64 MB onboard linear flash memory ● Extended fonts and international fonts
The Zebra 170Xi4 printer is an ideal choice for many customers due to its robust durability, excellent print quality, fast print speed, long lifespan, and unparalleled reliability in harsh environments.
Built upon traditional features, the 170Xi4 is designed to help users effectively improve operational efficiency – select models can offer up to 40% faster print speeds, 10/100 Ethernet connectivity provides significantly faster speeds, a more robust pre-notification system helps reduce downtime, multiple network connectivity options facilitate easier integration, and the ZebraLink solution provides remote printer management capabilities.
The all-metal Zebra 170Xi4 barcode printer boasts exceptional durability and performance, significantly reducing downtime. 1. The Zebra 170Xi4 printer easily meets the needs of high-volume production lines: ● With a print speed of 12 inches/305 mm per second, the 170Xi4 features one of the fastest technologies on the market, effectively improving the efficiency of batch printing and print-to-use production lines. ● High-speed processing power and throughput contribute to increased efficiency. ● Ample memory allows for the storage of more label formats, fonts, and images. ● The durable metal printhead provides excellent print quality even after prolonged use, effectively reducing or avoiding downtime due to printhead replacements. 2. For mission-critical and 24/7 operations, every second of downtime translates to lost money. The Zebra 170Xi4 printer is the best way to maximize uptime. ● The proven Xi platform ensures uninterrupted 24/7 operation . ● A pre-warning system that alerts users when printhead maintenance or ribbon/media replacement is needed, coupled with remote printer management/monitoring capabilities, allows for rapid identification and resolution of printer problems. 3. The Zebra 170Xi4 printer, meeting industrial strength standards, can withstand the most demanding working environments. ● Durability: The high-diameter steel frame and metal internal components effectively withstand impacts. ● Enclosed design prevents dust from entering. ● Trouble-free operation across a wide range of temperatures and humidity levels. 4. The Zebra 170Xi4 flexibly meets the needs of professional label printing.
Zebra 170Xi4 Detailed Specifications
Standard ● Printing Method: Thermal transfer or thermal printing ● Resolution: 203 dpi (8 dots/mm), 300 dpi (12 dots/mm) ● Memory: 16 MB SDRAM, 8 MB Flash ● Maximum Print Width: 168 mm ● Maximum Print Speed: 12 inches/second (305 mm/second) ● 32-bit 133 MHz RISC processor ● 8 MB Flash memory—including 2.0 MB of user-available non-volatile memory for storing downloadable content ● Built-in real-time clock ● Advanced label/media counter ● Automatic calibration—the printer automatically calibrates upon startup or when the printhead is closed after approximately two labels ● Pre-warning system—alerts are given via the front panel and ZebraLink warnings for low label/ribbon levels or printhead cleaning ● New multi-function front panel and multilingual widescreen monochrome LCD display—with user-programmable password protection ● Transparent media side door—easily monitor consumable usage without opening the printer system ● With E3 Element Energy Control The thin-film printhead facilitates superior print quality . It features a serial RS-232 port with automatic detection and a bidirectional parallel port . It also includes dual media sensors—emitting and reflective—selectable via software or the front panel.
Electrical Parameters ● 90-264 VAC, 48-62 Hz universal power supply with power parameter correction ● Serial RS-232 and bidirectional parallel ports with automatic detection ● USB 2.0 port
Labels and Ribbons ● Maximum Media Roll Size: Outer core diameter 8 inches/203 mm, inner core diameter 3 inches/76 mm ● Media Thickness (Labels and Backing Paper): 0.003 inches/0.076 mm to 0.012 inches/0.305 mm ● Media Width (Labels and Backing Paper): 2 inches/51 mm to 7.1 inches/180 mm ● Media Length (Labels and Backing Paper): 39 inches/991 mm to 150 inches/3810 mm (using non-continuous paper) ● Media Type: Continuous paper, die-cut paper, or black label paper ● For optimal print quality and printer performance, it is recommended to use sensitive consumables. ● It is recommended that the ribbon width be at least the same as the media width. ● Maximum media roll size: Outer diameter 3.2 inches/81.3 mm, inner diameter 1 inch/25.4 mm ● Ribbon width: 2 inches/51 mm to 6.7 inches/170 mm ● Standard ribbon length: 1,476 inches/450 meters or 984 inches/300 meters; available in 3:1 and 2:1 media roll to ribbon ratios ● Ribbon setup: Ink side of the ribbon is wound outwards
Fonts/Graphics/Symbols ● Bit-matrix fonts A through H and GS symbols can be magnified up to 10 times, with separate scaling for height and width . ● Smooth scalable fonts (CG Triumvirate Bold Condensed) can be magnified point by point, with separate scaling for height and width. ● IBM Code Page 850 international character set. ● Includes UFST from Montotype Imaging, Inc. ● Supports user-defined fonts and graphics—including custom logos. ● Linear barcodes: Code 11, Code 39, Code 93, Code 128 (including subsets A/B/C and UCC Case C Codes), ISBT-128, UPC-A, UPC-E, EAN-8, EAN-13, UPC and EAN 2 or 5-digit extensions, Plessey, Postnet, Standard 2-of-5, Industrial 2-of-5, Interleaved 2-of-5, Logmars, MSI, Codabar, Planet Code. ● Two-dimensional barcodes: Codablock, PDF417, Code 49, DataMatrix, MaxiCode, QR Code, MicroPDF417, TLC39, GS1 DataBar (RSS), Aztec
ZebraLink Solutions ● ZebraDesigner Pro/ZebraDesigner/ZebraDesigner for XML/ZebraNet Utilities v 7.0/ZebraNet Bridge Enterprise/Zebra Enterprise Connector ● ZebraNet Internal Wireless Plus/ZebraNet Wireless Plus Print Server/ZebraNet 10/100 Print Server ● ZPL or ZPL II programming languages—selectable via software or front panel ● XML-enabled printing—direct connection integration facilitates barcode label printing; not only saving on licensing fees and printer server hardware costs, but also reducing customization and programming costs ● Unicode-compatible global printing ● ZBI2.1—allows the printer to run applications, prompt users via control panel commands, and use files stored on the printer as a data source.
Options and Accessories ● Rewinder ● Paper cutter and receiving tray ● Media folding door with transparent panel ● 3-inch/76 mm or 40 mm core media supply shaft ● Labeler interface ● 64 MB onboard linear flash memory ● Extended fonts and international fonts
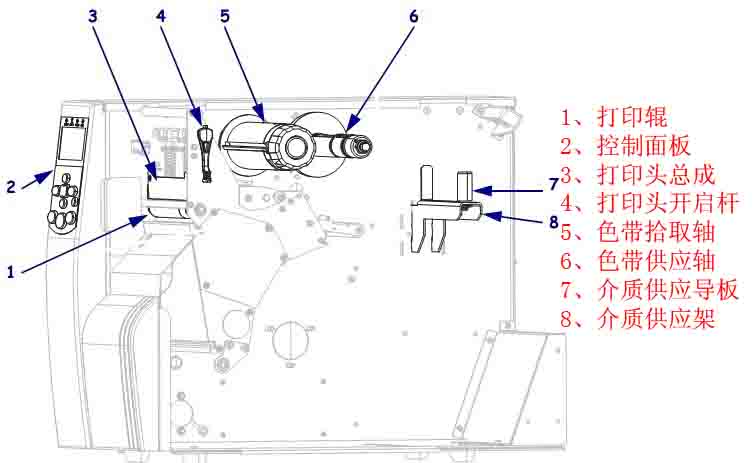
1. Introduction to the Components of the Zebra 170Xi4 Barcode Printer 1.1 Print Roller/Control Panel/Print Head Assembly/Print Head Opening Lever/Ribbon Pickup Shaft/Ribbon Supply Shaft/Media Supply Guide/Media Supply Holder
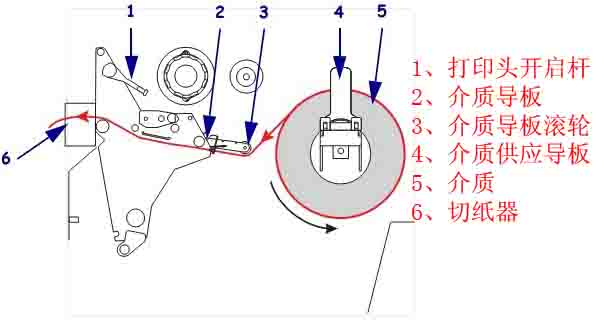
1.4 Structural Description in Cutter Mode Print Head Opening Lever/Media Guide/Media Guide Roller/Media Supply Guide/Media/Cutter
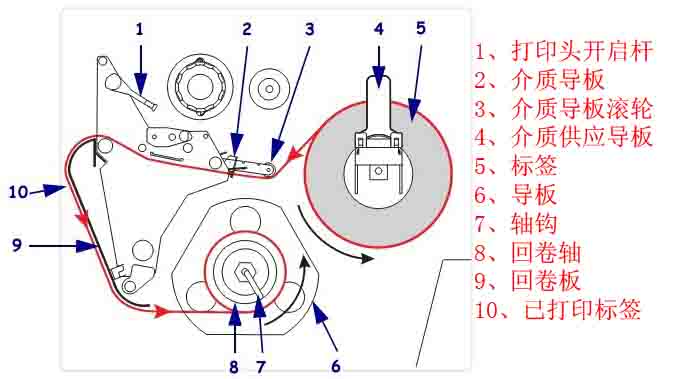
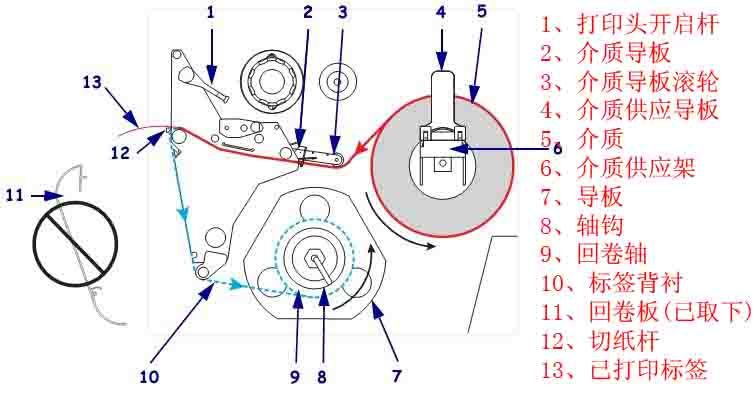
1.5 Structural Description in Rewind Mode: Printhead Opening Rod / Media Guide Plate / Media Guide Plate Roller / Media Supply Guide Plate / Label / Guide Plate / Shaft Hook / Rewind Shaft / Rewind Plate / Printed Label
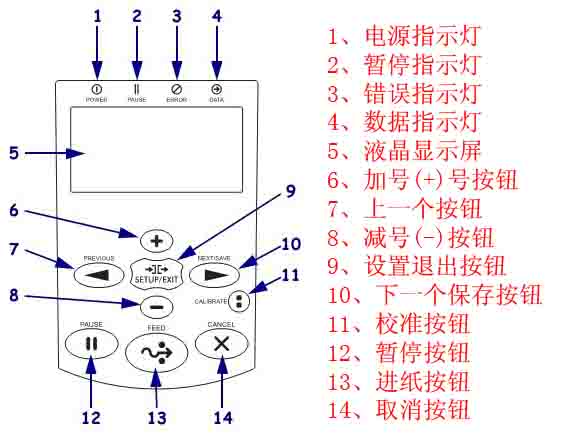
2. Zebra 170Xi4 Barcode Printer Control Panel Button and Indicator Description 2.1 Control Panel Button Description ■ FEED (Feed): Function: Each press forces the printer to feed a blank label. ① If the printer is not printing, immediately feed a blank label; ② If printing is in progress, feed a blank label after completing the current batch of labels. ■ PAUSE (Pause): Function: Starts or stops printer operation, or deletes error messages and clears the LCD screen. ① If the printer is idle, it will immediately enter “Pause” mode; ② If the printer is printing, the labels will be completed before the printer pauses. ■ CANCEL (Cancel): Function: Cancels print jobs when the printer is paused. ① If the printer is not printing, it will not print the next stored label format; ② If printing is in progress, print all labels for the day and cancel the next label format. Pressing and holding for a few seconds cancels all print jobs in memory. ■ SETUP/EXIT (Setup/Exit): Function: Enters and exits configuration mode. ■ PREVIOUS (Previous): Function: In setup mode, scrolls the LCD screen to the previous parameter. Pressing and holding this button scrolls quickly. ■ Plus sign (+): Function: Changes parameter value, usually used to increase the value, answer “Yes”, scroll between options, or change the input value when entering the printer password. ■ Minus sign (-): Function: Changes parameter value, usually used to decrease the value, answer “No”, scroll between options, or change the cursor position when entering the printer password. ■ NEXT/SAVE: Function: ① In setting mode, scrolls the LCD screen to the next parameter; pressing and holding this button allows for rapid scrolling; ② When exiting setting mode, all changes made in the configuration and calibration sequence will be preserved. ■ CALIBRATE (Calibration), Function: Calibrates the printer for the following items: ① Media length; ② Media type (continuous or intermittent); ③ Printing method (thermal or thermal transfer); ④ Sensor value. 2.2 Control Panel Indicator Light Descriptions ■ POWER (Power), Off: Printer is off or not powered; On: Printer power is on. ■ PAUSE (Pause), Off: Printer is working normally; On: Printer has stopped all printing operations; Flashing: The “Pause” indicator flashes when initializing the “Flash” memory or when a label is in “Peel Mode”. ■ ERROR (Error), Off: Printer is working normally; On: Errors preventing printing, including MEDIA OUT and RIBBON OUT errors; Flashing: Errors exist, but printing can still continue, including RIBBON IN (ribbon in), HEAD UNDER TEMP (printhead temperature too low) warning, and HEAD OVER TEMP (printhead temperature too high) error . ■ DATA: Off: Printer is working normally and is not receiving or processing data; Flash once: The CANCEL button was pressed and the formatting was successfully canceled; Slow flashing: Printer cannot accept more data from the host; Rapid flashing: Printer is receiving data; On: Partial formatting has been received, and there is no further data activity.
3. Zebra 170Xi4 Barcode Printer Data Communication Interface Selection Users can send label formats to the printer through any available data communication interface. All necessary data cables must be provided for the specific situation. Ethernet does not require shielding, but other data cables must be fully shielded and equipped with metal or metallized connector housings. Using unshielded cables will result in electromagnetic radiation levels exceeding regulatory limits. To minimize electrical noise pickup levels in the cables: ● Use the shortest possible data cables ● Do not tightly bundle data cables and power cords ● Do not tie data cables to power cord conduits Data Communication Interface Characteristics: ● RS232 Serial Port (Standard): ① Maximum cable length 15.24 meters; ② Printer parameters need to be changed to match the host computer; ③ If using a standard modem cable, a blank modem needs to be connected to the printer. ● IEEE1284 Bidirectional Parallel Port (Standard): ① Maximum cable length 3 meters; ② Recommended cable length 1.83 meters; ③ No printer parameter changes are required for compatibility with the host computer. ● USB (Standard): Features: ① Maximum cable length 5 meters; ② Compatible with host computer without requiring changes to printer parameters. ● Internal Ethernet Print Server (Standard): Features: ① Prints from any computer on the user’s LAN to the printer; ② Communicates with the printer via its web interface in ZPL mode; ③ The computer must have an Ethernet card; ④ The printer must be configured to use the LAN. ● Wireless Ethernet Print Server (Optional): Features: ① Prints from any computer on a wireless LAN (WLAN) to the printer; ② Communicates with the printer via its web interface in ZPL mode; ③ The printer must be configured to use the WLAN. Note: Before connecting the data communication cable, ensure the printer is powered off (O). Connecting the data communication cable while the power switch is on (I) may damage the printer.
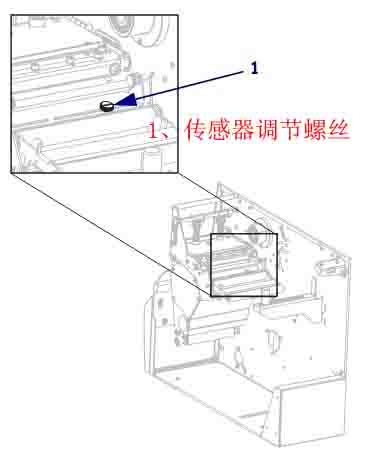
4. Zebra 170Xi4 Printer Calibration and Printhead Pressure Adjustment 4.1 Printer Calibration The printer should be calibrated when first used. The calibration process allows the printer to determine the correct settings for the specific media and ribbon used in your application. The printer can be calibrated as needed. 4.1.1 Automatic Calibration The printer automatically sets the distance values detected between labels. When the control panel for MEDIA POWER UP or HEAD CLOSE is set to CALIBRATION, the printer will automatically perform calibration when the printhead is powered on or off. During automatic calibration, the printer determines the label length and sensor settings. The results of automatic calibration are stored in the printer’s memory and are not lost even when the printer is powered off. These parameters remain valid until the next calibration. 4.1.2 Manual Calibration Performing media and ribbon sensor calibration resets the sensor sensitivity for more accurate media and ribbon detection. If you have changed the ribbon or media type, performing this calibration process will allow your printer to work better. The sensitivity of the media and ribbon sensors can be adjusted using the following steps: ① Press the SETUP/EXIT button on the control panel. ② Press the NEXT/SAVE button and select the “Media and Ribbon Calibration” parameter. ③ Press the plus sign (+) to start the calibration process. The LOAD BACKING prompt will appear. ④ Open the printhead . ⑤ Peel approximately 203 mm of the label off the backing paper and feed the media into the printer, ensuring only the backing paper is between the media sensors. ⑥ Keep the printhead open. ⑦ Press the plus sign (+) to continue; the REMOVE RIBBON prompt will appear. ⑧ If a ribbon is used, it should be removed. ⑨ Close the printhead. ⑩ Press the plus sign (+) to continue; the CALIBRATING PLEASE WAIT message will appear. The printer adjusts the signal gain received from the media and ribbon sensors based on the specific combination of media and ribbon used. On the sensor graph, this corresponds to the graphical peak that moves up and down to better read your printing application. After calibration, RELOAD ALL will be displayed. ⑾ Open the printhead and push the media forward so that the label is below the media sensor. ⑿ Reload the ribbon (if used). ⑬ Close the printhead . ⑭ Press the plus sign (+) to continue. The printer performs automatic calibration. During this process, the printer checks the media and ribbon readings against the newly established scale to determine the ribbon length and printing mode. To view the readings on the new scale, print a sensor calibration diagram. 4.2 Adjusting the Transmissive Media Sensor The transmissive media sensor assembly consists of two parts: a light source and a photosensitive element. The bottom media sensor is the light source, and the top media sensor is the photosensitive element. The media passes between the two parts. These sensors only need to be adjusted when the printer cannot detect the top of the label. In this case, even if there is a label in the printer, the control panel LCD screen will still display ERROR CONDITION PAPER OUT. For intermittent media with punches or notches, the sensor must be positioned directly above the punches or notches. 4.2.1 Top Medium Sensor To reposition the top medium sensor along the inside of the medium, perform the following steps: ① If a ribbon was used, remove it. ② Locate the top medium sensor adjusting screw; the sensor head of the top medium sensor is located directly below the adjusting nut.
③ Use a flathead screwdriver to loosen the top medium sensor adjusting screw. ④ Slide the top medium sensor along the slot to the desired position. ⑤ Tighten the adjusting screw to secure the top medium sensor in its new position. ⑥ Adjust the bottom medium sensor position according to the new position of the top medium sensor. 4.2.1 Bottom Medium Sensor After adjusting the position of the top medium sensor, the bottom medium sensor should be adjusted accordingly to match its new position. To adjust the bottom medium sensor, complete the following steps: ① Under the rear roller, locate the bottom medium sensor assembly; the sensor is a circuit board secured by a spring clip.
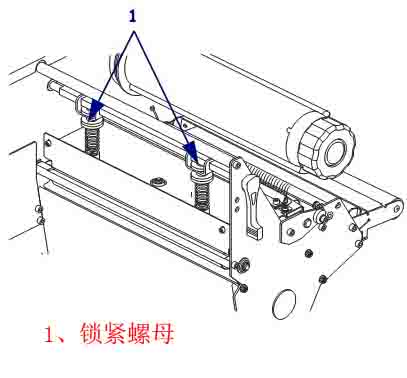
② Slide the bottom medium sensor until it is below the top medium sensor. Use the light emitted by the bottom sensor to help align the top sensor; the wire can be gently pulled out as needed (the wire should be slightly slack). 4.3 Adjusting Printhead Pressure and Clamp Position Print quality depends on the labels and ribbons used, as well as the pressure and position of the printhead clamps. Ensure the labels and ribbons are suitable for your application; if so, check the clamp position and printhead pressure. 4.3.1 Clamp Position Adjustment If one side of the printed content is lighter in color, or if the labels are thicker, the clamp position may need adjustment. If the clamp pressure is too low or uneven, the labels and ribbons may slip. To adjust the clamp position, perform the following steps: ① Loosen the locking nut on top of the clamp assembly.
② Slide the clamps until they apply even pressure to the media. For very narrow media, place one clamp in the center of the label and reduce the pressure of the other unused clamp. ③ Tighten the locking nut . 4.3.2 Printhead Pressure Adjustment If the print quality problem persists after correctly adjusting the clamps, try adjusting the printhead pressure. Use the lowest printhead pressure that provides the desired print quality; this will extend printhead life. To adjust the printhead pressure, follow these steps: ① Pause the self-test and print labels at a speed of 61 mm/s. ② During label printing, use the control keys on the control panel to decrease the print depth setting until the label prints gray instead of black. ③ Loosen the top embossed nut on the clamping assembly. ④ Some media types require higher pressure to achieve the desired printing effect. For some media types, use the bottom embossed nut to increase or decrease the pressure until the color depth is the same on the left and right edges of the printing area. ⑤ Use the control panel to increase the color depth to the desired level . ⑥ Tighten the top embossed nut.
5. Zebra 170Xi4 Barcode Printer Configuration 5.1 Entering, Using, and Exiting Setup Mode 5.1.1 Entering Setup Mode Use the LCD screen on the control panel to view and adjust printer settings in setup mode. When changing parameters, an asterisk (*) displayed in the upper left corner of the screen indicates that the value is different from the value used in the printer that day. Press the SETUP/EXIT key to enter or exit setup mode. Press the NEXT/SAVE key to continue processing the next parameter. Press the PREVIOUS key to return to the previous parameter in the loop. 5.1.2 Exiting Setup Mode When exiting setup mode, there are several options to save, change, or not change the parameters. To exit Setup Mode, complete the following steps: ① Press SETUP/EXIT. The LCD screen will display SAVE CHANGES. ② Press the plus (+) or minus (-) button to select the save option: ◆PERMANENT: These values are saved in the printer even after the printer is powered off. ◆TEMPORARY: Saves changes until the power is turned off. ◆CANCEL: Cancels all changes made after entering “Setup” mode, excluding color depth and cutter settings, which take effect immediately after changes. ◆LOAD DEFAULTS: Restores all parameters except network settings to factory default values. Be careful when loading default values, as you will need to reload all manually changed settings afterward. ◆LOAD LAST SAVE: Loads the parameter values that were last permanently saved. ◆DEFAULT NET: Restores wired and wireless network settings to factory default values. ③ Press the NEXT/SAVE button to select the displayed option. After the configuration and calibration process is complete, PRINTER READY will be displayed. 5.2 Changing Password-Protected Parameters Certain parameters, including communication parameters, are password-protected by the manufacturer’s default values. Do not change password-protected parameters unless you have a complete understanding of their function; otherwise, the printer will not function properly. When a user attempts to change a password-protected parameter for the first time, the printer will display ENTER PASSWORD. The user must enter a four-digit numeric password to change the parameter. After correctly entering the password, unless SETUP/EXIT or the printer power is turned off, the password does not need to be entered again. To enter a password for a password-protected parameter, complete the following steps: ① You can use the minus sign (-) at the password prompt to change the selected digits. ② If you have already selected the digits to change, you can use the plus sign (+) to increase the selected value. Repeat the above two steps for each digit of the password. ③ After entering the password, press SELECT to display the parameter you selected to change. If the user has entered the correct password, the value can be changed. The default password value is 1234. The password can be changed using the ZPL’s ^KP command or the printer’s web page. The ^KP command can be used to set the password to 0000 to disable password protection, thus eliminating the need for the user to enter a password. To re-enable password protection, send the ZPL command ^KPx, where x can be a number from 1 to 9999. 5.3 Standard Control Panel Parameters Note: Label printing software or printer drivers may override adjustments made through the control panel.
■Density: Adjusting print density. The optimal density setting depends on various factors, including ribbon type, label, and printhead condition. Adjusting the density allows for consistent, optimal print quality. Note: Set the density to the lowest value that provides the best print quality. If the density is set too high, the ink will spread, the ribbon will burn through, and the printhead will wear out prematurely. If the printed content is too light or there are blank areas in the printed area, increase the print density. If the printed color is too dark, or if the print ink spreads or bleeds, decrease the print density. Default: +4.0, Range: 00 to +30
■ Print speed: Adjusting the print speed usually results in higher print quality by reducing the print speed. Default: 2 IPS, Range: 2 to 14 IPS (203 dpi)
■ Tear off the paper and adjust the cutting position. This parameter sets the position of the media on the cutter/peel bar after printing. Increasing the number moves the media outward (the cutting line moves to the leading edge of the next label), and decreasing the number moves the media inward (the cutting line moves towards the edge of the printed label). Default value: 0, range: -120 to +120
■ Print Mode: Select the print mode. This parameter instructs the printer how to feed the printed label. Ensure that the user has selected a print mode compatible with the printer and printer options. Default: TEAR-OFF; Options: TEAR-OFF, PEEL-OFF, CUTTER, DELAYED CUT, REWIND.
■Media Type: Sets the media type. This parameter informs the printer which type of parameters you are using. If Option Media is selected, a label length instruction must be included in the label format. If Non-Continuous Media is selected, the printer feeds the media to calculate the label length (the distance between two alignment points identified on the label gap, weave, alignment notch, or perforation). Default: NON-CONTINUOUS, Options: CONTINUOUS, NON-CONTINUOUS
■ Sensor Type: This parameter sets the sensor type. It informs the printer user whether to use media with a textured surface (labels have gaps/slits, notches, or perforations) to indicate separation between labels, or whether to use media with black printed markings on the backing. If there are no black markings for alignment on the back of the media, the printer will retain the default setting. Default: WEB (texture), Options: WEB (texture), MARK (marking)
■ Printing Method: Select the printing method. This parameter informs the printer user of the desired printing method: thermal (without ribbon) or thermal transfer (using thermal transfer media and ribbon). Default: Thermal Transfer; Options: Thermal Transfer, Thermal
■ Print Width: Sets the print width. This parameter specifies the printable area within the label width range. 203dpi: Default 1344, range 2 to 1344 300dpi: Default 1984, range 2 to 1984 Note: Setting the width too narrow may cause some label formats to fail to print on the media. Setting the width too wide will waste format memory, causing labels to print outside the lines or onto the print roller. If using a flipped image, this setting will affect the horizontal position of the label format.
■Maximum Length: Sets the maximum label length. This parameter is used in the media section of the calibration process. The maximum label length should be set to at least 25.4 mm longer than the actual label length. If this value is set to less than the label length, the printer will assume continuous media is loaded, and the printer will be unable to calibrate. For example: if the label length, including the label gap, is 126 mm, the parameter should be set to 152 mm; if the label length is 190 mm, the parameter should be set to 229 mm. Default: 988 mm; Option: This value can be adjusted in 25.4 mm increments.
■Low Consumables Warning: This setting includes a low consumables warning. If enabled, the printer will issue a warning when the media or ribbon quantity is low. Default: DISABLED, Options: ENABLED, DISABLED
■ Early Warning: Enables early maintenance warnings. If this function is enabled, the printer will warn you when the printhead needs cleaning. Default: MAINT.OFF (Maintenance Off), Options: MAINT.OFF (Maintenance Off), MAINTENANCE ON (Maintenance On)
■ The printhead is being cleaned. This setting provides an early warning for the printhead cleaning interval. This parameter is only displayed when “Early Maintenance Warning” is enabled. The value should correspond to the length of the media or ribbon roll used by the user. Default: 450 meters/1476 feet; Options: 100 meters/328 feet to 450 meters/1476 feet, in 50-meter increments.
■ Printhead cleaned? This is an early warning to reset the printhead cleaning counter. This parameter is only displayed when “Early Maintenance Warning” is enabled.
■ Printhead Life: Sets the printhead life for early warning. This parameter is only displayed when “Early Maintenance Warning” is enabled. Set this value to the number of inches of media the printhead is expected to print. Default: 1,000,000 inches; Range: 100 to 1,000,000 inches.
■A new printhead has been used? This is a warning to reset the printhead life counter. This parameter is only displayed when “Early Maintenance Warning” is enabled.
■ Non-reset counter: View the non-reset counter. This parameter displays the total length of media printed by the printer.
■ Reset Counter 1. View the user-controlled Counter 1. This parameter displays the total length of media printed by the printer since the last reset. The ZPL command can be used to change the unit of measurement of this counter and reset it.
■ Reset Counter 2. View the user-controlled Counter 2. This parameter displays the total length of media printed by the printer since the last reset. The ZPL command can be used to change the unit of measurement of this counter and reset it.
■ Print meter readings, print counter readings, and can print a label listing the following length readings: ① Non-resettable counter ② Two user-controlled counters ③ “Early Maintenance Warning” indicates the last time the printhead was cleaned and the lifespan of the printhead (if the “Early Maintenance Warning” function is disabled, the associated counters will not be printed).
■ List Fonts: This option prints a label listing the fonts available in the printer, including standard printer fonts and any optional fonts. Fonts can be stored in RAM or flash memory.
■ List barcodes. This option prints a label listing the barcodes available in the printer. The barcodes can be stored in RAM or flash memory.
■ List Images: This option prints a label listing the images available in the printer, which can be stored in RAM, flash memory, or an optional PCMCIA card.
■ List Formats: This option prints a label listing the available formats for your printer. These images can be stored in RAM, flash memory, or an optional PCMCIA card.
■ List Settings: This option prints a configuration label that lists the current printer configuration.
■ List Networks: This option prints a list of network configuration tabs, which show the settings of the installed print servers.
■ List All: This option allows you to print labels that list available fonts, barcodes, graphics, formats, and current printer and network configurations.
■ Initialize flash memory. This option erases information previously stored in the flash memory, and can completely erase the contents stored in the flash memory.
■ Sensor calibration chart, media sensor graph. The sensor graph shows the settings compared to the actual sensor readings. This label can be used to troubleshoot printing problems.
■ Media and Ribbon: To calibrate the sensitivity of the media and ribbon sensors, follow these steps: ① Press the SETUP/EXIT button on the control panel. ② Press the NEXT/SAVE button and select the “Media and Ribbon Calibration” parameter. ③ Press the plus sign (+) to start the calibration process. The LOAD BACKING prompt will appear. ④ Open the printhead . ⑤ Peel approximately 203 mm of label off the backing paper and feed the media into the printer, ensuring only the backing paper is between the media sensors. ⑥ Keep the printhead open. ⑦ Press the plus sign (+) to continue. The REMOVE RIBBON prompt will appear. ⑧ If a ribbon is used, remove it. ⑨ Close the printhead . ⑩ Press the plus sign (+) to continue. The CALIBRATING PLEASE WAIT message will appear. The printer adjusts the signal gain received from the media and ribbon sensors based on the specific media and ribbon combination used. On the sensor graph, this corresponds to the graphical peak that moves up and down to better read your printing application. After calibration, RELOAD ALL will be displayed. ⑾ Open the printhead and push the media forward so the label is below the media sensor. ⑿ Reload the ribbon (if used). ⑃ Close the printhead . Press the plus sign (+) to continue. The printer performs automatic calibration, during which it checks the media and ribbon readings against the newly established scale to determine the ribbon length and printing mode. To view the readings on the new scale, print a sensor calibration graph.
■ Parallel Communication: Configure parallel traffic by selecting a communication port that matches the computer host’s settings. Default: Bidirectional; Options: BIDIRECTIONAL, UNIDIRECTIONAL, TWINAX/COAX
■ Serial Communication: Configure serial communication by selecting the communication port that matches the settings used by the computer host. This setting only applies when using a serial port. Note: If using an external adapter to enable RS422/485 operation, select RS232. Default: RS232, Options: RS232, RS485 MULTIFROP
■ Baud Rate: Set the baud rate. This setting is only applicable when using a serial port. For accurate communication, the computer host’s baud rate setting must match the printer’s baud rate setting. Select a value that matches the settings used by the computer host. Default: 9600, Options: 300, 600, 1200, 2400, 4800, 9600, 14400, 19200, 28800, 38400, 57600, 115200
■ Data Bits: Sets the data bits. This setting is only applicable when using a serial port. For accurate communication, the computer host’s data bit setting must match the printer’s data bit setting. Select a value that matches the settings used by the computer host. Default: 8 bits, Options: 7 bits, 8 bits
■ Parity bit: Sets the parity. This setting only applies when using a serial port. For accurate communication, the computer host’s parity setting must match the printer’s parity setting. Select a value that matches the parity setting used by the computer host. Default: NONE, Options: ENVEN (Even), ODD (Odd), NONE (None)
■ Host Handshake: Configure host handshake. This setting is only applicable when using a serial port. For accurate communication, the computer host’s handshake protocol must match the printer’s handshake protocol. Select a handshake protocol that matches the settings used by the computer host. Default: XON/XOFF, Options: XON/XOFF, DSR/DTR, RTS/CTS
■ Protocol: Configure the protocol. The protocol is an error type checking system. Depending on the options, an indicator can be sent from the printer to the host computer, indicating that data has been received. The protocol requested by the host computer should be selected. Default: NONE; Options: NONE, ZEBRA, ACK_NAK. Note: ZEBRA and ACK_NAK are the same, but the ZEBRA response message order is different. If ZEBRA is selected, the printer must use DSR/DTR as the host handshake protocol.
■ Network Identifier: Set a network identifier. If the printer operates in an RS422/485 multi-point download environment, a unique identifier should be assigned to the printer. This allows the host computer to communicate with the specific printer without affecting the TCP/IP or IPX network. Default: 000, Range: 000 to 999
■ Communication: Configure communication mode. The communication diagnostic mode is a troubleshooting tool used to check the interconnection between the printer and the host computer. Default: Normal mode; Options: Normal mode, Diagnostics.
■ Control Character Prefix: Sets the control character prefix. The printer looks for this two-digit hexadecimal character to indicate the start of the ZPL control specification. Note: Do not use the same hexadecimal value for the control, format, and delimiter characters. The printer must use different characters to function correctly. Default: 7E, Range: 00 to FF
■ Format Prefix: Sets the format prefix, which is a two-digit hexadecimal value used as a parameter position marker in the ZPL format specification. The printer looks for this hexadecimal character that indicates the start of the ZPL format instruction. Note: Do not use the same hexadecimal value for the control, format, and delimiter characters; the printer must use different characters to function correctly. Default: 5E, Range: 00 to FF
■ Separator: Sets the separator, which is a two-digit hexadecimal value used as a parameter position marker in the ZPL format specification. Note: Do not use the same hexadecimal value for the control, format, and separator characters; the printer must use different characters to function correctly. Default: 2C, Range: 00 to FF
■ZPL Mode: Selecting ZPL mode will keep the printer in that mode until the mode is changed by this parameter or the ZPL command. The printer can accept label formats written using ZPL or ZPLII without needing to rewrite any existing ZPL formats. Default: ZPLII, Options: ZPLII, ZPL
■ Media is powered on. Select the Media Power-On option. This parameter sets the media operation when the printer is powered on. Default: CALIBRATION, Options: CALIBRATION, SHORT CAL, LENGTH, NO MOTION, FEED. The calibration process adjusts the sensor level and threshold, determines the length, and feeds the media to the next mesh. Short calibration sets the media and mesh thresholds without adjusting the sensor gain, determines the length, and feeds the media to the next mesh. Length is used to determine the label length using the current sensor value and feeds the media to the next mesh. No Motion instructs the printer not to move the media; you must manually confirm that the mesh is correctly positioned, or you can press the Feed button to position the next mesh. Feed feeds the label to the first alignment point.
■ Printhead Close: Sets the printhead close options. This parameter is used to set media operation when the printhead is closed. Default: CALIBRATION, Options: CALIBRATION, SHORT CAL, LENGTH, NO MOTION, FEED. The calibration process adjusts the sensor level and threshold, determines the length, and feeds the media to the next mesh. Short calibration sets the media and mesh thresholds without adjusting the sensor gain, determines the length, and feeds the media to the next mesh. Length is used to determine the label length using the current sensor value and feeds the media to the next mesh. No movement instructs the printer not to move the media; you must manually confirm that the mesh is correctly positioned, or you can press the feed button to position the next mesh. Feed feeds the label to the first alignment point.
■Rewind: Select the rewind sequence. This parameter sets when the label rewinds after being retrieved in some printing modes. This setting is invalid in “Wrap-up” mode. When received as part of the label format, this setting is replaced by ~JS. Default: Default (90%), Options: DEFAULT (default), AFTER (before), OFF (off), FEFORE (after), 10%, 20%, 30%, 40%, 50%, 60%, 70%, 80%
■ Label Top: Adjusts the top position of the label. This parameter adjusts the vertical printing position of the label. A positive number moves the top of the label down (away from the print head) by a specified number of dots, while a negative number moves the label down (towards the print head) by a specified number of dots. Default: +000, Options: Range: -120 to +120
■Left Position: Adjusting the left position allows you to adjust the label’s horizontal printing position. Positive numbers shift the printed content to the left by a specified number of dots, while negative numbers shift it to the right. Default: +000, Options: Range: -9999 to +9999
■ Printhead Test Count: Sets the printhead test count. The printer should periodically perform a printhead function test called a printhead test. This parameter is used to determine the number of labels printed between two tests. Default: 0000 (Test Disabled), Options: Range: 0000 to 9999
■ Verifier Port: Configures the verifier port. The auxiliary port determines how the printer responds to the online verifier. Default: OFF, Options: OFF, VER-RPRNT ERR (Verifier Reports Error), VER-THRUPUT (Verification Throughput) OFF: The verifier port is off. VER-RPRNT ERR (Verifier Reports Error): If the verifier detects an error, it will reprint the label. If the barcode is near the top edge of the label, the label length is sufficient for verification when it is sent out, and it can backtrack to print and verify the next label. VER-THRUPUT (Verification Throughput): Allows maximum throughput, but cannot immediately indicate a verification error when it is detected. One to three labels may have been printed before the error is recognized and printing stops.
■ Adhesive Interface: Sets the adhesive port mode, determining the operation of the adhesive port. Default: OFF (Off), Options: OFF (Off), MODE1, MODE2, MODE3, MODE4 OFF (Off): Verifier port is off. MODE1: Determines the ~END_PRINT signal as low when the printer moves the label forward. MODE2: Determines the ~END_PRINT signal as high when the printer moves the label forward. MODE3: Determines the ~END_PRINT signal as low for 20 milliseconds after the label is completed and repositioned; does not determine this in continuous printing mode. MODE4: Determines the ~END_PRINT signal as high for 20 milliseconds after the label is completed and repositioned; does not determine this in continuous printing mode.
■ Pause on Error: Sets the pasteer error signal when the printer pauses. If this option is enabled and the printer pauses, the printer sets the pasteer error state. Default: ENABLED, Options: ENABLED, DISABLED
■ Start Print Signal: Select the start print signal. This parameter determines how the printer responds to the “Start Print Signal” input on pin 3 of the adhesive interface connector on the back of the printer. Default: PULSE MODE, Options: PULSE MODE, LEVEL MODE. Pulse mode prints the label when the signal transitions from “high” to “low”. LEVEL mode prints the label as long as the signal is determined to be “low”.
■ Resynchronization Mode: Select the resynchronization mode. This parameter determines the printer’s operation in cases of label synchronization loss and unexpected label top position. Default: FEED MODE, Options: FEED MODE, ERROR MODE. FEED MODE : If the label top is not in the expected position, the printer will feed a blank label to find the label top position. ERROR MODE: If the label is not in the expected position, the printer will stop and enter “Pause” mode, displaying “Error condition feed label,” flashing the ERROR indicator, and issuing a “Service Required” signal (pin 10 on the adhesive interface connector). To resynchronize the media with the label top in “ERROR” mode, press the PAUSE button to exit “Pause” mode. The “ERROR” indicator will stop flashing, and the “Service Required” signal will turn off.
■ Reprint Mode: This setting allows users to reprint the previously printed label by issuing the ~PR command or pressing the minus (-) button on the control panel. Default: Disabled; Options: Enable, Disabled
■ Format Conversion: Select Format Conversion, then select Bitmap Scaling. The first number is the origin of the dots per inch (dpi) value, and the second number is the dpi to be scaled. Default: NONE, Options: None, 150 300, 150 600, 200 600, 300, 600
■ Idle Display: Selecting standby display allows you to choose the LCD screen option for the real-time clock. Note: If the default value is not selected, pressing the plus (+) or minus (-) sign will briefly display the printer’s firmware version. Default: Firmware version; Options: MM/DD/YY (24HR), MM/DD/YY (12HR), DD/MM/YY (24HR), DD/MM/YY (12HR), Firmware version
■ Real-time clock date: Sets the real-time clock (RTC) date. This parameter allows users to set the date according to the specifications listed in IDLE DUSPLAY (Standby Display).
■ Real-time clock time: Sets the real-time clock (RTC) time. This parameter allows users to set the time according to the specifications listed in IDLE DUSPLAY (Standby Display).
■ Password Level: Specifies the password level. This parameter allows the user to choose whether to password-protect selected menu items or all menu items. Default: Selected items; Options: Selected items, All items.
■Language: Select the display language. This parameter changes the language displayed on the LCD screen. Each language option is displayed in its own language. Default: English; Options: English, Spanish, French, German, Italian, Norwegian, Portuguese, Swedish, Danish, Spanish 2, Dutch, Finnish, Japanese, Korean, Simplified Chinese, Traditional Chinese
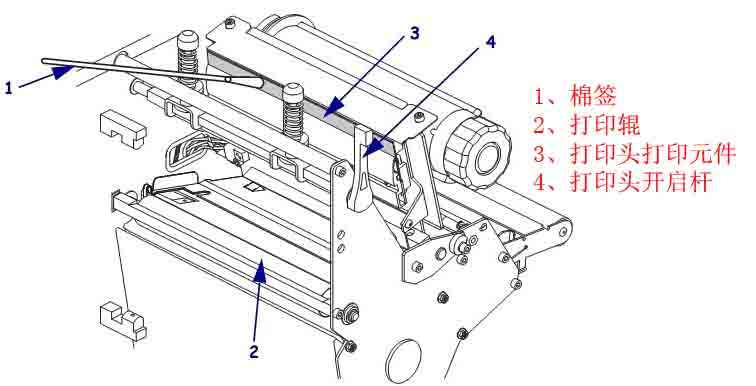
6. Routine Maintenance of Zebra 170Xi4 Barcode Printer Important Note: Zebra is not responsible for damage caused by the use of cleaning solutions on this printer. 6.1 Recommended Cleaning Schedule Depending on the application and media, more frequent cleaning may be required. Printhead, Method: 95% alcohol solvent, Time Interval: After one media roll is used up in thermal mode; after each ribbon roll is printed in thermal transfer mode. Roller, Method: 95% alcohol solvent, Time interval: After one media roll is used up in thermal mode, thermal transfer is performed after each ribbon roll is printed. Media sensor, Method: Air jet, Time interval: After one media roll is used up in thermal mode, thermal transfer is performed after each ribbon roll is printed. Ribbon sensor, Method: Air jet, Time interval: After one media roll is used up in thermal mode, thermal transfer is performed after each ribbon roll is printed . Media path: Method: 95% alcohol solvent, Time interval: After one media roll is used up in thermal mode, thermal transfer is performed after each ribbon roll is printed. Ribbon path: Method: 95% alcohol solvent, Time interval: After one media roll is used up in thermal mode, thermal transfer is performed after each ribbon roll is printed. 6.2 Cleaning steps 6.2.1 Cleaning the printer casing The printer’s outer surface can be cleaned with a lint-free cloth and a small amount of neutral detergent. Do not use abrasive cleaners or solvents. 6.2.2 Clean the Media Tank After every four rolls of media, check the media tank and use a soft-bristled brush or vacuum cleaner to remove dust and paper scraps from inside the printer. 6.2.3 Clean the Printhead and Roller Daily maintenance can minimize printhead wear and maintain print quality. As printing continues, the media or ribbon passing through the printhead will continuously wear down the ceramic protective layer, exposing and eventually damaging the printed elements. To prevent corrosion: ◆ Clean the printhead frequently and use a backed and fully lubricated thermal transfer ribbon to reduce friction. ◆ Optimize the balance between these two by using the lowest possible printhead pressure and burn-in temperature settings. ◆ Ensure the thermal transfer ribbon width is greater than or equal to the label media width to protect the printed elements from exposure to more corrosive label materials. For best results, clean the printhead after each ribbon roll change. Unstable print quality, such as blank spaces in printed barcodes or graphics, may indicate a dirty printhead. Caution: When performing tasks near the exposed printhead, remove all rings, watches, long necklaces, ID cards, and other metal objects that may come into contact with the printhead. Caution: The printhead gets very hot and may cause severe burns; allow the printhead to cool completely. Caution: Before touching the printhead assembly, touch the printer’s metal frame or use an anti-static wrist strap or pad to discharge any accumulated static electricity. To clean the printhead and rollers, complete the following steps: ① Turn the printhead opening lever counter-clockwise to open the printhead assembly. ② Remove the media and ribbon. ③ Use a cleaning swab to wipe from one end of the brown strip on the printhead assembly to the other.
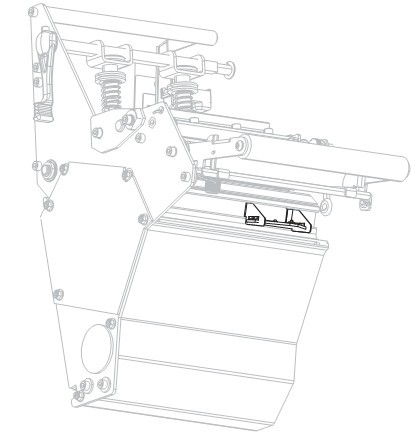
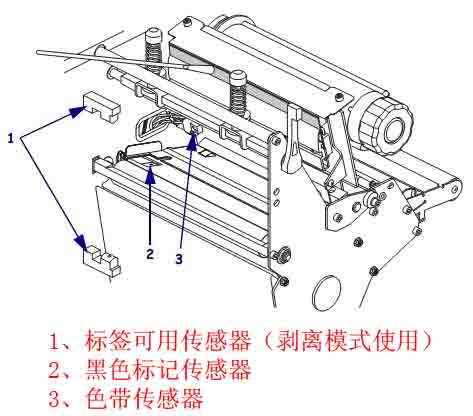
④ While manually rotating the print rollers, thoroughly clean them with a cotton swab to allow the solution to evaporate completely. ⑤ Reinstall the media and ribbon and close the printhead assembly. Note: If print quality does not improve after performing the above steps, try cleaning the printhead with the Save-a-Printhead cleaning film, a specially coated material that removes accumulated dirt without damaging the printhead. 6.2.4 Clean the Sensor Use a brush or vacuum cleaner to remove accumulated paper scraps and dust from the sensor. Location of the ribbon and label sensor:
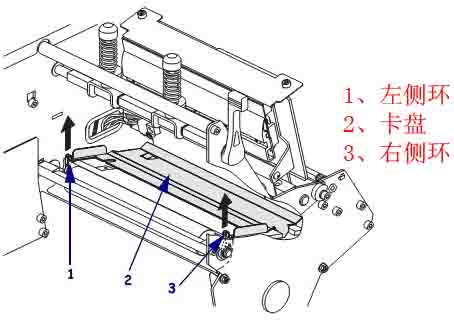
6.2.5 Clean the Chuck The chuck should be cleaned when labels stick or are stuck to the bottom. To clean the chuck, complete the following steps: ① Insert a small flathead screwdriver or similar tool into the ring on the left side of the chuck.
② Gently lift the left side of the chuck. ③ Insert a small flathead screwdriver or similar tool into the ring on the right side of the chuck. ④ Gently lift the right side of the chuck. ⑤ Remove the chuck from the printer. ⑥ Wipe the chuck with a clean cotton swab or soft cloth soaked in gasoline solvent. ⑦ To reinstall the chuck, insert the two retaining tabs at the bottom of the chuck into the two slots in the media path. ⑧ Slide the chuck towards yourself. ⑨ Press the ring component down to lock the chuck in place. 6.2.6 Replacing the Fuse Caution: Before performing this step, first turn off the AC power switch and unplug the power cord. The printer uses metric fuses (5*20 mm IEC), rated F5A, 250 volts. The AC power input module includes two approved fuses on the fuse holder: one is the fuse used in the circuit, and the other is a spare fuse. To replace a faulty fuse, follow these steps: ① Use a small flathead screwdriver or similar tool to remove the fuse holder, which is part of the AC power input module at the rear of the printer. ② Remove the faulty fuse and install a new one. ③ Reinstall the fuse holder into the AC power input module. ④ Reconnect the power cord and turn on the printer.
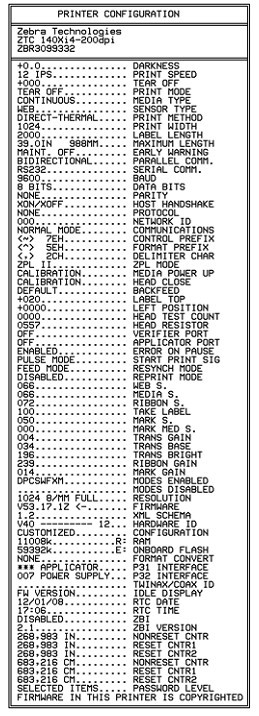
7. Troubleshooting Zebra 170Xi4 Barcode Printer 7.1 LCD Screen Error Messages When an error occurs, the LCD screen displays a message. Below are the LCD screen errors, possible causes, and recommended solutions. ●INVALID HEAD (Invalid printhead); Possible cause: An original Zebra printhead was not used when replacing the printhead; Solution: Install an original Zebra printhead. ●RIBBON OUT (Ribbon exhausted); Possible causes and solutions: ① In thermal transfer mode, the ribbon is not loaded or is incorrectly loaded. Please load the media correctly. ② In thermal transfer mode, the ribbon sensor does not detect an incorrectly loaded ribbon. Please load the media correctly and calibrate the sensor. ③ In thermal transfer mode, the media is blocking the ribbon sensor. Please load the media correctly and calibrate the sensor. ④ In thermal transfer mode, even if the ribbon is loaded, the printer still does not detect the ribbon. Please print the sensor chart, calibrate the sensor, or load the printer default settings. ●RIBBON IN (Ribbon loaded); Possible cause: The ribbon is loaded, but the printer is set to thermal mode; Solution: Thermal media does not require a ribbon. If you want to use thermal transfer media that requires a ribbon, you should set the printer to “Thermal Transfer” mode. ●PAPER OUT (Paper Out), Possible Causes and Solutions: ① No media loaded or improper media loading. Please load the media correctly. ② Media sensor misalignment. Please check the media sensor position. ③ The printer is set to use non-continuous media, but continuous media is loaded. Please install the correct media type, or reset the printer to the current media type and perform calibration. ● HEAD OPEN (Print Head Open), Possible Causes and Solutions: ① Print head not fully closed. Please fully close the print head. ② Print head open sensor malfunction. Please replace the sensor. 7.2 Calibration Fault ● Fault: Print alignment mark missing on label, vertical offset of top alignment mark on form too much. Possible Causes and Solutions: ① Paper pressure roller too dirty. Please clean the paper pressure roller. ② Media guide plate position incorrect. Please ensure the media guide plate is correctly positioned. ③ Incorrect media type. Please set the printer to use the correct media type. ④ Incorrect media loading. Please load the media correctly. ● Fault: Automatic calibration failed. Possible causes and solutions: ① Incorrect media or ribbon loading. Please load the media and ribbon correctly. ② The sensor did not detect the media or ribbon. Please manually calibrate the printer. ③ The sensor is too dirty or incorrectly positioned, preventing detection. Please ensure the sensor is clean and the media is in the correct position. ④ Incorrect media type setting. Please set the printer to use the correct media type. 7.3 Communication Failure ● Failure: The label format has been sent to the printer, but it is not recognized, and the DATA indicator light is not flashing. Possible cause: Incorrect communication parameters. Solutions: ① Check the printer driver or software communication settings. ② If using a serial port, check the port settings in the control panel menu. ③ If using a driver, check the driver communication settings related to the connection. ● Failure: The label format has been sent to the printer, but after printing multiple labels, the printer skips, misplaces, loses, or distorts the image on the labels. Possible cause: Incorrect serial communication settings. Solutions: ① Ensure the flow control settings match. ② Check the communication cable length. ③ Check the printer driver or software communication settings. ● Failure: The label format has been sent to the printer, but it is not recognized. The DATA light flashes, but no printing occurs. Possible causes and solutions: ① The prefix and separator character sets in the printer do not match the character sets in the label format. Please check the prefix and separator characters. ② Incorrect data is being sent to the printer. Please check the communication settings on your computer to ensure that these settings match the settings on the printer. If the problem persists, check the label format. 7.4 Ribbon Fault ● Fault: Ribbon is damaged or melted. Possible cause: Depth setting value is too high. Solution: ① Lower the depth setting value. ② Thoroughly clean the print head. ● Fault: The printer does not detect that the ribbon is used up. Possible cause: The printer was calibrated without a ribbon, and then the ribbon was inserted without performing a user recalibration of the printer, or the printer defaults were not loaded. Solution: Now calibrate the printer with the ribbon, or load the printer defaults. ● Fault: In thermal transfer mode, the printer does not detect the ribbon even though it is correctly loaded. Possible cause: The printer was calibrated without a ribbon, and then the ribbon was inserted without performing a user recalibration of the printer, or the printer defaults were not loaded. Solutions: Use the ribbon to calibrate the printer now, or load the printer defaults. ● Fault: The ribbon indicator light is still on even when the ribbon is correctly loaded. Possible Cause: The printer has not been calibrated for the labels and ribbon to be used. Solution: Perform calibration of the media and ribbon sensor sensitivity 7.5. Printer Diagnostics Self-tests and other diagnostic methods can provide specific information about the printer’s condition. Self-tests can provide sample printouts and can provide specific information to help determine the printer’s working condition . The most commonly used are the “Power-On” self-test and the CANCEL self-test. Important Note: Use full-width media when performing self-tests. If your media is not wide enough, the test label will print on the pressure rollers. To prevent this, check the print width setting on the control panel and ensure that the width is correct for the media to be used. Note: ▲ Do not send data from the host to the printer while performing these self-tests. ▲ If the media is shorter than the label to be printed, the test will continue printing on the next label. ▲ If you cancel the self-test before it is actually completed, you can reset the printer by turning off the power and then on again. 7.5.1 Power-On Self-Test A power-on self-test will be performed each time the printer is powered on. During this self-test, the control panel indicator lights will turn on and off to ensure correct operation. At the end of the self-test, only the power indicator light will be on. When the power-on self-test is complete, the media will be fed into the correct position. 7.5.2 CANCEL Self-Test To perform the “CANCEL self-test,” complete the following steps: ① Turn off the printer power. ② With the printer power on, press and hold the CANCEL button until the first control panel light goes out. A printer configuration label will be printed, as shown below.
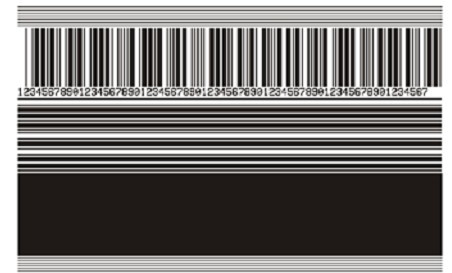
7.5.3 PAUSE Self-Test This self-test can be used to provide a necessary checklist when adjusting the printer’s mechanical components or determining whether the printhead components are working properly. To perform the PAUSE self-test, complete the following steps: ① Turn off the printer power ② With the printer power on, press and hold the PAUSE button until the first control panel light goes out. ● During the initial self-test, the printer prints 15 labels at its lowest speed, then automatically pauses. Each time the PAUSE button is pressed, an additional 15 labels will be printed.
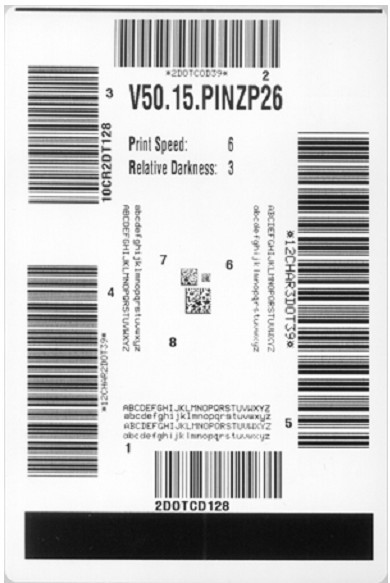
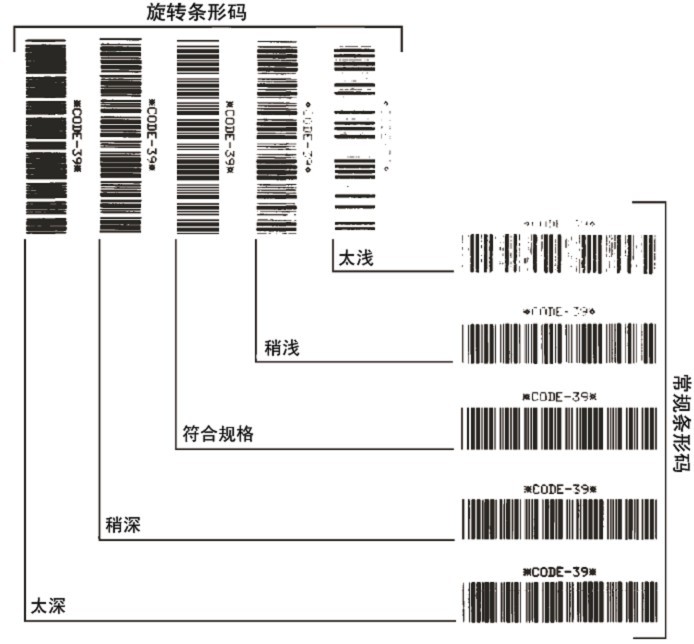
● While the printer is paused, pressing CANCEL will change the self-test; each time PAUSE is pressed, 15 labels will be printed at a speed of 152 mm/s. ● While the printer is paused, pressing CANCEL again will change the self-test; each time PAUSE is pressed, 50 labels will be printed at the printer’s lowest speed. ● When the printer is paused, pressing CANCEL again will change the self-test for the third time. Each time PAUSE is pressed, 50 labels will be printed at a speed of 152 mm/s. ● When the printer is paused, pressing CANCEL again will change the self-test for the fourth time. Each time PAUSE is pressed, 15 labels will be printed at the printer’s maximum speed. ● Holding down CANCEL will exit the self-test at any time. 7.5.4 FEED Self-Test Different types of media may require different depth settings. During the FEED self-test, labels are printed at two different printing speeds with different depth settings. Each label will be printed with a relative depth and printing speed. ANSI grading can be performed on the barcodes on these labels to check print quality. The depth value starts below the printer’s current depth value (relative depth 3) and increases to three depth settings above the current depth value (relative depth + 3). Depending on the printhead dot density, a series of 7 labels can be printed at each speed: ● 203dpi printer: 2ips, 6ips, and 10ips ● 300dpi printer: 2ips, 6ips, and 8ips ● 600dpi printer: 2ips and 4ips To perform a FEED self-test, complete the following steps: ① Print a configuration label to display the printer’s current configuration. ② Turn off the printer power. ③ With the printer power on, press and hold the FEED button until the first control panel light goes out. The printer will print a series of labels at different speeds and depths above and below the depth value shown in the configuration label.
④ Use the diagram below to check the test labels and determine which label has the best print quality for your application. If you have a barcode detector , you can use it to measure the barcode/blank and calculate the print contrast. If you do not have a barcode detector, you can use a visual method or a system scanner to select the best depth setting based on the labels printed in this self-test.
■ Too Dark: The label is too dark and obvious. It is readable but does not conform to specifications. This manifests as an enlarged size of the regular barcode, with ink filling the spaces for small alphanumeric characters. Rotating the barcode results in crowded spaces. ■ Slightly Dark: The label is slightly darker and not very noticeable. This is a standard barcode with slightly thickened small alphanumeric characters, appearing somewhat crowded. Rotating barcodes have less space compared to standard barcodes, potentially making the code unreadable. ■ Conforms to Specifications: This type of barcode can only be verified using a barcode detector, but it still has some visual characteristics. Regular barcodes have complete, balanced bars and clear, distinct gaps; rotating barcodes also have complete, balanced bars and clear, distinct gaps. While not as visually appealing as slightly darker barcodes, these barcodes conform to specifications. In both regular and rotating styles, small alphanumeric characters appear more complete. ■ Slightly Lighter: In some cases, for “conforms to specifications” barcodes, slightly lighter labels are more effective than darker ones. The results show that both regular and rotating barcodes conform to specifications, but small alphanumeric characters may be incomplete. ■ Too light, indicating the label color is too light and indistinct. This manifests as incomplete regular and rotating barcodes, and unreadable small alphanumeric characters. ⑤ Pay attention to the relative depth value and printing speed on the label that produces the best results. ⑥ The relative depth value can be added to or subtracted from the depth value specified on the configuration label; the resulting numerical value is the optimal depth value for a specific label/ribbon combination and printing speed. ⑦ If necessary, the depth value should be changed to the depth value on the label that produces the best results. ⑧ The printing speed should be changed to the same speed as the label that produces the best results, as needed. 7.5.5 FEED and PAUSE Self-Test Performing this self-test can temporarily reset the printer to factory defaults. Unless these values are retained in memory, they will only take effect after the power is turned off. If the factory defaults are permanently retained, a media calibration procedure must be performed. To perform the FEED and PAUSE self-test, complete the following steps: ① Turn off the printer power. ② With the printer power on, press and hold the FEED (paper feed) and PAUSE (pause) buttons. ③ Press and hold the FEED and PAUSE buttons until the first control panel light goes out. The printer configuration will be temporarily reset to factory defaults, and no labels will be printed when the test is complete.
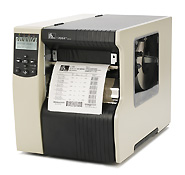
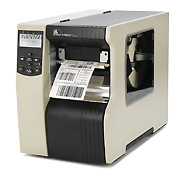
The Zebra 140Xi4 printer is an ideal choice for many customers due to its robust durability, excellent print quality, fast print speed, long lifespan, and unparalleled reliability in harsh environments.
Built on legacy features, the 140Xi4 is designed to help users effectively improve operational efficiency – select models can offer up to 40% faster print speeds, 10/100 Ethernet connectivity provides significantly faster speeds, a more robust pre-notification system helps reduce downtime, multiple network connectivity options facilitate easier integration, and the ZebraLink solution provides remote printer management capabilities.
The all-metal Zebra 140Xi4 barcode printer boasts exceptional durability and performance, significantly reducing downtime. 1. The Zebra 140Xi4 printer easily meets the needs of high-volume production lines: ● With a print speed of 14 inches/356 mm per second, the 140Xi4 features one of the fastest technologies on the market, effectively improving the efficiency of batch printing and print-to-use production lines. ● High-speed processing power and throughput contribute to increased efficiency. ● Ample memory allows for the storage of more label formats, fonts, and images. ● The durable metal printhead provides excellent print quality even after prolonged use, effectively reducing or avoiding downtime due to printhead replacements. 2. For mission-critical and 24/7 operations, every second of downtime translates to lost money. The Zebra 140Xi4 printer is the best way to maximize uptime. ● The proven Xi platform ensures uninterrupted 24/7 operation . ● A pre-warning system that alerts users when printhead maintenance or ribbon/media replacement is needed, coupled with remote printer management/monitoring capabilities, allows for rapid identification and resolution of printer problems. 3. The Zebra 140Xi4 printer, meeting industrial strength standards, can withstand the most demanding working environments. ● Durability: The high-diameter steel frame and metal internal components effectively withstand impacts. ● Enclosed design prevents dust from entering. ● Trouble-free operation across a wide range of temperatures and humidity levels. 4. The Zebra 140Xi4 flexibly meets the needs of professional label printing.
Zebra 140Xi4 Detailed Specifications
Standard ● Printing Method: Thermal transfer or thermal printing ● Resolution: 203 dpi (8 dots/mm) ● Memory: 16MB SDRAM, 8MB Flash ● Maximum Print Width: 128mm ● Maximum Print Speed: 14 inches/second (356 mm/second) ● 32-bit 133 MHz RISC processor ● 8 MB Flash memory—including 2.0 MB of user-available non-volatile memory for storing downloadable content ● Built-in real-time clock ● Advanced label/media counter ● Automatic calibration—the printer automatically calibrates upon startup or when the printhead is closed after approximately two labels ● Pre-warning system—alerts are given via the front panel and ZebraLink warnings for low label/ribbon levels or printhead cleaning ● New multi-function front panel and multilingual widescreen monochrome LCD display—with user-programmable password protection ● Transparent media side door—easily monitor consumable usage without opening the printer system ● With E3 Element Energy Control The thin-film printhead facilitates superior print quality . It features a serial RS-232 port with automatic detection and a bidirectional parallel port . It also includes dual media sensors—emitting and reflective—selectable via software or the front panel.
Electrical Parameters ● 90-264 VAC, 48-62 Hz universal power supply with power parameter correction ● Serial RS-232 and bidirectional parallel ports with automatic detection ● USB 2.0 port
Labels and Ribbons ● Maximum Media Roll Size: Outer core diameter 8 inches/203 mm, Inner core diameter 3 inches/76 mm ● Media Thickness (Labels and Backing Paper): 0.003 inches/0.076 mm to 0.012 inches/0.305 mm ● Media Width (Labels and Backing Paper): 1.57 inches/40 mm to 5.51 inches/140 mm ● Media Length (Labels and Backing Paper): 39 inches/991 mm to 150 inches/3810 mm (using non-continuous paper) ● Media Type: Continuous paper, die-cut paper, or black label paper ● For optimal print quality and printer performance, it is recommended to use sensitive consumables. ● It is recommended that the ribbon width be at least the same as the media width. ● Maximum media roll size: 3.2 inches/81.3 mm outer diameter, 1 inch/25.4 mm inner diameter ● Standard ribbon length: 1,476 inches/450 meters or 984 inches/300 meters; available in 3:1 and 2:1 media roll to ribbon ratios ● Ribbon setting: ink side of the ribbon is facing outwards during winding
Fonts/Graphics/Symbols ● Bit-matrix fonts A through H and GS symbols can be magnified up to 10 times, with separate scaling for height and width . ● Smooth scalable fonts (CG Triumvirate Bold Condensed) can be magnified point by point, with separate scaling for height and width. ● IBM Code Page 850 international character set. ● Includes UFST from Montotype Imaging, Inc. ● Supports user-defined fonts and graphics—including custom logos. ● Linear barcodes: Code 11, Code 39, Code 93, Code 128 (including subsets A/B/C and UCC Case C Codes), ISBT-128, UPC-A, UPC-E, EAN-8, EAN-13, UPC and EAN 2 or 5-digit extensions, Plessey, Postnet, Standard 2-of-5, Industrial 2-of-5, Interleaved 2-of-5, Logmars, MSI, Codabar, Planet Code. ● Two-dimensional barcodes: Codablock, PDF417, Code 49, DataMatrix, MaxiCode, QR Code, MicroPDF417, TLC39, GS1 DataBar (RSS), Aztec
ZebraLink Solutions ● ZebraDesigner Pro/ZebraDesigner/ZebraDesigner for XML/ZebraNet Utilities v 7.0/ZebraNet Bridge Enterprise/Zebra Enterprise Connector ● ZebraNet Internal Wireless Plus/ZebraNet Wireless Plus Print Server/ZebraNet 10/100 Print Server ● ZPL or ZPL II programming languages—selectable via software or front panel ● XML-enabled printing—direct connection integration facilitates barcode label printing; not only saving on licensing fees and printer server hardware costs, but also reducing customization and programming costs ● Unicode-compatible global printing ● ZBI2.1—allows the printer to run applications, prompt users via control panel commands, and use files stored on the printer as a data source.
Options and Accessories ● Rewinder ● Paper cutter and receiving tray ● Media folding door with transparent panel ● 3-inch/76 mm or 40 mm core media supply shaft ● Labeler interface ● 64 MB onboard linear flash memory ● Extended fonts and international fonts
1. Introduction to the Components of the Zebra 140Xi4 Barcode Printer 1.1 Print Roller/Control Panel/Print Head Assembly/Print Head Opening Lever/Ribbon Pickup Shaft/Ribbon Supply Shaft/Media Supply Guide/Media Supply Holder
1.4 Structural Description in Cutter Mode Print Head Opening Lever/Media Guide/Media Guide Roller/Media Supply Guide/Media/Cutter
1.5 Structural Description in Rewind Mode: Printhead Opening Rod / Media Guide Plate / Media Guide Plate Roller / Media Supply Guide Plate / Label / Guide Plate / Shaft Hook / Rewind Shaft / Rewind Plate / Printed Label
2. Zebra 140Xi4 Barcode Printer Control Panel Button and Indicator Description 2.1 Control Panel Button Description ■ FEED (Feed): Function: Each press forces the printer to feed a blank label. ① If the printer is not printing, immediately feed a blank label; ② If printing is in progress, feed a blank label after completing the current batch of labels. ■ PAUSE (Pause): Function: Starts or stops printer operation, or deletes error messages and clears the LCD screen. ① If the printer is idle, it will immediately enter “Pause” mode; ② If the printer is printing, the labels will be completed before the printer pauses. ■ CANCEL (Cancel): Function: Cancels print jobs when the printer is paused. ① If the printer is not printing, it will not print the next stored label format; ② If printing is in progress, it will print all labels for the day and cancel the next label format. Pressing and holding for a few seconds cancels all print jobs in memory. ■ SETUP/EXIT (Setup/Exit): Function: Enters and exits configuration mode. ■ PREVIOUS (Previous): Function: In setup mode, scrolls the LCD screen to the previous parameter. Pressing and holding this button scrolls quickly. ■ Plus sign (+): Function: Changes parameter value, usually used to increase the value, answer “Yes”, scroll between options, or change the input value when entering the printer password. ■ Minus sign (-): Function: Changes parameter value, usually used to decrease the value, answer “No”, scroll between options, or change the cursor position when entering the printer password. ■ NEXT/SAVE: Function: ① In setting mode, scrolls the LCD screen to the next parameter; pressing and holding this button allows for rapid scrolling; ② When exiting setting mode, all changes made in the configuration and calibration sequence will be preserved. ■ CALIBRATE (Calibration), Function: Calibrates the printer for the following items: ① Media length; ② Media type (continuous or intermittent); ③ Printing method (thermal or thermal transfer); ④ Sensor value. 2.2 Control Panel Indicator Light Descriptions ■ POWER (Power), Off: Printer is off or not powered; On: Printer power is on. ■ PAUSE (Pause), Off: Printer is working normally; On: Printer has stopped all printing operations; Flashing: The “Pause” indicator flashes when initializing the “Flash” memory or when a label is in “Peel Mode”. ■ ERROR (Error), Off: Printer is working normally; On: Errors preventing printing, including MEDIA OUT and RIBBON OUT errors; Flashing: Errors exist, but printing can still continue, including RIBBON IN (ribbon in), HEAD UNDER TEMP (printhead temperature too low) warning, and HEAD OVER TEMP (printhead temperature too high) error . ■ DATA: Off: Printer is working normally and is not receiving or processing data; Flash once: The CANCEL button was pressed and the formatting was successfully canceled; Slow flashing: Printer cannot accept more data from the host; Rapid flashing: Printer is receiving data; On: Partial formatting has been received, and there is no further data activity.
3. Zebra 140Xi4 Barcode Printer Data Communication Interface Selection Users can send label formats to the printer through any available data communication interface. All necessary data cables must be provided for the specific situation. Ethernet does not require shielding, but other data cables must be fully shielded and equipped with metal or metallized connector housings. Using unshielded cables will result in electromagnetic radiation levels exceeding regulatory limits. To minimize electrical noise pickup levels in the cables: ● Use the shortest possible data cables ● Do not tightly bundle data cables and power cords together ● Do not tie data cables to power cord conduits Data Communication Interface Characteristics: ● RS232 Serial Port (Standard): ① Maximum cable length 15.24 meters; ② Printer parameters need to be changed to match the host computer; ③ If using a standard modem cable, a blank modem needs to be connected to the printer. ● IEEE1284 Bidirectional Parallel Port (Standard): ① Maximum cable length 3 meters; ② Recommended cable length 1.83 meters; ③ No printer parameter changes are required for compatibility with the host computer. ● USB (Standard): Features: ① Maximum cable length 5 meters; ② Compatible with host computer without requiring changes to printer parameters. ● Internal Ethernet Print Server (Standard): Features: ① Prints from any computer on the user’s LAN to the printer; ② Communicates with the printer via its web interface in ZPL mode; ③ The computer must have an Ethernet card; ④ The printer must be configured to use the LAN. ● Wireless Ethernet Print Server (Optional): Features: ① Prints from any computer on a wireless LAN (WLAN) to the printer; ② Communicates with the printer via its web interface in ZPL mode; ③ The printer must be configured to use the WLAN. Note: Before connecting the data communication cable, ensure the printer is powered off (O). Connecting the data communication cable while the power switch is on (I) may damage the printer.
4. Zebra 140Xi4 Printer Calibration and Printhead Pressure Adjustment 4.1 Printer Calibration The printer should be calibrated when first used. The calibration process allows the printer to determine the correct settings for the specific media and ribbon used in your application. The printer can be calibrated as needed. 4.1.1 Automatic Calibration The printer automatically sets the distance values detected between labels. When the control panel for MEDIA POWER UP or HEAD CLOSE is set to CALIBRATION, the printer will automatically perform calibration when the printhead is powered on or off. During automatic calibration, the printer determines the label length and sensor settings. The results of automatic calibration are stored in the printer’s memory and are not lost even when the printer is powered off. These parameters remain valid until the next calibration. 4.1.2 Manual Calibration Performing media and ribbon sensor calibration resets the sensor sensitivity for more accurate media and ribbon detection. If you have changed the ribbon or media type, performing this calibration process will allow your printer to work better. The sensitivity of the media and ribbon sensors can be adjusted using the following steps: ① Press the SETUP/EXIT button on the control panel. ② Press the NEXT/SAVE button and select the “Media and Ribbon Calibration” parameter. ③ Press the plus sign (+) to start the calibration process. The LOAD BACKING prompt will appear. ④ Open the printhead . ⑤ Peel approximately 203 mm of the label off the backing paper and feed the media into the printer, ensuring only the backing paper is between the media sensors. ⑥ Keep the printhead open. ⑦ Press the plus sign (+) to continue; the REMOVE RIBBON prompt will appear. ⑧ If a ribbon is used, it should be removed. ⑨ Close the printhead. ⑩ Press the plus sign (+) to continue; the CALIBRATING PLEASE WAIT message will appear. The printer adjusts the signal gain received from the media and ribbon sensors based on the specific combination of media and ribbon used. On the sensor graph, this corresponds to the graphical peak that moves up and down to better read your printing application. After calibration, RELOAD ALL will be displayed. ⑾ Open the printhead and push the media forward so that the label is below the media sensor. ⑿ Reload the ribbon (if used). ⑬ Close the printhead . ⑭ Press the plus sign (+) to continue. The printer performs automatic calibration. During this process, the printer checks the media and ribbon readings against the newly established scale to determine the ribbon length and printing mode. To view the readings on the new scale, print a sensor calibration diagram. 4.2 Adjusting the Transmissive Media Sensor The transmissive media sensor assembly consists of two parts: a light source and a photosensitive element. The bottom media sensor is the light source, and the top media sensor is the photosensitive element. The media passes between the two parts. These sensors only need to be adjusted when the printer cannot detect the top of the label. In this case, even if there is a label in the printer, the control panel LCD screen will still display ERROR CONDITION PAPER OUT. For intermittent media with punches or notches, the sensor must be positioned directly above the punches or notches. 4.2.1 Top Medium Sensor To reposition the top medium sensor along the inside of the medium, perform the following steps: ① If a ribbon was used, remove it. ② Locate the top medium sensor adjusting screw; the sensor head of the top medium sensor is located directly below the adjusting nut.
③ Use a flathead screwdriver to loosen the top medium sensor adjusting screw. ④ Slide the top medium sensor along the slot to the desired position. ⑤ Tighten the adjusting screw to secure the top medium sensor in its new position. ⑥ Adjust the bottom medium sensor position according to the new position of the top medium sensor. 4.2.1 Bottom Medium Sensor After adjusting the position of the top medium sensor, the bottom medium sensor should be adjusted accordingly to match its new position. To adjust the bottom medium sensor, complete the following steps: ① Under the rear roller, locate the bottom medium sensor assembly; the sensor is a circuit board secured by a spring clip.
② Slide the bottom medium sensor until it is below the top medium sensor. Use the light emitted by the bottom sensor to help align the top sensor; the wire can be gently pulled out as needed (the wire should be slightly slack). 4.3 Adjusting Printhead Pressure and Clamp Position Print quality depends on the labels and ribbons used, as well as the pressure and position of the printhead clamps. Ensure the labels and ribbons are suitable for your application; if so, check the clamp position and printhead pressure. 4.3.1 Clamp Position Adjustment If one side of the printed content is lighter in color, or if the labels are thicker, the clamp position may need adjustment. If the clamp pressure is too low or uneven, the labels and ribbons may slip. To adjust the clamp position, perform the following steps: ① Loosen the locking nut on top of the clamp assembly.
② Slide the clamps until they apply even pressure to the media. For very narrow media, place one clamp in the center of the label and reduce the pressure of the other unused clamp. ③ Tighten the locking nut . 4.3.2 Printhead Pressure Adjustment If the print quality problem persists after correctly adjusting the clamps, try adjusting the printhead pressure. Use the lowest printhead pressure that provides the desired print quality; this will extend printhead life. To adjust the printhead pressure, follow these steps: ① Pause the self-test and print labels at a speed of 61 mm/s. ② During label printing, use the control keys on the control panel to decrease the print depth setting until the label prints gray instead of black. ③ Loosen the top embossed nut on the clamping assembly. ④ Some media types require higher pressure to achieve the desired printing effect. For some media types, use the bottom embossed nut to increase or decrease the pressure until the color depth is the same on the left and right edges of the printing area. ⑤ Use the control panel to increase the color depth to the desired level . ⑥ Tighten the top embossed nut.
5. Zebra 140Xi4 Barcode Printer Configuration 5.1 Entering, Using, and Exiting Setup Mode 5.1.1 Entering Setup Mode Use the LCD screen on the control panel to view and adjust printer settings in setup mode. When changing parameters, an asterisk (*) displayed in the upper left corner of the screen indicates that the value is different from the value used in the printer that day. Press the SETUP/EXIT key to enter or exit setup mode. Press the NEXT/SAVE key to continue processing the next parameter. Press the PREVIOUS key to return to the previous parameter in the loop. 5.1.2 Exiting Setup Mode When exiting setup mode, there are several options to save, change, or not change the parameters. To exit Setup Mode, complete the following steps: ① Press SETUP/EXIT. The LCD screen will display SAVE CHANGES. ② Press the plus (+) or minus (-) button to select the save option: ◆PERMANENT: These values are saved in the printer even after the printer is powered off. ◆TEMPORARY: Saves changes until the power is turned off. ◆CANCEL: Cancels all changes made after entering “Setup” mode, excluding color depth and cutter settings, which take effect immediately after changes. ◆LOAD DEFAULTS: Restores all parameters except network settings to factory default values. Be careful when loading default values, as you will need to reload all manually changed settings afterward. ◆LOAD LAST SAVE: Loads the parameter values that were last permanently saved. ◆DEFAULT NET: Restores wired and wireless network settings to factory default values. ③ Press the NEXT/SAVE button to select the displayed option. After the configuration and calibration process is complete, PRINTER READY will be displayed. 5.2 Changing Password-Protected Parameters Certain parameters, including communication parameters, are password-protected by the manufacturer’s default values. Do not change password-protected parameters unless you have a complete understanding of their function; otherwise, the printer will not function properly. When a user attempts to change a password-protected parameter for the first time, the printer will display ENTER PASSWORD. The user must enter a four-digit numeric password to change the parameter. After correctly entering the password, unless SETUP/EXIT or the printer power is turned off, the password does not need to be entered again. To enter a password for a password-protected parameter, complete the following steps: ① You can use the minus sign (-) at the password prompt to change the selected digits. ② If you have already selected the digits to change, you can use the plus sign (+) to increase the selected value. Repeat the above two steps for each digit of the password. ③ After entering the password, press SELECT to display the parameter you selected to change. If the user has entered the correct password, the value can be changed. The default password value is 1234. The password can be changed using the ZPL’s ^KP command or the printer’s web page. The ^KP command can be used to set the password to 0000 to disable password protection, thus eliminating the need for the user to enter a password. To re-enable password protection, send the ZPL command ^KPx, where x can be a number from 1 to 9999. 5.3 Standard Control Panel Parameters Note: Label printing software or printer drivers may override adjustments made through the control panel.
■Density: Adjusting print density. The optimal density setting depends on various factors, including ribbon type, label, and printhead condition. Adjusting the density allows for consistent, optimal print quality. Note: Set the density to the lowest value that provides the best print quality. If the density is set too high, the ink will spread, the ribbon will burn through, and the printhead will wear out prematurely. If the printed content is too light or there are blank areas in the printed area, increase the print density. If the printed color is too dark, or if the print ink spreads or bleeds, decrease the print density. Default: +4.0, Range: 00 to +30
■ Print speed: Adjusting the print speed usually results in higher print quality by reducing the print speed. Default: 2 IPS, Range: 2 to 14 IPS (203 dpi)
■ Tear off the paper and adjust the cutting position. This parameter sets the position of the media on the cutter/peel bar after printing. Increasing the number moves the media outward (the cutting line moves to the leading edge of the next label), and decreasing the number moves the media inward (the cutting line moves towards the edge of the printed label). Default value: 0, range: -120 to +120
■ Print Mode: Select the print mode. This parameter instructs the printer how to feed the printed label. Ensure that the user has selected a print mode compatible with the printer and printer options. Default: TEAR-OFF; Options: TEAR-OFF, PEEL-OFF, CUTTER, DELAYED CUT, REWIND.
■Media Type: Sets the media type. This parameter informs the printer which type of parameters you are using. If Option Media is selected, a label length instruction must be included in the label format. If Non-Continuous Media is selected, the printer feeds the media to calculate the label length (the distance between two alignment points identified on the label gap, weave, alignment notch, or perforation). Default: NON-CONTINUOUS, Options: CONTINUOUS, NON-CONTINUOUS
■ Sensor Type: This parameter sets the sensor type. It informs the printer user whether to use media with a textured surface (labels have gaps/slits, notches, or perforations) to indicate separation between labels, or whether to use media with black printed markings on the backing. If there are no black markings for alignment on the back of the media, the printer will retain the default setting. Default: WEB (texture), Options: WEB (texture), MARK (marking)
■ Printing Method: Select the printing method. This parameter informs the printer user of the desired printing method: thermal (without ribbon) or thermal transfer (using thermal transfer media and ribbon). Default: Thermal Transfer; Options: Thermal Transfer, Thermal
■ Print Width: Sets the print width. This parameter specifies the printable area within the label width range. 203dpi: Default 1344, range 2 to 1344 300dpi: Default 1984, range 2 to 1984 Note: Setting the width too narrow may cause some label formats to fail to print on the media. Setting the width too wide will waste format memory, causing labels to print outside the lines or onto the print roller. If using a flipped image, this setting will affect the horizontal position of the label format.
■Maximum Length: Sets the maximum label length. This parameter is used in the media section of the calibration process. The maximum label length should be set to at least 25.4 mm longer than the actual label length. If this value is set to less than the label length, the printer will assume continuous media is loaded, and the printer will be unable to calibrate. For example: if the label length, including the label gap, is 126 mm, the parameter should be set to 152 mm; if the label length is 190 mm, the parameter should be set to 229 mm. Default: 988 mm; Option: This value can be adjusted in 25.4 mm increments.
■Low Consumables Warning: This setting includes a low consumables warning. If enabled, the printer will issue a warning when the media or ribbon quantity is low. Default: DISABLED, Options: ENABLED, DISABLED
■ Early Warning: Enables early maintenance warnings. If this function is enabled, the printer will warn you when the printhead needs cleaning. Default: MAINT.OFF (Maintenance Off), Options: MAINT.OFF (Maintenance Off), MAINTENANCE ON (Maintenance On)
■ The printhead is being cleaned. This setting provides an early warning for the printhead cleaning interval. This parameter is only displayed when “Early Maintenance Warning” is enabled. The value should correspond to the length of the media or ribbon roll used by the user. Default: 450 meters/1476 feet; Options: 100 meters/328 feet to 450 meters/1476 feet, in 50-meter increments.
■ Printhead cleaned? This is an early warning to reset the printhead cleaning counter. This parameter is only displayed when “Early Maintenance Warning” is enabled.
■ Printhead Life: Sets the printhead life for early warning. This parameter is only displayed when “Early Maintenance Warning” is enabled. Set this value to the number of inches of media the printhead is expected to print. Default: 1,000,000 inches; Range: 100 to 1,000,000 inches.
■A new printhead has been used? This is a warning to reset the printhead life counter. This parameter is only displayed when “Early Maintenance Warning” is enabled.
■ Non-reset counter: View the non-reset counter. This parameter displays the total length of media printed by the printer.
■ Reset Counter 1. View the user-controlled Counter 1. This parameter displays the total length of media printed by the printer since the last reset. The ZPL command can be used to change the unit of measurement of this counter and reset it.
■ Reset Counter 2. View the user-controlled Counter 2. This parameter displays the total length of media printed by the printer since the last reset. The ZPL command can be used to change the unit of measurement of this counter and reset it.
■ Print meter readings, print counter readings, and can print a label listing the following length readings: ① Non-resettable counter ② Two user-controlled counters ③ “Early Maintenance Warning” indicates the last time the printhead was cleaned and the lifespan of the printhead (if the “Early Maintenance Warning” function is disabled, the associated counters will not be printed).
■ List Fonts: This option prints a label listing the fonts available in the printer, including standard printer fonts and any optional fonts. Fonts can be stored in RAM or flash memory.
■ List barcodes. This option prints a label listing the barcodes available in the printer. The barcodes can be stored in RAM or flash memory.
■ List Images: This option prints a label listing the images available in the printer, which can be stored in RAM, flash memory, or an optional PCMCIA card.
■ List Formats: This option prints a label listing the available formats for your printer. These images can be stored in RAM, flash memory, or an optional PCMCIA card.
■ List Settings: This option prints a configuration label that lists the current printer configuration.
■ List Networks: This option prints a list of network configuration tabs, which show the settings of the installed print servers.
■ List All: This option allows you to print labels that list available fonts, barcodes, graphics, formats, and current printer and network configurations.
■ Initialize flash memory. This option erases information previously stored in the flash memory, and can completely erase the contents stored in the flash memory.
■ Sensor calibration chart, media sensor graph. The sensor graph shows the settings compared to the actual sensor readings. This label can be used to troubleshoot printing problems.
■ Media and Ribbon: To calibrate the sensitivity of the media and ribbon sensors, follow these steps: ① Press the SETUP/EXIT button on the control panel. ② Press the NEXT/SAVE button and select the “Media and Ribbon Calibration” parameter. ③ Press the plus sign (+) to start the calibration process. The LOAD BACKING prompt will appear. ④ Open the printhead . ⑤ Peel approximately 203 mm of label off the backing paper and feed the media into the printer, ensuring only the backing paper is between the media sensors. ⑥ Keep the printhead open. ⑦ Press the plus sign (+) to continue. The REMOVE RIBBON prompt will appear. ⑧ If a ribbon is used, remove it. ⑨ Close the printhead . ⑩ Press the plus sign (+) to continue. The CALIBRATING PLEASE WAIT message will appear. The printer adjusts the signal gain received from the media and ribbon sensors based on the specific media and ribbon combination used. On the sensor graph, this corresponds to the graphical peak that moves up and down to better read your printing application. After calibration, RELOAD ALL will be displayed. ⑾ Open the printhead and push the media forward so the label is below the media sensor. ⑿ Reload the ribbon (if used). ⑃ Close the printhead . Press the plus sign (+) to continue. The printer performs automatic calibration, during which it checks the media and ribbon readings against the newly established scale to determine the ribbon length and printing mode. To view the readings on the new scale, print a sensor calibration graph.
■ Parallel Communication: Configure parallel traffic by selecting a communication port that matches the computer host’s settings. Default: Bidirectional; Options: BIDIRECTIONAL, UNIDIRECTIONAL, TWINAX/COAX
■ Serial Communication: Configure serial communication by selecting the communication port that matches the settings used by the computer host. This setting only applies when using a serial port. Note: If using an external adapter to enable RS422/485 operation, select RS232. Default: RS232, Options: RS232, RS485 MULTIFROP
■ Baud Rate: Set the baud rate. This setting is only applicable when using a serial port. For accurate communication, the computer host’s baud rate setting must match the printer’s baud rate setting. Select a value that matches the settings used by the computer host. Default: 9600, Options: 300, 600, 1200, 2400, 4800, 9600, 14400, 19200, 28800, 38400, 57600, 115200
■ Data Bits: Sets the data bits. This setting is only applicable when using a serial port. For accurate communication, the computer host’s data bit setting must match the printer’s data bit setting. Select a value that matches the settings used by the computer host. Default: 8 bits, Options: 7 bits, 8 bits
■ Parity bit: Sets the parity. This setting only applies when using a serial port. For accurate communication, the computer host’s parity setting must match the printer’s parity setting. Select a value that matches the parity setting used by the computer host. Default: NONE, Options: ENVEN (Even), ODD (Odd), NONE (None)
■ Host Handshake: Configure host handshake. This setting is only applicable when using a serial port. For accurate communication, the computer host’s handshake protocol must match the printer’s handshake protocol. Select a handshake protocol that matches the settings used by the computer host. Default: XON/XOFF, Options: XON/XOFF, DSR/DTR, RTS/CTS
■ Protocol: Configure the protocol. The protocol is an error type checking system. Depending on the options, an indicator can be sent from the printer to the host computer, indicating that data has been received. The protocol requested by the host computer should be selected. Default: NONE; Options: NONE, ZEBRA, ACK_NAK. Note: ZEBRA and ACK_NAK are the same, but the ZEBRA response message order is different. If ZEBRA is selected, the printer must use DSR/DTR as the host handshake protocol.
■ Network Identifier: Set a network identifier. If the printer operates in an RS422/485 multi-point download environment, a unique identifier should be assigned to the printer. This allows the host computer to communicate with the specific printer without affecting the TCP/IP or IPX network. Default: 000, Range: 000 to 999
■ Communication: Configure communication mode. The communication diagnostic mode is a troubleshooting tool used to check the interconnection between the printer and the host computer. Default: Normal mode; Options: Normal mode, Diagnostics.
■ Control Character Prefix: Sets the control character prefix. The printer looks for this two-digit hexadecimal character to indicate the start of the ZPL control specification. Note: Do not use the same hexadecimal value for the control, format, and delimiter characters. The printer must use different characters to function correctly. Default: 7E, Range: 00 to FF
■ Format Prefix: Sets the format prefix, which is a two-digit hexadecimal value used as a parameter position marker in the ZPL format specification. The printer looks for this hexadecimal character that indicates the start of the ZPL format instruction. Note: Do not use the same hexadecimal value for the control, format, and delimiter characters; the printer must use different characters to function correctly. Default: 5E, Range: 00 to FF
■ Separator: Sets the separator, which is a two-digit hexadecimal value used as a parameter position marker in the ZPL format specification. Note: Do not use the same hexadecimal value for the control, format, and separator characters; the printer must use different characters to function correctly. Default: 2C, Range: 00 to FF
■ZPL Mode: Selecting ZPL mode will keep the printer in that mode until the mode is changed by this parameter or the ZPL command. The printer can accept label formats written using ZPL or ZPLII without needing to rewrite any existing ZPL formats. Default: ZPLII, Options: ZPLII, ZPL
■ Media is powered on. Select the Media Power-On option. This parameter sets the media operation when the printer is powered on. Default: CALIBRATION, Options: CALIBRATION, SHORT CAL, LENGTH, NO MOTION, FEED. The calibration process adjusts the sensor level and threshold, determines the length, and feeds the media to the next mesh. Short calibration sets the media and mesh thresholds without adjusting the sensor gain, determines the length, and feeds the media to the next mesh. Length is used to determine the label length using the current sensor value and feeds the media to the next mesh. No Motion instructs the printer not to move the media; you must manually confirm that the mesh is correctly positioned, or you can press the Feed button to position the next mesh. Feed feeds the label to the first alignment point.
■ Printhead Close: Sets the printhead close options. This parameter is used to set media operation when the printhead is closed. Default: CALIBRATION, Options: CALIBRATION, SHORT CAL, LENGTH, NO MOTION, FEED. The calibration process adjusts the sensor level and threshold, determines the length, and feeds the media to the next mesh. Short calibration sets the media and mesh thresholds without adjusting the sensor gain, determines the length, and feeds the media to the next mesh. Length is used to determine the label length using the current sensor value and feeds the media to the next mesh. No movement instructs the printer not to move the media; you must manually confirm that the mesh is correctly positioned, or you can press the feed button to position the next mesh. Feed feeds the label to the first alignment point.
■Rewind: Select the rewind sequence. This parameter sets when the label rewinds after being retrieved in some printing modes. This setting is invalid in “Wrap-up” mode. When received as part of the label format, this setting is replaced by ~JS. Default: Default (90%), Options: DEFAULT (default), AFTER (before), OFF (off), FEFORE (after), 10%, 20%, 30%, 40%, 50%, 60%, 70%, 80%
■ Label Top: Adjusts the top position of the label. This parameter adjusts the vertical printing position of the label. A positive number moves the top of the label down (away from the print head) by a specified number of dots, while a negative number moves the label down (towards the print head) by a specified number of dots. Default: +000, Options: Range: -120 to +120
■Left Position: Adjusting the left position allows you to adjust the label’s horizontal printing position. Positive numbers shift the printed content to the left by a specified number of dots, while negative numbers shift it to the right. Default: +000, Options: Range: -9999 to +9999
■ Printhead Test Count: Sets the printhead test count. The printer should periodically perform a printhead function test called a printhead test. This parameter is used to determine the number of labels printed between two tests. Default: 0000 (Test Disabled), Options: Range: 0000 to 9999
■ Verifier Port: Configures the verifier port. The auxiliary port determines how the printer responds to the online verifier. Default: OFF, Options: OFF, VER-RPRNT ERR (Verifier Reports Error), VER-THRUPUT (Verification Throughput) OFF: The verifier port is off. VER-RPRNT ERR (Verifier Reports Error): If the verifier detects an error, it will reprint the label. If the barcode is near the top edge of the label, the label length is sufficient for verification when it is sent out, and it can backtrack to print and verify the next label. VER-THRUPUT (Verification Throughput): Allows maximum throughput, but cannot immediately indicate a verification error when it is detected. One to three labels may have been printed before the error is recognized and printing stops.
■ Adhesive Interface: Sets the adhesive port mode, determining the operation of the adhesive port. Default: OFF (Off), Options: OFF (Off), MODE1, MODE2, MODE3, MODE4 OFF (Off): Verifier port is off. MODE1: Determines the ~END_PRINT signal as low when the printer moves the label forward. MODE2: Determines the ~END_PRINT signal as high when the printer moves the label forward. MODE3: Determines the ~END_PRINT signal as low for 20 milliseconds after the label is completed and repositioned; does not determine this in continuous printing mode. MODE4: Determines the ~END_PRINT signal as high for 20 milliseconds after the label is completed and repositioned; does not determine this in continuous printing mode.
■ Pause on Error: Sets the pasteer error signal when the printer pauses. If this option is enabled and the printer pauses, the printer sets the pasteer error state. Default: ENABLED, Options: ENABLED, DISABLED
■ Start Print Signal: Select the start print signal. This parameter determines how the printer responds to the “Start Print Signal” input on pin 3 of the adhesive interface connector on the back of the printer. Default: PULSE MODE, Options: PULSE MODE, LEVEL MODE. Pulse mode prints the label when the signal transitions from “high” to “low”. LEVEL mode prints the label as long as the signal is determined to be “low”.
■ Resynchronization Mode: Select the resynchronization mode. This parameter determines the printer’s operation in cases of label synchronization loss and unexpected label top position. Default: FEED MODE, Options: FEED MODE, ERROR MODE. FEED MODE : If the label top is not in the expected position, the printer will feed a blank label to find the label top position. ERROR MODE: If the label is not in the expected position, the printer will stop and enter “Pause” mode, displaying “Error condition feed label,” flashing the ERROR indicator, and issuing a “Service Required” signal (pin 10 on the adhesive interface connector). To resynchronize the media with the label top in “ERROR” mode, press the PAUSE button to exit “Pause” mode. The “ERROR” indicator will stop flashing, and the “Service Required” signal will turn off.
■ Reprint Mode: This setting allows users to reprint the previously printed label by issuing the ~PR command or pressing the minus (-) button on the control panel. Default: Disabled; Options: Enable, Disabled
■ Format Conversion: Select Format Conversion, then select Bitmap Scaling. The first number is the origin of the dots per inch (dpi) value, and the second number is the dpi to be scaled. Default: NONE, Options: None, 150 300, 150 600, 200 600, 300, 600
■ Idle Display: Selecting standby display allows you to choose the LCD screen option for the real-time clock. Note: If the default value is not selected, pressing the plus (+) or minus (-) sign will briefly display the printer’s firmware version. Default: Firmware version; Options: MM/DD/YY (24HR), MM/DD/YY (12HR), DD/MM/YY (24HR), DD/MM/YY (12HR), Firmware version
■ Real-time clock date: Sets the real-time clock (RTC) date. This parameter allows users to set the date according to the specifications listed in IDLE DUSPLAY (Standby Display).
■ Real-time clock time: Sets the real-time clock (RTC) time. This parameter allows users to set the time according to the specifications listed in IDLE DUSPLAY (Standby Display).
■ Password Level: Specifies the password level. This parameter allows the user to choose whether to password-protect selected menu items or all menu items. Default: Selected items; Options: Selected items, All items.
■Language: Select the display language. This parameter changes the language displayed on the LCD screen. Each language option is displayed in its own language. Default: English; Options: English, Spanish, French, German, Italian, Norwegian, Portuguese, Swedish, Danish, Spanish 2, Dutch, Finnish, Japanese, Korean, Simplified Chinese, Traditional Chinese
6. Routine Maintenance of Zebra 140Xi4 Barcode Printer Important Note: Zebra is not responsible for damage caused by the use of cleaning solutions on this printer. 6.1 Recommended Cleaning Schedule Depending on the application and media, more frequent cleaning may be required. Printhead, Method: 95% alcohol solvent, Time Interval: After one media roll is used up in thermal mode; after each ribbon roll is printed in thermal transfer mode. Roller, Method: 95% alcohol solvent, Time interval: After one media roll is used up in thermal mode, thermal transfer is performed after each ribbon roll is printed. Media sensor, Method: Air jet, Time interval: After one media roll is used up in thermal mode, thermal transfer is performed after each ribbon roll is printed. Ribbon sensor, Method: Air jet, Time interval: After one media roll is used up in thermal mode, thermal transfer is performed after each ribbon roll is printed . Media path: Method: 95% alcohol solvent, Time interval: After one media roll is used up in thermal mode, thermal transfer is performed after each ribbon roll is printed. Ribbon path: Method: 95% alcohol solvent, Time interval: After one media roll is used up in thermal mode, thermal transfer is performed after each ribbon roll is printed. 6.2 Cleaning steps 6.2.1 Cleaning the printer casing The printer’s outer surface can be cleaned with a lint-free cloth and a small amount of neutral detergent. Do not use abrasive cleaners or solvents. 6.2.2 Clean the Media Tank After every four rolls of media, check the media tank and use a soft-bristled brush or vacuum cleaner to remove dust and paper scraps from inside the printer. 6.2.3 Clean the Printhead and Roller Daily maintenance can minimize printhead wear and maintain print quality. As printing continues, the media or ribbon passing through the printhead will continuously wear down the ceramic protective layer, exposing and eventually damaging the printed elements. To prevent corrosion: ◆ Clean the printhead frequently and use a backed and fully lubricated thermal transfer ribbon to reduce friction. ◆ Optimize the balance between these two by using the lowest possible printhead pressure and burn-in temperature settings. ◆ Ensure the thermal transfer ribbon width is greater than or equal to the label media width to protect the printed elements from exposure to more corrosive label materials. For best results, clean the printhead after each ribbon roll change. Unstable print quality, such as blank spaces in printed barcodes or graphics, may indicate a dirty printhead. Caution: When performing tasks near the exposed printhead, remove all rings, watches, long necklaces, ID cards, and other metal objects that may come into contact with the printhead. Caution: The printhead gets very hot and may cause severe burns; allow the printhead to cool completely. Caution: Before touching the printhead assembly, touch the printer’s metal frame or use an anti-static wrist strap or pad to discharge any accumulated static electricity. To clean the printhead and rollers, complete the following steps: ① Turn the printhead opening lever counter-clockwise to open the printhead assembly. ② Remove the media and ribbon. ③ Use a cleaning swab to wipe from one end of the brown strip on the printhead assembly to the other.
④ While manually rotating the print rollers, thoroughly clean them with a cotton swab to allow the solution to evaporate completely. ⑤ Reinstall the media and ribbon and close the printhead assembly. Note: If print quality does not improve after performing the above steps, try cleaning the printhead with the Save-a-Printhead cleaning film, a specially coated material that removes accumulated dirt without damaging the printhead. 6.2.4 Clean the Sensor Use a brush or vacuum cleaner to remove accumulated paper scraps and dust from the sensor. Location of the ribbon and label sensor:
6.2.5 Clean the Chuck The chuck should be cleaned when labels stick or are stuck to the bottom. To clean the chuck, complete the following steps: ① Insert a small flathead screwdriver or similar tool into the ring on the left side of the chuck.
② Gently lift the left side of the chuck. ③ Insert a small flathead screwdriver or similar tool into the ring on the right side of the chuck. ④ Gently lift the right side of the chuck. ⑤ Remove the chuck from the printer. ⑥ Wipe the chuck with a clean cotton swab or soft cloth soaked in gasoline solvent. ⑦ To reinstall the chuck, insert the two retaining tabs at the bottom of the chuck into the two slots in the media path. ⑧ Slide the chuck towards yourself. ⑨ Press the ring component down to lock the chuck in place. 6.2.6 Replacing the Fuse Caution: Before performing this step, first turn off the AC power switch and unplug the power cord. The printer uses metric fuses (5*20 mm IEC), rated F5A, 250 volts. The AC power input module includes two approved fuses on the fuse holder: one is the fuse used in the circuit, and the other is a spare fuse. To replace a faulty fuse, follow these steps: ① Use a small flathead screwdriver or similar tool to remove the fuse holder, which is part of the AC power input module at the rear of the printer. ② Remove the faulty fuse and install a new one. ③ Reinstall the fuse holder into the AC power input module. ④ Reconnect the power cord and turn on the printer.
7. Troubleshooting Zebra 140Xi4 Barcode Printer 7.1 LCD Screen Error Messages When an error occurs, the LCD screen displays a message. Below are the LCD screen errors, possible causes, and recommended solutions. ●INVALID HEAD (Invalid printhead); Possible cause: An original Zebra printhead was not used when replacing the printhead; Solution: Install an original Zebra printhead. ●RIBBON OUT (Ribbon exhausted); Possible causes and solutions: ① In thermal transfer mode, the ribbon is not loaded or is incorrectly loaded. Please load the media correctly. ② In thermal transfer mode, the ribbon sensor does not detect an incorrectly loaded ribbon. Please load the media correctly and calibrate the sensor. ③ In thermal transfer mode, the media is blocking the ribbon sensor. Please load the media correctly and calibrate the sensor. ④ In thermal transfer mode, even if the ribbon is loaded, the printer still does not detect the ribbon. Please print the sensor chart, calibrate the sensor, or load the printer default settings. ●RIBBON IN (Ribbon loaded); Possible cause: The ribbon is loaded, but the printer is set to thermal mode; Solution: Thermal media does not require a ribbon. If you want to use thermal transfer media that requires a ribbon, you should set the printer to “Thermal Transfer” mode. ●PAPER OUT (Paper Out), Possible Causes and Solutions: ① No media loaded or improper media loading. Please load the media correctly. ② Media sensor misalignment. Please check the media sensor position. ③ The printer is set to use non-continuous media, but continuous media is loaded. Please install the correct media type, or reset the printer to the current media type and perform calibration. ● HEAD OPEN (Print Head Open), Possible Causes and Solutions: ① Print head not fully closed. Please fully close the print head. ② Print head open sensor malfunction. Please replace the sensor. 7.2 Calibration Fault ● Fault: Print alignment mark missing on label, vertical offset of top alignment mark on form too much. Possible Causes and Solutions: ① Paper pressure roller too dirty. Please clean the paper pressure roller. ② Media guide plate position incorrect. Please ensure the media guide plate is correctly positioned. ③ Incorrect media type. Please set the printer to use the correct media type. ④ Incorrect media loading. Please load the media correctly. ● Fault: Automatic calibration failed. Possible causes and solutions: ① Incorrect media or ribbon loading. Please load the media and ribbon correctly. ② The sensor did not detect the media or ribbon. Please manually calibrate the printer. ③ The sensor is too dirty or incorrectly positioned, preventing detection. Please ensure the sensor is clean and the media is in the correct position. ④ Incorrect media type setting. Please set the printer to use the correct media type. 7.3 Communication Failure ● Failure: The label format has been sent to the printer, but it is not recognized, and the DATA indicator light is not flashing. Possible cause: Incorrect communication parameters. Solutions: ① Check the printer driver or software communication settings. ② If using a serial port, check the port settings in the control panel menu. ③ If using a driver, check the driver communication settings related to the connection. ● Failure: The label format has been sent to the printer, but after printing multiple labels, the printer skips, misplaces, loses, or distorts the image on the labels. Possible cause: Incorrect serial communication settings. Solutions: ① Ensure the flow control settings match. ② Check the communication cable length. ③ Check the printer driver or software communication settings. ● Failure: The label format has been sent to the printer, but it is not recognized. The DATA light flashes, but no printing occurs. Possible causes and solutions: ① The prefix and separator character sets in the printer do not match the character sets in the label format. Please check the prefix and separator characters. ② Incorrect data is being sent to the printer. Please check the communication settings on your computer to ensure that these settings match the settings on the printer. If the problem persists, check the label format. 7.4 Ribbon Fault ● Fault: Ribbon is damaged or melted. Possible cause: Depth setting value is too high. Solution: ① Lower the depth setting value. ② Thoroughly clean the print head. ● Fault: The printer does not detect that the ribbon is used up. Possible cause: The printer was calibrated without a ribbon, and then the ribbon was inserted without performing a user recalibration of the printer, or the printer defaults were not loaded. Solution: Now calibrate the printer with the ribbon, or load the printer defaults. ● Fault: In thermal transfer mode, the printer does not detect the ribbon even though it is correctly loaded. Possible cause: The printer was calibrated without a ribbon, and then the ribbon was inserted without performing a user recalibration of the printer, or the printer defaults were not loaded. Solutions: Use the ribbon to calibrate the printer now, or load the printer defaults. ● Fault: The ribbon indicator light is still on even when the ribbon is correctly loaded. Possible Cause: The printer has not been calibrated for the labels and ribbon to be used. Solution: Perform calibration of the media and ribbon sensor sensitivity 7.5. Printer Diagnostics Self-tests and other diagnostic methods can provide specific information about the printer’s condition. Self-tests can provide sample printouts and can provide specific information to help determine the printer’s working condition . The most commonly used are the “Power-On” self-test and the CANCEL self-test. Important Note: Use full-width media when performing self-tests. If your media is not wide enough, the test label will print on the pressure rollers. To prevent this, check the print width setting on the control panel and ensure that the width is correct for the media to be used. Note: ▲ Do not send data from the host to the printer while performing these self-tests. ▲ If the media is shorter than the label to be printed, the test will continue printing on the next label. ▲ If you cancel the self-test before it is actually completed, you can reset the printer by turning off the power and then on again. 7.5.1 Power-On Self-Test A power-on self-test will be performed each time the printer is powered on. During this self-test, the control panel indicator lights will turn on and off to ensure correct operation. At the end of the self-test, only the power indicator light will be on. When the power-on self-test is complete, the media will be fed into the correct position. 7.5.2 CANCEL Self-Test To perform the “CANCEL self-test,” complete the following steps: ① Turn off the printer power. ② With the printer power on, press and hold the CANCEL button until the first control panel light goes out. A printer configuration label will be printed, as shown below.
7.5.3 PAUSE Self-Test This self-test can be used to provide a necessary checklist when adjusting the printer’s mechanical components or determining whether the printhead components are working properly. To perform the PAUSE self-test, complete the following steps: ① Turn off the printer power ② With the printer power on, press and hold the PAUSE button until the first control panel light goes out. ● During the initial self-test, the printer prints 15 labels at its lowest speed, then automatically pauses. Each time the PAUSE button is pressed, an additional 15 labels will be printed.
● While the printer is paused, pressing CANCEL will change the self-test; each time PAUSE is pressed, 15 labels will be printed at a speed of 152 mm/s. ● While the printer is paused, pressing CANCEL again will change the self-test; each time PAUSE is pressed, 50 labels will be printed at the printer’s lowest speed. ● When the printer is paused, pressing CANCEL again will change the self-test for the third time. Each time PAUSE is pressed, 50 labels will be printed at a speed of 152 mm/s. ● When the printer is paused, pressing CANCEL again will change the self-test for the fourth time. Each time PAUSE is pressed, 15 labels will be printed at the printer’s maximum speed. ● Holding down CANCEL will exit the self-test at any time. 7.5.4 FEED Self-Test Different types of media may require different depth settings. During the FEED self-test, labels are printed at two different printing speeds with different depth settings. Each label will be printed with a relative depth and printing speed. ANSI grading can be performed on the barcodes on these labels to check print quality. The depth value starts below the printer’s current depth value (relative depth 3) and increases to three depth settings above the current depth value (relative depth + 3). Depending on the printhead dot density, a series of 7 labels can be printed at each speed: ● 203dpi printer: 2ips, 6ips, and 10ips ● 300dpi printer: 2ips, 6ips, and 8ips ● 600dpi printer: 2ips and 4ips To perform a FEED self-test, complete the following steps: ① Print a configuration label to display the printer’s current configuration. ② Turn off the printer power. ③ With the printer power on, press and hold the FEED button until the first control panel light goes out. The printer will print a series of labels at different speeds and depths above and below the depth value shown in the configuration label.
④ Use the diagram below to check the test labels and determine which label has the best print quality for your application. If you have a barcode detector , you can use it to measure the barcode/blank and calculate the print contrast. If you do not have a barcode detector, you can use a visual method or a system scanner to select the best depth setting based on the labels printed in this self-test.
■ Too Dark: The label is too dark and obvious. It is readable but does not conform to specifications. This manifests as an enlarged size of the regular barcode, with ink filling the spaces for small alphanumeric characters. Rotating the barcode results in crowded spaces. ■ Slightly Dark: The label is slightly darker and not very noticeable. This is a standard barcode with slightly thickened small alphanumeric characters, appearing somewhat crowded. Rotating barcodes have less space compared to standard barcodes, potentially making the code unreadable. ■ Conforms to Specifications: This type of barcode can only be verified using a barcode detector, but it still has some visual characteristics. Regular barcodes have complete, balanced bars and clear, distinct gaps; rotating barcodes also have complete, balanced bars and clear, distinct gaps. While not as visually appealing as slightly darker barcodes, these barcodes conform to specifications. In both regular and rotating styles, small alphanumeric characters appear more complete. ■ Slightly Lighter: In some cases, for “conforms to specifications” barcodes, slightly lighter labels are more effective than darker ones. The results show that both regular and rotating barcodes conform to specifications, but small alphanumeric characters may be incomplete. ■ Too light, indicating the label color is too light and indistinct. This manifests as incomplete regular and rotating barcodes, and unreadable small alphanumeric characters. ⑤ Pay attention to the relative depth value and printing speed on the label that produces the best results. ⑥ The relative depth value can be added to or subtracted from the depth value specified on the configuration label; the resulting numerical value is the optimal depth value for a specific label/ribbon combination and printing speed. ⑦ If necessary, the depth value should be changed to the depth value on the label that produces the best results. ⑧ The printing speed should be changed to the same speed as the label that produces the best results, as needed. 7.5.5 FEED and PAUSE Self-Test Performing this self-test can temporarily reset the printer to factory defaults. Unless these values are retained in memory, they will only take effect after the power is turned off. If the factory defaults are permanently retained, a media calibration procedure must be performed. To perform the FEED and PAUSE self-test, complete the following steps: ① Turn off the printer power. ② With the printer power on, press and hold the FEED (paper feed) and PAUSE (pause) buttons. ③ Press and hold the FEED and PAUSE buttons until the first control panel light goes out. The printer configuration will be temporarily reset to factory defaults, and no labels will be printed when the test is complete.
The Zebra 110Xi4 printer is an ideal choice for many customers due to its robust durability, excellent print quality, fast printing speed, long lifespan, and unparalleled reliability in harsh environments.
Built upon traditional features, the 110Xi4 is designed to help users effectively improve operational efficiency – select models can offer up to 40% faster print speeds, 10/100 Ethernet connectivity provides significantly faster speeds, a more robust pre-notification system helps reduce downtime, multiple network connectivity options facilitate easier integration, and the ZebraLink solution provides remote printer management capabilities.
The all-metal Zebra 110Xi4 barcode printer boasts exceptional durability and performance, significantly reducing downtime. 1. The Zebra 110Xi4 printer easily meets the needs of high-volume production lines: ● With a print speed of 14 inches/356 mm per second, the 110Xi4 features one of the fastest technologies on the market, effectively improving the efficiency of batch printing and print-to-use production lines. ● High-speed processing power and throughput contribute to increased efficiency. ● Ample memory allows for the storage of more label formats, fonts, and images. ● The durable metal printhead provides excellent print quality even after prolonged use, effectively reducing or avoiding downtime due to printhead replacements. 2. For mission-critical and 24/7 operations, every second of downtime translates to lost money. The Zebra 110Xi4 printer is the best way to maximize uptime. ● The proven Xi platform ensures uninterrupted 24/7 operation . ● A pre-warning system that alerts users when printhead maintenance or ribbon/media replacement is needed, coupled with remote printer management/monitoring capabilities, allows for rapid identification and resolution of printer problems. 3. The Zebra 110Xi4 printer, meeting industrial strength standards, can withstand the most demanding working environments. ● Durability: The high-diameter steel frame and metal internal components effectively withstand impacts. ● Enclosed design prevents dust from entering. ● Trouble-free operation across a wide range of temperatures and humidity levels. 4. The Zebra 110Xi4 flexibly meets the needs of professional label printing.
Zebra 110Xi4 Detailed Specifications
Standard ● Printing Method: Thermal transfer or thermal printing ● Resolution: 203 dpi (8 dots/mm), 300 dpi (12 dots/mm), 600 dpi (23.5 dots/mm) ● Memory: 16 MB SDRAM, 8 MB Flash ● Maximum Print Width: 102 mm ● Maximum Print Speed: 14 inches/second (356 mm/second) ● 32-bit 133 MHz RISC processor ● 8 MB Flash memory—including 2.0 MB of user-available non-volatile memory for storing downloadable content ● Built-in real-time clock ● Advanced label/media counter ● Automatic calibration—the printer automatically calibrates upon startup or when the printhead is closed after approximately two labels ● Pre-warning system—alerts are given via the front panel and ZebraLink warnings for low label/ribbon levels or printhead cleaning ● New multi-function front panel and multilingual widescreen monochrome LCD display—with user-programmable password protection ● Transparent media side door—easily monitor consumable usage without opening the printer system ● With E3 Element Energy Control The thin-film printhead facilitates superior print quality . It features a serial RS-232 port with automatic detection and a bidirectional parallel port . It also includes dual media sensors—emitting and reflective—selectable via software or the front panel.
Electrical Parameters ● 90-264 VAC, 48-62 Hz universal power supply with power parameter correction ● Serial RS-232 and bidirectional parallel ports with automatic detection ● USB 2.0 port
Labels and Ribbons ● Maximum Media Roll Size: Outer core diameter 8 inches/203 mm, Inner core diameter 3 inches/76 mm ● Media Thickness (Labels and Backing Paper): 0.003 inches/0.076 mm to 0.012 inches/0.305 mm ● Media Width (Labels and Backing Paper): 0.79 inches/20 mm to 4.5 inches/114 mm ● Media Length (Labels and Backing Paper): 39 inches/991 mm to 150 inches/3810 mm (using non-continuous paper) ● Media Type: Continuous paper, die-cut paper, or black label paper ● For optimal print quality and printer performance, it is recommended to use sensitive consumables. ● It is recommended that the ribbon width be at least the same as the media width. ● Maximum media roll size: 3.2 inches/81.3 mm outer diameter, 1 inch/25.4 mm inner diameter ● Standard ribbon length: 1,476 inches/450 meters or 984 inches/300 meters; available in 3:1 and 2:1 media roll to ribbon ratios ● Ribbon setting: ink side of the ribbon is facing outwards during winding
Fonts/Graphics/Symbols ● Bit-matrix fonts A through H and GS symbols can be magnified up to 10 times, with separate scaling for height and width . ● Smooth scalable fonts (CG Triumvirate Bold Condensed) can be magnified point by point, with separate scaling for height and width. ● IBM Code Page 850 international character set. ● Includes UFST from Montotype Imaging, Inc. ● Supports user-defined fonts and graphics—including custom logos. ● Linear barcodes: Code 11, Code 39, Code 93, Code 128 (including subsets A/B/C and UCC Case C Codes), ISBT-128, UPC-A, UPC-E, EAN-8, EAN-13, UPC and EAN 2 or 5-digit extensions, Plessey, Postnet, Standard 2-of-5, Industrial 2-of-5, Interleaved 2-of-5, Logmars, MSI, Codabar, Planet Code. ● Two-dimensional barcodes: Codablock, PDF417, Code 49, DataMatrix, MaxiCode, QR Code, MicroPDF417, TLC39, GS1 DataBar (RSS), Aztec
ZebraLink Solutions ● ZebraDesigner Pro/ZebraDesigner/ZebraDesigner for XML/ZebraNet Utilities v 7.0/ZebraNet Bridge Enterprise/Zebra Enterprise Connector ● ZebraNet Internal Wireless Plus/ZebraNet Wireless Plus Print Server/ZebraNet 10/100 Print Server ● ZPL or ZPL II programming languages—selectable via software or front panel ● XML-enabled printing—direct connection integration facilitates barcode label printing; not only saving on licensing fees and printer server hardware costs, but also reducing customization and programming costs ● Unicode-compatible global printing ● ZBI2.1—allows the printer to run applications, prompt users via control panel commands, and use files stored on the printer as a data source.
Options and Accessories ● Rewinder ● Paper cutter and receiving tray ● Media folding door with transparent panel ● 3-inch/76 mm or 40 mm core media supply shaft ● Labeler interface ● 64 MB onboard linear flash memory ● Extended fonts and international fonts
The Zebra ZT620 builds upon its industry-leading predecessor, the Xi series, integrating exceptional durability and superior performance into a user-friendly, future-proof platform.
This next-generation powerhouse helps you navigate the ever-evolving business technology landscape.
Therefore, whether you’re concerned about growing production line demands, increasing operational complexity, integrating disparate systems, or controlling investment costs, the ZT620 industrial printer meets your needs now and in the future.
Zebra ZT620 Product Advantages: ◆ All-Weather Reliability for the Harshest Environments: ZT620 printers can withstand daily use in the most demanding industrial conditions, virtually eliminating downtime due to printer malfunctions. Furthermore, they meet your high-intensity daily production needs with excellent print quality and speed achievable in a wide range of applications. ◆ User-Friendly Setup, Use, Maintenance, and Troubleshooting: The intuitive Link-OS app and user-friendly design simplify everything—from deployment and daily use to routine maintenance. Compatibility with other printing systems and technologies helps simplify integration and management, while built-in sensors, diagnostics, and help resources guide users through troubleshooting, eliminating the need to seek support for every minor issue. ◆ Highly Adaptable Platform for Future Needs: The last thing you need is so-called new technology that becomes obsolete within a few years. That’s why the ZT620 was designed with future needs in mind—from its adaptable design supporting field communication, media handling, and other upgrades to compatibility with SOTI and AirWatch device management software, and the intuitive Link-OS app that simplifies updates and reconfiguration as needed. ◆ Unparalleled performance to meet current needs * Durable all-metal structured components designed for all-weather, high-intensity use, meeting years of continuous operation * Built-in thermal management eliminates the need for ventilation and cooling fans, effectively preventing dust and debris intrusion and enabling trouble-free printing even in the most challenging environments * High-quality printing mechanisms and internal components are carefully designed to ensure outstanding performance and reliability * Long-life printheads reduce replacement costs and help minimize printer downtime * Easily adjustable printhead pressure toggle with graduated and color-coded pressure indicators simplifies printer setup and operation ◆ User-friendly features for everyday operation * Simple, intuitive side media mounting helps ensure efficient printer operation and reduces training requirements * High-visibility color display turns red when the printer is in an error state, allowing users to determine the printer’s status from a distance * Guided media path changes color when a media error occurs, providing simple visual cues to help users quickly find and resolve problems * Color graphic display with icon menu system and local language support helps simplify everyday operation and achieve a better user experience * Built-in chamber lights illuminate the ribbon and media path for enhanced visibility. * Color-coded components make all contacts easily identifiable . * Quick troubleshooting is achieved with QR codes linked to help videos for errors. * Quick-change printheads simplify maintenance with easy-to-plug receptacles, eliminating the need for wiring. * Convenient single-knob adjustment without affecting media positioning is achieved with integrated top and bottom media sensors. * Powerful insights for a smarter future: * Link-OS Printer Profile Manager Enterprise enables administrators to monitor networked Link-OS printers from a user-friendly, browser-based interface . * The Mobile Device Management connector easily integrates networked printers into AirWatch or SOTI Device Management systems. * Link-OS Cloud Connect provides direct, encrypted, and authenticated connectivity to connect printers to clients or cloud-based servers. * Zebra’s visibility services enable businesses to track and analyze printer status, performance, and usage, driving improved business performance. * Exceptional adaptability for a better future :* Optional advanced RFID coding is easy to install and use . Field-installable media handling options take full advantage of the partition-type electrical connectors for easy and quick installation to expand printer functionality. * Two USB host ports allow for flexible connection of various peripheral devices. * Two available communication slots facilitate quick and easy addition of connectivity options, including 802.11ac, parallel, Ethernet, IPv6, and labeler interfaces.
Zebra ZT620 Detailed Specifications
Standard Features ● Printing Methods: Thermal transfer and thermal printing ● Design: Metal frame and folding metal media cover with a large, clear window ● Side-mounted consumable path for simplified media and ribbon installation ● Printhead with Element Energy Equalizer (E3) technology for excellent print quality ● Communication: High-speed USB 2.0, RS-232 serial, Gigabit Ethernet, Bluetooth 4.0 ● Highly intuitive color display that turns red when the printer is in an error state, allowing operators to check the printer’s status from a distance ● Simplified icon-based menu navigation system categorizes settings into different logical function groups
Print Specifications ● Resolution: 203 dpi (8 dots/mm), 300 dpi (12 dots/mm) (optional) ● Memory: 1 GB RAM, 2 GB Flash ● Maximum Print Width: 6.6 inches/168 mm ● Maximum Print Length: 203 dpi: 3810 mm; 300 dpi: 2540 mm ● Maximum Print Speed: 12 inches/second (305 mm/second) ● Media Sensor: Transmissive and Reflective
Media Characteristics ● Media Width (Label and Backing): 2 inches/51 mm to 7 inches/178 mm, tear/cutter; 2 inches/51 mm to 6.75 inches/171 mm, peel/rewind ● Maximum Media Roll Size: 8 inches/203 mm, core outer diameter 3 inches/76 mm, core inner diameter ● Minimum Label Length: 0.25 inches/6 mm (rewind mode); 0.5 inches/13 mm (peel mode); 0.7 inches/18 mm (tear mode); 1.5 inches/38 mm (cutter mode) ● Media Thickness: 0.003 inches/0.076 mm to 0.007 inches/0.18 mm (cutter mode); 0.012 inches/0.305 mm (non-cutter mode) ● Media Type: Continuous paper, die-cut paper, notched paper, black label paper ● Media Printing Deviation: Vertical: ±1.5 mm; Horizontal: ±1.5 mm
Ribbon Characteristics ● Maximum Outer Diameter: 450 meters: 3.2 inches/81.3 mm, Core Outer Diameter: 1 inch/25.4 mm, Core Inner Diameter ● Standard Length: 1476′/450 meters ● Width: 2.00 inches/51 mm to 6.85 inches/174 mm ● Ribbon Setup: Ink side of the ribbon is wound outwards.
Electrical Parameters ● Automatic detection (PFC compliant) 90-250VAC, 47-63Hz, rated power 250 watts ● ENERGY STAR certified
Physical parameters (closed state) ● Width: 13.44 inches / 341.45 mm ● Height: 15.58 inches / 395.68 mm ● Depth: 19.88 inches / 505 mm ● Weight: 57.4 lbs / 26 kg
Fonts/Graphics/Symbols ● 16 built-in scalable ZPL II bitmap fonts and two built-in scalable ZPL fonts ● Scalable smooth bitmap fonts for Asian and other international languages ● Unicode: suitable for multilingual printing ● Downloadable objects include images, scalable fonts and bitmap fonts, label templates and formatting. ● The IBM Code Page 850 international character set is available for fonts A, B, C, D, E, F, G and 0 via software control. ● Code Page 1250, 1252, 1253, 1254, and 1255 support font 0.
Barcode Types: ● 1D Barcodes: Code 11, Code 39, Code 93, Code 128 with A/B/C subsets and UCC Case Codes, ISBT-128, UPC-A, UPC-E, EAN-8, EAN-13, UPC and EAN 2- or 5-digit extensions, Plessey, Postnet, Standard 2-of-5, Industrial 2-of-5, Interleaved 2-of-5, Logmars, MSI, Codabar and Planet Code ● 2D Barcodes: Codablock, PDF417, Code 49, Data Matrix, MaxiCode, QR Code, TLC 39, MicroPDF RSS-14 (and additional codes), Aztec
Link-OS Solutions : ● Documentation Design: Quickly design custom printing solutions using business data and Zebra’s intuitive plug-and-play design tools. ● Device Integration: Zebra’s applications and products help you integrate Zebra devices into existing systems. ● Device Management: Manage local and global printing operations with Zebra’s device management tool suite. ● Developer Tools: Provides the tools you need to create your own applications, including documentation, source code, programming languages, templates, and more.
Firmware ● Built-in ZPL, ZPL II, and EPL programming languages can be selected via software or front panel. ● Supports XML printing – Enables XML communication for barcode label printing.
Options and Accessories ● Connecting two available communication slots for adding internal cards to 802.11ac, parallel, Ethernet, and labeler interfaces. IPv6 option as an external adapter attached to the parallel port. ● Media Handling * Rewinder: Rewinds all printed labels inwards onto the 3-inch core, and can also peel and rewind backing paper (factory setting only). * Cutter: Forward-facing guillotine cutter and receiving tray. * 1-inch core inner diameter media supply rack. * Ribbon supply shaft supports ribbon ink-side-in winding. ● Radio Frequency Identification (RFID) * Supports signage compatible with UHF EPC Gen 2 V2/ISO/IEC 18000-6C and RAIN RFID protocols. * Integrated RFID system can be upgraded by the user in the field. * Adaptive coding technology automatically selects the optimal coding settings. ● Keyboard Display Unit: Supports ZKDU keyboard display unit, suitable for standalone printing applications.