I. Introduction to the Zebra ZT210 Barcode Printer
Note: Components in the printer are color-coded
● Touch points that require operation are gold.
● Components related to the ribbon system are black plastic, and media-related components are gray. These components, along with other components, are shown in light blue in this manual.
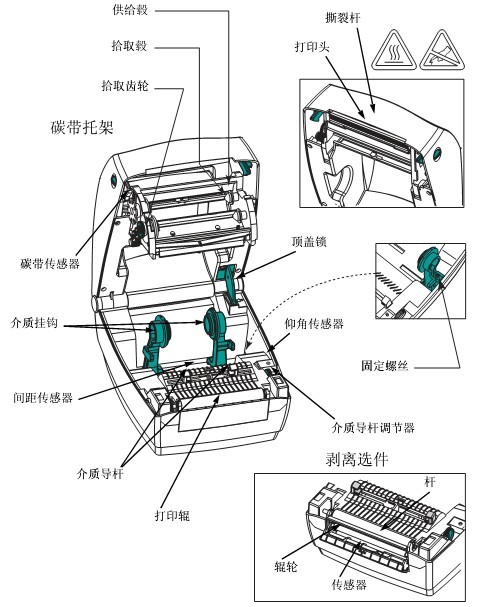
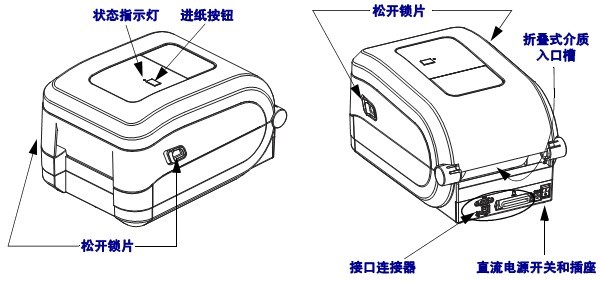
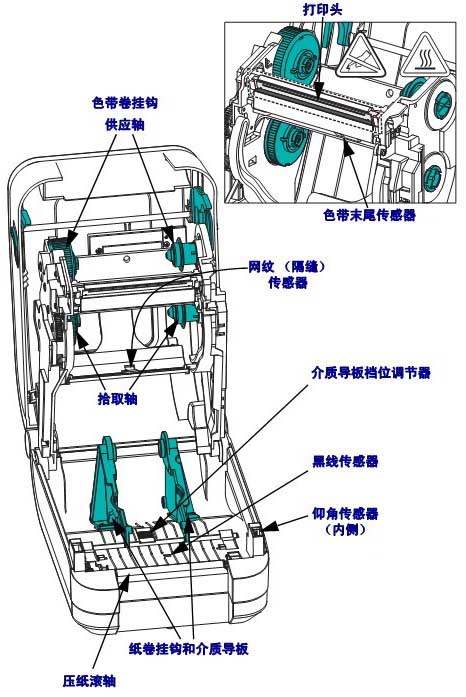
1.1 Printer Components
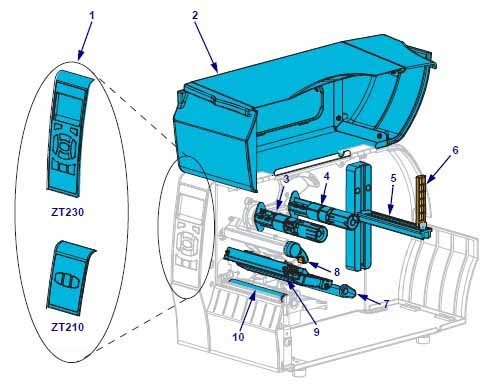
| Component serial number | Component Name | Component serial number | Component Name |
|---|---|---|---|
| 1 | control Panel | 6 | Medium supply guide plate |
| 2 | Medium gate | 7 | Medium tension regulating assembly |
| 3 | ribbon pickup axis | 8 | Print head opening lever |
| 4 | ribbon supply shaft | 9 | Printing device |
| 5 | Media supply rack | 10 | Printing roller |
1.2 Control Panel
The control panel displays the printer’s current status and allows users to control basic printer operations.
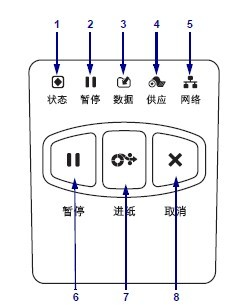
| Panel serial number | Panel Name |
|---|---|
| 1 | Status indicator light |
| 2 | “Pause” indicator light |
| 3 | “Data” indicator light |
| 4 | “Consumables” indicator light |
| 5 | “Network” indicator light |
| 6 | Pressing the PAUSE button will start or stop the printer operation. |
| 7 | Pressing the FEED button each time forces the printer to feed a blank label. |
| 8 | When the printer is paused, the CANCEL button can cancel label formatting. ● Press once to cancel the formatting of the next label . ● Press and hold for 2 seconds to cancel all label formatting. |
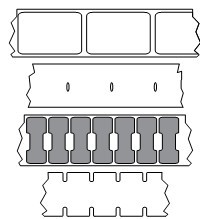
1.3 Media Types
The ZT210 printer can use various media types:
● Standard Media – Most standard media use an adhesive material that allows multiple individual labels or continuous labels of a certain length to be pasted onto a backing. Standard media is available in media rolls or folded stacks.
● Cardboard Tags – Tags are usually made of thick paper. The label material has no adhesive or backing and usually has pre-perforated holes between each cardboard tag. Cardboard tag media may be available in media rolls or folded stacks.
1.4 Ribbon Introduction
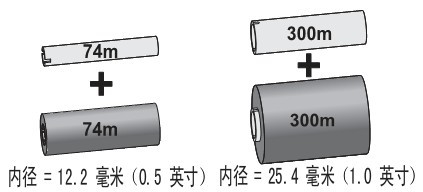
A ribbon is a thin film coated with wax, resin, or wax resin on one side. During the heat transfer process, the wax or wax resin can be transferred to the media. The media determines whether a ribbon is needed and what width of ribbon must be used.
If a ribbon is used, its width must be greater than or equal to the width of the media. If the ribbon is narrower than the media, parts of the printhead will wear out prematurely due to lack of protection.
Heat transfer media require a ribbon to print, while thermal media do not. To ensure whether a ribbon must be used for a specific media, a media scratch test can be performed.
II. Zebra ZT210 Barcode Printer Setup and Operation
2.1 Selecting a Data Communication Interface
Connect the printer to one or more available connections. The ZT210 printer may also be equipped with the ZebraNet wired or wireless print server option or a parallel port.
Caution: Ensure the printer is powered off before connecting the data communication cable. Continuously connecting the data communication cable when the power is on may damage the printer.
| interface | Standard parts or optional parts | illustrate |
|---|---|---|
| RS-232 serial port | Standard parts | Limitations and Requirements: ● Maximum cable length: 15.24 meters ● Printer parameters must be changed to match the host computer ● If using a standard modem cable, a blank modem must be connected to the printer. |
| The connection and configuration of baud rate, data and stop bits, parity, and XON/XOFF or DTR control must be matched with the host computer. | ||
| USB | Standard parts | Limitations and Requirements: ● Maximum cable length: 5 meters ● Can be paired with the host computer without changing printer parameters |
No additional configuration is required for connection and setup. | ||
| 8-bit parallel data interface | Options | Limitations and Requirements: ● Maximum cable length: 3 meters ● Recommended cable length: 1.83 meters ● Wired or wireless Ethernet print server (if installed) will occupy this port on the printer ● No printer parameter changes are required for compatibility with the host computer |
No additional configuration is required for connection and setup. | ||
| Wired Ethernet print server | Options | Limitations and Requirements: ● Printing can be done from any computer on the user’s local area network (LAN ) . ● Communication with the printer can be achieved via the printer’s web interface. ● The printer must be configured to use a LAN. ● Parallel connections or wireless Ethernet print servers (if installed) will occupy this port on the printer. Caution: Do not plug a USB cable into the printer’s wired Ethernet print server interface, as this may damage the interface. |
| Connection and configuration require configuring parameters such as network IP. | ||
| Wireless print server | Options | Limitations and Requirements: ● Printing can be done from any computer on a wireless LAN (WLAN). ● Communication with the printer can be achieved via the printer’s web interface . ● The printer must be configured to use a wireless LAN. ● Parallel connections or wired Ethernet print servers (if installed) will occupy this port on the printer. Caution: Do not plug a USB cable into the printer’s wired Ethernet print server interface, as this may damage the interface. |
| Connecting and configuring requires configuring parameters such as the wireless network IP address. |
All necessary interface cables must be provided for the specific situation. Ethernet cables do not require shielding, but other data cables must be fully shielded and equipped with metal or metallized connector housings. Using unshielded cables will result in electromagnetic radiation levels exceeding regulatory limits. To minimize the level of electrical noise pickup in the cables, the following should be done:
● Use the shortest possible data cables
● Do not tightly bundle data cables and power cables together
● Do not tie data cables to power cable conduits
2.2 Select Printing Mode
| Printing mode | When to use/required printer options | Printer operation |
|---|---|---|
| Tear paper (default setting) | Suitable for most applications, this mode is available for any printer option and most media types. | The printer prints the label upon receiving the label format, and the printer operator can remove the label at any time after printing is complete. |
| peeling | Use only when the printer is equipped with the peel-off option. | The printer peels the label off the backing during printing and pauses after the label is removed, with the backing retracting from the front of the printer. ● In “Peel” mode, the backing is ejected from the front of the printer . |
| Paper cutter | If the printer has a paper cutter option and the user wants to cut off the labels, this option can be used. | The printer prints the label, then cuts it off. |
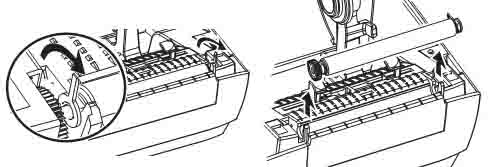
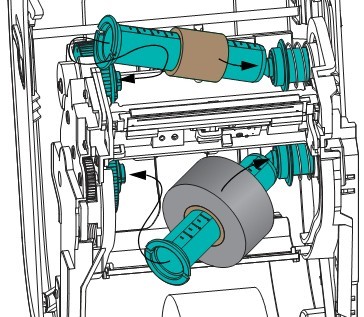
2.3 Loading the Ribbon
The ribbon is for thermal transfer labels only. To print labels using thermal printing, do not load the ribbon into the printer.
Important: To protect the printhead from wear, use a ribbon wider than the media, and the ribbon coating must be on the outer side.
To load the ribbon, complete the following steps:
(1) Rotate the printhead release lever counterclockwise to loosen the printing unit.
(2) Rotate the release lever clockwise to adjust the ribbon position.
(3) Load the ribbon onto the ribbon supply shaft, pushing the paper roll back as far as possible.
(4) Before shipping, the printer has an empty ribbon core on the ribbon pickup shaft. If this ribbon core is missing, place an empty ribbon core on the ribbon pickup shaft and push the paper roll back as far as possible.
(5) Pass the ribbon under the printing unit assembly.
(6) Wind the ribbon clockwise onto the ribbon core on the ribbon pickup shaft, rotating the pickup shaft several times to allow the ribbon to wind around it a few times.
(7) If media is already loaded, rotate the printhead opening lever clockwise until the printhead is locked in place.
(8) Close the media door.
(9) Press the pause button if necessary to start printing.
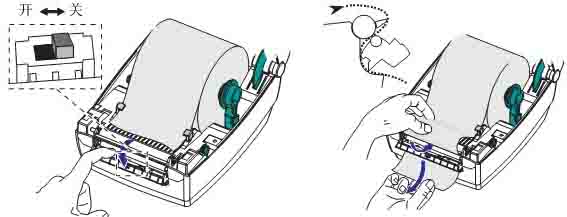
2.4 Loading Media
(1) Rotate the printhead opening lever counterclockwise to release the printhead mechanism.
(2) Insert the media into the printer, performing the operation as needed for roll media and folded media.
(3) Slide the outer media guide fully out.
(4) Let the media slide under the media tension adjustment assembly and printing mechanism, pulling the end of the media out from the front of the printer.
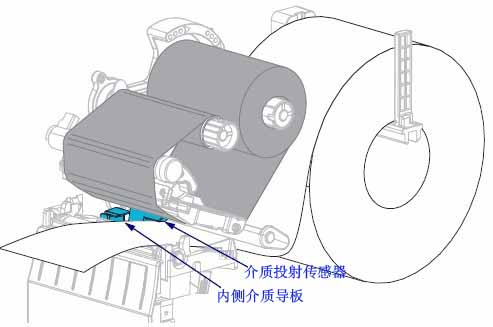
(5) Ensure the media has passed through the hole on the media projection sensor and reached below the inner media guide; the media should just touch the back of the media projection sensor slot.
(6) Load the media according to the printer mode.
(7) Slide the outer media guide in until it just touches the edge of the media.
(8) Rotate the printhead opening lever clockwise until the printhead is locked in place.
(9) Close the media door.
(10) Pressing pause will exit pause mode and start printing. Depending on user settings, the printer may perform label calibration or feed a label.
(11) A self-test can be performed as needed to check if the printer is printing correctly.
III. Zebra ZT210 Barcode Printer Configuration and Adjustment
3.1 Changing Printer Settings
This section lists the printer settings that users can change, as well as the tools used to change these settings, including the following functions:
● ZPL and Set/Get/Do (SGD) commands
● If the printer has an available wired or wireless print server connection, the printer’s web page.
3.1.1 Printer Settings
| Settings | illustrate |
|---|---|
| Printing depth | Set the depth to the lowest value that provides the best print quality. If the depth value is set too high, the label image may not print clearly, the barcode may not scan correctly, the ribbon may burn through, or the print head may wear out prematurely. |
| Accepted values: | 0.0-30.0 |
| Related ZPL commands | ^MD, ~SD |
| SGD command used | print.tone |
| Printer webpage | View and modify printer settings > General settings > Depth |
| Printing speed | Choose the label printing speed (in inches per second); lowering the printing speed usually results in higher print quality. |
| Accepted values: | 2, 3, 4, 5, 6 |
| Related ZPL commands: | ^PR |
| SGD commands used: | media.speed |
| Printer webpage | not applicable |
| Media type | Select the media type to use. ● If you select “Continuous Media”, you must include the label length instruction in the label format (if using the ZPL language, the command is ^LL). ● If you select “Gap/Notch” or “Mark” for different types of non-continuous media, the printer will feed the media to calculate the label length. |
| Accepted values: | ● Continuous; ● Gap/Gap; ● Marking |
| Related ZPL commands: | ^MN |
| SGD commands used: | ezpl.media_type |
| Printer webpage | View and modify printer settings > Media settings > Media type |
| Printing method | Specify whether the printer uses “thermal” mode (no ribbon) or “thermal transfer” mode (using thermal transfer media and ribbon). |
| Accepted values: | ● Thermal transfer printing; ● Thermal printing |
| Related ZPL commands: | ^MT |
| SGD commands used: | ezpl.print_method |
| Printer webpage | View and modify printer settings > Media settings > Print method |
| Tear position | Adjust the media’s position on the cutter bar as needed after printing: ● A higher number indicates the media has moved out, meaning the tear line is closer to the next label. ● A lower number indicates the media has moved in, meaning the tear line is closer to the label that was just printed. |
| Accepted values: | -120 to 120 |
| Related ZPL commands: | ~TA |
| SGD commands used: | ezpl.tear_off |
| Printer webpage | View and modify printer settings > General settings > Tear paper |
| Print width | Specify the label width to use. The default value is the printer’s maximum width, depending on the printhead DPI value. Note: Setting the width too narrow may cause some label formats to fail to print on the media. Setting the width too wide will waste format memory and cause labels to print out of bounds or onto the print roller. This setting will affect the horizontal position of the label format if the image is flipped using the ^POI ZPLII command. |
| Accepted values: | 0000 to 1248 |
| Related ZPL commands: | ^PW |
| SGD commands used: | ezpl.print_width |
| Printer webpage | View and modify printer settings > Media settings > Print width |
| Printing mode | Select the printing mode compatible with the printer options. |
| Accepted values: | ● Paper tearer; ● Paper cutter; ● Peel |
| Related ZPL commands: | ^MM |
| SGD commands used: | media.printmode |
| Printer webpage | View and modify printer settings > General settings > Print mode |
| Left side of the label | Adjust the horizontal printing position of the label as needed. Positive numbers will move the left edge of the image towards the center of the label by the selected number of points, while negative numbers will move the left edge of the image towards the left side of the label. |
| Accepted values: | -9999 to 9999 |
| Related ZPL commands: | ^LS |
| SGD commands used: | zpl.left_position |
| Printer webpage | View and modify printer settings > Advanced settings > Left side |
| Reprint mode | If reprint mode is enabled, press and hold the PAUSE+CANCEL buttons on the printer control panel to reprint the previously printed label. |
| Accepted values: | ● Open; ● Close |
| Related ZPL commands: | ^JZ |
| SGD commands used: | ezpl.reprint_mode |
| Printer webpage | not applicable |
| Maximum tag length | The maximum label length should be set to be at least 25.4 mm longer than the actual label length plus the label spacer. If this value is set to less than the label length, the printer will assume that continuous media is loaded and will be unable to calibrate. For example, if the label length including the label spacer is 152 mm, the parameter should be set to at least 178 mm. |
| Accepted values: | The printer supports label lengths from 0 to the maximum. |
| Related ZPL commands: | ^ML |
| SGD commands used: | ezpl.label_length_max |
| Printer webpage | View and modify printer settings > Media settings > Maximum length |
3.1.2 Calibration and Diagnostic Tools
| Calibration and diagnostic tools | illustrate |
|---|---|
| Print information | Print specified information on one or more labels. |
| Received value: | ● Settings—Prints the printer’s configuration label . ● Network—Prints settings values for the installed print server. ● Format—Prints available formats stored in printer memory, flash memory cards, or other optional memory cards. ● Image—Prints available images stored in printer memory, flash memory cards, or other optional memory cards. ● Font—Prints available fonts in the printer, including standard printer fonts and any optional fonts. Fonts can be stored in RAM or flash memory. ● Barcode—Prints available barcodes in the printer; barcodes can be stored in RAM or flash memory. ● All—Prints the first six labels. ● Sensor Chart—Displays settings values compared to actual sensor readings. |
| Related ZPL commands: | Settings: ~WC; Network: ~WL; Sensor Charts: ~JG; Other: ^WD |
| SGD command used | none |
| Control Panel Key | Setup and Network: Perform one of the following actions: ● Press and hold the CANCEL button while the printer is powered on. ● While the printer is in the “Ready” state, press and hold the FEED+CANCEL buttons for 2 seconds. Sensor Chart: Press and hold the FEED+CANCEL buttons while the printer is powered on. |
| Printer webpage | View and modify printer settings > Print list on labels |
| Power-on operation | The Power-On Setup specifies the actions the printer will perform when powered on: ● Calibration: Adjusts sensor levels and thresholds to determine label length and feeds media to the next halftone. ● Feed: Feeds the label to the first alignment point. ● Length: Uses the current sensor value to determine the label length and feeds media to the next halftone. ● No Movement: Instructs the printer not to move the media. You must manually confirm that the halftone is correctly positioned. Alternatively, you can press the Feed button to position the next halftone. ● Short Calibration: Sets the media and halftone thresholds without adjusting sensor gain, determines the label length, and feeds media to the next halftone. |
| Received value: | ● Calibration ● Paper Feed ● Length ● No Movement ● Brief Calibration |
| Related ZPL commands: | ^MF |
| SGD command used | ezpl.power_up_action |
| Printer webpage | View and modify printer settings > Calibration |
| Printhead closing operation | The printhead shutdown setting configures the actions the printer performs when the printhead is closed: ● Calibration: Adjusts sensor levels and thresholds to determine label length and feeds media to the next shim. ● Feed: Feeds the label to the first alignment point . ● Length: Uses the current sensor value to determine the label length and feeds media to the next shim. ● No Movement: Notifies the printer not to move the media. You must manually confirm that the shim is correctly positioned. Alternatively, you can press the feed button to position the next shim. ● Short Calibration: Sets the media and shim thresholds without adjusting sensor gain, determines the label length, and feeds media to the next shim. |
| Received value: | ● Calibration ● Paper Feed ● Length ● No Movement ● Brief Calibration |
| Related ZPL commands: | ^MF |
| SGD command used | ezpl.head_close_action |
| Printer webpage | View and modify printer settings > Calibration |
| Load default values | Reset printer or print server settings to default values: ● Factory—Restores all printer settings except network settings to factory defaults. Be careful when resetting defaults, as you will need to reset any settings you have manually changed. ● Network—Reinitializes the printer’s wired or wireless print server. When using a wireless print server, the printer will also reconnect to the wireless network. ● Load Last Saved Values—Loads the last permanently saved settings. |
| Received value: | ● Factory ● Network ● Last saved value |
| Related ZPL commands: | Factory: ^JUF; Network: ^JUN; Last saved value: ^JUR |
| SGD command used | none |
| Control Panel Key | ● Factory: Press and hold the FEED + PAUSE buttons while the printer is powered on to reset the printer parameters to factory values. ● Network: Press and hold the CANCEL + PAUSE buttons while the printer is powered on to reset the network parameters to factory values. ● Last saved value: Not applicable. |
| Printer webpage | ● Factory: View and modify printer settings > Restore default configuration ● Network: Print server settings > Reset print server ● Last saved value: View and modify printer settings > Restore saved configuration |
| Media and ribbon sensor calibration | Calibrate the printer and adjust the sensitivity of the media and ribbon sensors. |
| Received value: | not applicable |
| Related ZPL commands: | ^JC |
| SGD command used | ezpl.manual_calibration |
| Control Panel Key | Press and hold the PAUSE+FEED+CANCEL buttons for 2 seconds to initiate the calibration process. |
| Printer webpage | Unable to initiate calibration steps via webpage |
| Communication diagnostic mode | This diagnostic tool allows the printer to output hexadecimal values for all data received by the printer. |
| Received value: | ● Disable ● Enable |
| Related ZPL commands: | ~JD is used to start; ~JE is used to stop. |
| SGD command used | device.diagnostic_print |
| Control Panel Key | With the printer in the “Ready” state, press and hold the PAUSE + FEED buttons for 2 seconds. |
| Printer webpage | not applicable |
3.1.3 Network Settings
| Network settings | illustrate |
|---|---|
| IP address | View or set the printer’s IP address . View and change the printer’s IP address as needed. Changes to this setting are only saved if the IP PROTOCOL protocol is set to PERMANENT. To make saved changes take effect, the print server should be reset. |
| Received value: | 000 to 255 are used for each field |
| Related ZPL commands: | ^ND |
| SGD command used | Wired: internal_wired.ip.addr; Wireless: ip.addr, wlan.ip.addr |
| Printer webpage | View and modify printer settings > Network communication settings > TCP/IP settings |
| Subnet mask | View or set the subnet mask . View and change the subnet mask as needed. This menu item is only displayed if a wired or wireless print server is installed on the printer. To save changes to this setting, set the IP PROTOCOL protocol to PERMANENT and then reset the print server. |
| Received value: | 000 to 255 are used for each field |
| Related ZPL commands: | ^ND |
| SGD command used | Wired: internal_wired.ip.netmask; Wireless: wlan.ip.netmask |
| Printer webpage | View and modify printer settings > Network communication settings > TCP/IP settings |
| gateway | View or set the default gateway . View and change the default gateway as needed. This menu item only appears if a wired or wireless print server is installed on the printer. To save changes to this setting, set the IP PROTOCOL protocol to PERMANENT and then reset the print server. |
| Received value: | 000 to 255 are used for each field |
| Related ZPL commands: | ^ND |
| SGD command used | Wired: internal_wired.ip.gateway; Wireless: wlan.ip.gateway |
| Printer webpage | View and modify printer settings > Network communication settings > TCP/IP settings |
| IP protocol | Configure IP Resolution Method. This parameter specifies whether the user (permanent) or server (dynamic) should select an IP address. If the dynamic option is selected, this parameter informs the wired or wireless print server how to receive IP addresses from the server. |
| Received value: | ● All ● GLEANING Only ● RARP ● BOOTP ● DHCP ● DHCP and BOOTP ● Permanent |
| Related ZPL commands: | ^ND |
| SGD command used | Wired: internal_wired.ip.protocol; Wireless: wlan.ip.protocol |
| Printer webpage | View and modify printer settings > Network communication settings > TCP/IP settings |
| MAC address | To view the MAC address, you need to find the Media Access Control (MAC) address of the print server installed in the wired or wireless printer. |
| Received value: | not applicable |
| Related ZPL commands: | none |
| SGD command used | Wired: internal_wired.mac.addr; Wireless: wlan.mac.addr |
| Printer webpage | View and modify printer settings > Network communication settings > Wireless settings |
| ESSID | The Extended Service Set Identifier (ESSID) is an identifier used for wireless networks. This setting cannot be modified from the control panel; it provides the ESSID for the current wireless configuration. |
| Received value: | A 32-character alphanumeric string (default is 125). |
| Related ZPL commands: | none |
| SGD command used | wlan.essid |
| Printer webpage | View and modify printer settings > Network communication settings > Wireless settings |
| Reset Network | This option can reset the wired or wireless print server. The print server must be reset for changes to the network settings to take effect. |
| Received value: | not applicable |
| Related ZPL commands: | ~WR |
| SGD command used | device.reset |
| Printer webpage | Print Server Settings > Print Server Factory Settings |
3.1.4 Language Settings
| Language settings | illustrate |
|---|---|
| language | Changing the printer display language as needed will affect the language of the following information: ● Main menu ● User menu ● Error messages ● Printer configuration label, network configuration label, and other optional labels printed via the user menu. |
| Received value: | English, Spanish, French, German, Italian, Norwegian, Portuguese, Swedish, Danish, Spanish 2, Dutch, Finnish |
| Related ZPL commands: | ^KL |
| SGD command used | display.language |
| Printer webpage | View and modify printer settings > General settings > Language |
| ZPL replacement | Enabling ZPL overrides this menu item, allowing the following commands to replace the printer’s current settings: ● ^MM (Print Mode) ● ^MT (Thermal or Thermal Transfer Printing Method) ● ^MN (Media Type: Non-continuous or Continuous) |
| Received value: | ● Disable; ● Enable |
| Related ZPL commands: | none |
| SGD command used | zpl.zpl_override |
| Printer webpage | none |
| command characters | The format command prefix is a two-digit hexadecimal value used as a parameter position marker in the ZPL/ZPLII format specification. The printer looks for this hexadecimal character, which indicates the start of a ZPL/ZPLII format instruction. Set the format command character to match the value in the label format. Important: The same hexadecimal value cannot be used for the format command prefix, control characters, and separator characters. The printer must use different characters to function correctly. If the user sets the value via the control panel, the printer will ignore the value already in use. |
| Received value: | 00 to FF |
| Related ZPL commands: | ^CC or ~CC |
| SGD command used | zpl.caret |
| Printer webpage | View and modify printer settings > ZPL Control |
| Control characters | Setting the Control Prefix Character Value: The printer looks for this two-digit hexadecimal character to indicate the start of ZPL/ZPLII control instructions. Set the control prefix character to match the value used in the label format. |
| Received value: | OO to FF |
| Related ZPL commands: | ^CT or ~CT |
| SGD command used | zpl.control_character |
| Printer webpage | View and modify printer settings > ZPL Control |
| separator | The separator value is set to a two-digit hexadecimal value, used as a parameter position marker in the ZPL/ZPLII format specification, to match the value used in the label format. |
| Received value: | OO to FF |
| Related ZPL commands: | ^CD or ~CD |
| SGD command used | zpl.delimiter |
| Printer webpage | View and modify printer settings > ZPL Control |
| ZPL mode | Set ZPL Mode: Select a mode that matches the values used in the label format. This printer accepts label formats written using ZPL or ZPLII voice; no rewriting of any existing ZPL format is required. The printer operates in the selected mode until the mode is changed using one of the following methods. |
| Received value: | ● ZPLII; ● ZPL |
| Related ZPL commands: | ^SZ |
| SGD command used | zpl.zpl_mode |
| Printer webpage | View and modify printer settings > ZPL Control |
3.1.5 Sensor Settings
| Sensor settings | illustrate |
|---|---|
| Sensor type | Select the appropriate medium sensor for the medium being used by the user. Reflective sensors can be used for all medium types, while transmissive sensors can only be used for simple slit media. |
| Received value: | ● Transmissive; ● Reflective |
| Related ZPL commands: | ^JS |
| SGD command used | device_sensor_select |
| Printer webpage | View and modify printer settings > Media settings |
| Tag sensor | Set the sensitivity of the tag sensor |
| Received value: | 0-255 |
| Related ZPL commands: | none |
| SGD command used | ezpl.label_sensor |
| Printer webpage | View and modify printer settings > Calibration |
| Take the label | Adjust the brightness of the indicator light when the tag is removed. |
| Received value: | 0-255 |
| Related ZPL commands: | none |
| SGD command used | ezpl.take_label |
| Printer webpage | View and modify printer settings > Calibration |
3.2 Calibrate the Ribbon and Media Sensors
Use the steps in this section to calibrate the printer. This process adjusts the sensitivity of the media and ribbon sensors.
Important: Strictly follow the calibration process as described in this manual. Even if only one sensor needs adjustment, all steps must be performed. You can cancel the process by pressing CANCEL at any step.
To perform sensor calibration, complete the following steps:
⑴ With the printer in the “Ready” state, initiate media and ribbon calibration using one of the following methods:
◆ Press and hold the Pause + Feed + Cancel button for two seconds.
◆ Send the ezpl.manual_calibration SGD command to the printer.
The printer will do the following:
● The Status and Consumables indicators flash yellow once.
● The Pause indicator lights up yellow.
⑵ Rotate the printhead opening lever counterclockwise to release the printing device.
⑶ Allow the media to extend approximately 203 mm outside the printer.
⑷ Remove the exposed label, leaving only the backing.
⑸ Pull the backing paper into the printer, ensuring only the backing is between the media sensors.
(6) If a ribbon was used, it should be removed.
(7) Rotate the printhead opening lever clockwise until the printhead is locked in place.
(8) Press pause to begin the media calibration process.
◆ The “Pause Indicator” goes out.
◆ The “Consumables Indicator” flashes.
When this process is complete:
◆ The “Consumables Indicator” flashes.
◆ The “Pause Indicator” flashes yellow.
(9) Rotate the printhead opening lever counterclockwise to release the printing device.
(10) Pull the media forward so that the label is below the media sensor. (11
) Reinstall the ribbon (if used).
(12) Close the printhead.
(13) Close the media door.
(14) Press the pause button to start printing.
3.3 Adjusting Printhead Pressure
If the print color is too light on one side, if the media is too thick, or if the media shifts to one side during printing, you may need to adjust the printhead pressure to the lowest printhead pressure that will provide the best print quality.
The printhead pressure adjustment wheel has half-scale increments from 1 to 4.
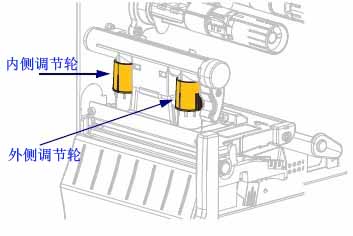
If necessary, the printhead pressure adjustment wheel should be adjusted using the following method:
| If the medium… | but… |
|---|---|
| Greater pressure is needed to improve print quality. | Increase the position of the two adjusting wheels by one position. |
| Slide to the left while printing | Increase the outer adjusting wheel by one position, or decrease the inner adjusting wheel by one position. |
| Slide to the right when printing | Increase the inner adjusting wheel by one position, or decrease the outer adjusting wheel by one position. |
| The printed content on the left side of the label is too light in color. | Increase the size of the inner adjusting wheel by one position. |
| The printed content on the right side of the label is too light in color. | Increase the outer adjustment wheel by one position. |
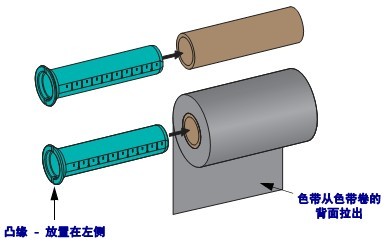
3.4 Adjusting Ribbon Tension
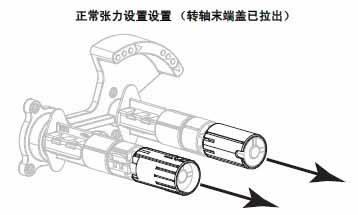
For the printer to function properly, both the ribbon supply shaft and the ribbon pickup shaft must use the same tension setting (normal tension or low tension). For most applications, the normal tension setting should be used. If using a narrow ribbon or encountering specific ribbon issues, low tension may be necessary.
Normal Tension Setting : To position the ribbon shaft in its normal position, forcefully push out the end cap until it extends and locks in place. This setting can be used for most applications.
Low Tension Setting : To position the supply shaft in the low tension position, forcefully push in the end cap until it retracts and clicks into place. This setting should only be used when necessary, such as when the ribbon causes the wear indicator to be at the beginning of the ribbon roll, or when normal tension causes the ribbon to stop at the end of the roll.

IV. Zebra ZT210 Barcode Printer Routine Maintenance
4.1 Cleaning Plan and Procedures
Routine preventative maintenance is an important part of ensuring the printer works correctly. By diligently maintaining the printer, users can minimize the possibility of potential malfunctions and help achieve and maintain the standard print quality they require.
As printing continues, the media or ribbon passing through the printhead will gradually wear down the ceramic protective layer, exposing and eventually damaging the printed elements (dots). Avoid Abrasion:
◆ Clean the printhead regularly.
◆ Optimize the balance between these two by using the lowest possible printhead pressure and burn-in temperature settings.
◆ When using thermal transfer mode, ensure the ribbon width is greater than or equal to the media width to protect the printed elements from exposure to more corrosive label materials.
Depending on the application and media, more frequent cleaning may be required.
Printhead, Method: 95% alcohol solvent, Time Interval: After using one roll of media for thermal mode, after using a perfect ribbon for thermal transfer or after every three rolls of media.
Roller, Method: 95% alcohol solvent, Time interval: After one media roll is used up in thermal mode, after using a Perfect Silk ribbon in thermal transfer, or after every three media rolls.
Media sensor, Method: Air jetting, Time interval: After one media roll is used up in thermal mode, after using a Perfect Silk ribbon in thermal transfer, or after every three media rolls.
Ribbon sensor, Method: Air jetting, Time interval: After one media roll is used up in thermal mode, after using a Perfect Silk ribbon in thermal transfer, or after every three media rolls.
Media path: Method: 95% alcohol solvent, Time interval: After one media roll is used up in thermal mode, after using a Perfect Silk ribbon in thermal transfer, or after every three media rolls.
Ribbon path: Method: 95% alcohol solvent, Time interval: After one media roll is used up in thermal mode, after using a Perfect Silk ribbon in thermal transfer, or after every three media rolls.
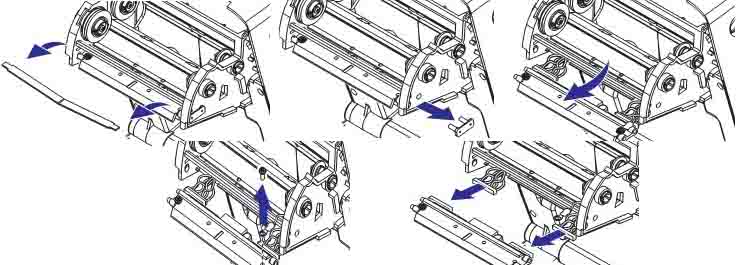
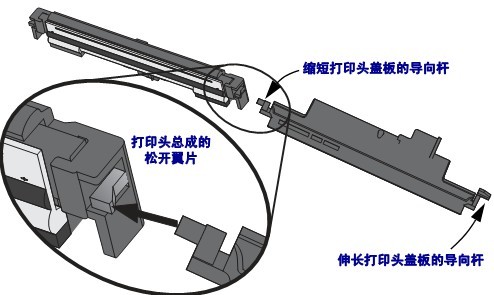
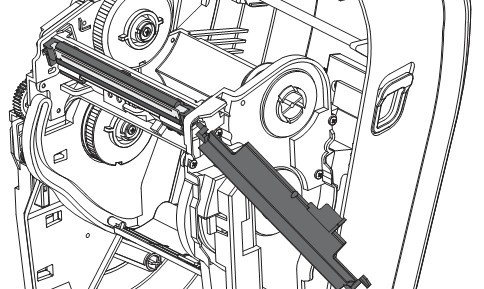
4.2 Replacing Printer Components
Printer components such as the printhead and print rollers may wear down over time and can be easily replaced.
V. Troubleshooting Zebra ZT210 Barcode Printer
5.1 Meaning of Indicator Lights
The indicator lights on the control panel are used to display the current status of the printer.
| Indicator light status | Printer status description |
|---|---|
| When the printer is powered on, the status indicator light remains green (other indicator lights remain yellow for 2 seconds), indicating that the printer is ready. | |
| The “Pause” indicator light remains consistently yellow, indicating that the printer is paused. | |
| The “Status” indicator light is consistently red. The “Consumables” indicator light is consistently red. The media is low, requiring attention to the printer, but it can continue operating without user intervention. | |
| The “Status” indicator light will remain steadily red. The “Consumables” indicator light will flash red , indicating the ribbon is low and the printer needs attention; however, it can continue operating without user intervention. | |
| The “Status” indicator light is steadily yellow. The “Consumables” indicator light is flashing yellow. The printer is in “Thermal” mode, which does not require a ribbon, but the ribbon is already installed in the printer. | |
| The “Status” indicator light is steadily red. The “Pause” indicator light is steadily yellow. The printhead is open, so you need to pay attention to the printer, but it can continue to work without user intervention. | |
| The status indicator light is consistently showing a yellow warning, indicating that the printhead temperature is too high. | |
| A flashing yellow indicator light indicates one of the following conditions: ● Printhead temperature too low; ● Power supply unit temperature too high; ● Main logic board (MLB) temperature too high. | |
| The “Status” indicator light is consistently red. The “Pause” indicator light is consistently red. The “Data” indicator light is consistently red. When changing the printhead, if an original Zebra printhead was not used, simply install an original Zebra printhead to continue operation. | |
| The status indicator light is flashing red, indicating that the printer cannot read the printhead’s DPI settings. | |
| Printers with ZebraNet wired Ethernet option | |
| The “Network” indicator light is off; there is no usable Ethernet connection. | |
| The “Network” indicator light remains steadily green, indicating a 100Base connection has been detected . | |
| The “Network” indicator light is steadily displaying yellow, indicating a 10Base connection. | |
| The network indicator light is steadily showing red , indicating an Ethernet error and the printer is not connected to the network. | |
| Printers with ZebraNet wireless Ethernet option | |
| The “Network” indicator light is off. When power is applied, a radio signal is detected, and the printer attempts to connect to the network. The indicator light flashes red while the printer is establishing a connection. The indicator light flashes yellow while the printer is authenticating with the network. | |
| The “Network” indicator light is steadily displaying green, indicating a strong and reliable wireless signal. Your network is connected to your network and has been verified. | |
| The flashing “Network” indicator light shows a green Wi-Fi signal that is associated with your network and has been verified, but the WLAN signal is weak. | |
| The network indicator light is steadily displaying red , indicating a WLAN error and the printer is not connected to the network. |
5.2 Printing Issues
The following lists issues related to printing and print quality, possible causes, and suggested solutions.
| question | Possible reasons | Recommended solution |
|---|---|---|
| Common print quality issues | Incorrect printer speed setting | To achieve the best print quality, you should set the lowest possible print speed for your application via the control panel, driver, or software. |
| The incorrect combination of labels and ribbons was selected for your application. | 1. Switch to different types of media or ribbons to find a compatible combination; 2. Contact MinYong Digital as needed for information and advice. | |
| The printer’s print depth setting is incorrect. | To achieve the best print quality, the print depth should be set to the lowest setting suitable for your application. | |
| Dirty printhead | Clean the print head and print roller | |
| Incorrect or uneven printhead pressure | Set the printhead pressure to the minimum value that will yield the best print quality. | |
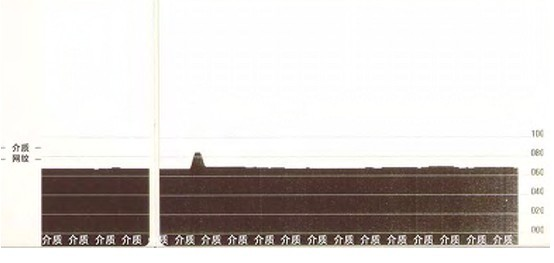
| The print alignment mark on the label is missing, and the vertical offset of the alignment mark at the top of the form is too large. | The printing roller is too dirty | Clean the print head and print roller |
| The dielectric guide plate is not in the correct position. | Ensure correct positioning of the media guide plate | |
| Incorrect media type setting | Configure the printer to work with the correct media type (slit/cut, continuous, or marking). | |
| Incorrect media loading | Correctly load the media | |
| Long, incomplete printing marks appeared on multiple labels. | Damaged printing components | Replace the print head |
| Colored ribbon folds | Solve according to the methods in “Ribbon Fault” | |
| A thin, slanted gray line appears on the blank label. | Colored ribbon folds | Solve according to the methods in “Ribbon Fault” |
| The entire ribbon is printed too dark or too light. | The media or ribbon was not designed for high-speed printing. | Replace consumables suitable for high-speed operation |
| The wrong combination of media and ribbon was selected for your application. | 1. Switch to different types of media or ribbons to find a compatible combination; 2. Contact MinYong Digital as needed for information and advice. | |
| Users use ribbons for thermal media. | Thermal media do not require ribbons; it is necessary to determine whether thermal media has been used. | |
| Incorrect or uneven printhead pressure | Set the printhead pressure to the minimum value that yields the best print quality. | |
| The label has stains. | The media or ribbon is not designed for high-speed printing. | Replace consumables suitable for high-speed operation |
| Misaligned/Skipped ribbon | Printer not calibrated | Calibrate printer |
| Incorrect label format | Check your label format and correct it as needed. | |
| One to three labels are misaligned or have printing errors. | The printing roller is too dirty | Clean the print head and print roller |
| The medium does not meet specifications | Use media that meet specifications. | |
| Vertical offset of the top position of the label | Printer not calibrated | Calibrate printer |
| The printing roller is too dirty | Clean the print head and print roller | |
| Label or image vertical offset | The printer uses non-continuous labels, but is configured to work in continuous mode. | Set the printer to the correct media type and calibrate the printer as needed. |
| Incorrect calibration of the medium sensor | Calibrate printer | |
| The printing roller is too dirty | Clean the print head and print roller | |
| Incorrect printhead pressure setting | Adjust the printhead pressure to ensure proper operation. | |
| Incorrect loading of media or ribbon | Ensure that the media and ribbon are loaded correctly. | |
| Media incompatibility | Media that meets the printer’s technical specifications must be used to ensure that the labels are evenly spaced with a gap of 2 to 4 millimeters. | |
| Unable to scan the barcode printed on the label | The barcode does not meet specifications because it is printed too dark or too light. | Adjust the depth or printing speed settings as needed. |
| There is not enough blank space around the barcode. | Leave at least 3.2mm clearance between the barcode and other printed areas on the label, as well as between the barcode and the label edge. | |
| Automatic calibration failed | Incorrect loading of media or ribbon | Ensure the media and ribbon are loaded correctly. |
| The sensor did not detect the medium or color band. | Calibrate printer | |
| The sensor is too dirty, or the positioning is incorrect. | Ensure the sensor is clean and correctly positioned. | |
| Incorrect media type setting | Set the printer to use the correct media type. |
5.3 Ribbon Failures
The table below lists the ribbon failures that may occur, their possible causes, and suggested solutions.
| Fault | Possible reasons | Recommended solution |
|---|---|---|
| ribbon damaged or melted | The depth setting is too high. | 1. Lower the depth setting; 2. Thoroughly clean the printhead. |
| The ribbon coating is faulty and cannot be used with this printer. | Replace with a ribbon that has the correct coating. | |
| The ribbon is slipping or cannot move forward correctly. | Incorrect ribbon tension setting | Change the tension setting of the ribbon shaft. |
| Colored ribbon folds | Incorrect ribbon insertion | Correctly load the ribbon |
| Incorrect burning temperature | To achieve the best print quality, the print depth should be set to the lowest setting suitable for your application. | |
| Incorrect or uneven printhead pressure | Set the printhead pressure to the minimum value that yields the best print quality. | |
| Improper medium feeding caused it to deviate from one side to the other. | Ensure the medium is level by adjusting the medium guide plate. | |
| The print head or print roller may be installed incorrectly. | Contact Minyong Digital | |
| The printer did not detect that the ribbon was used up. | The printer may have been calibrated without a ribbon, and then a ribbon was inserted without performing a user recalibration, or the printer’s default settings may not have been loaded. | Now calibrate the printer using the ribbon, or load the printer defaults. |
| In thermal transfer mode, the printer does not detect the ribbon even though it is correctly loaded. | ||
| Even if the ribbon is correctly loaded, the printer still displays “ribbon exhausted”. | The printer was not calibrated for the labels and ribbons to be used. | Calibrate printer |