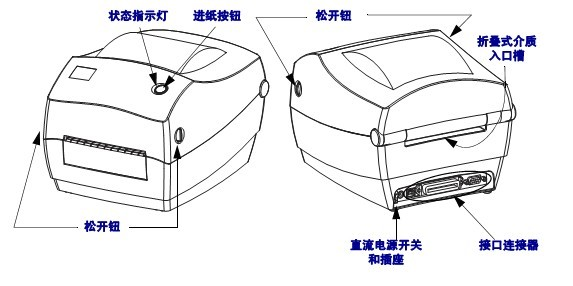
1、Zebra_GK888t barcode printer introduction to each part
1.1 Status indicator light/Paper feed button/Lock release/Interface connector/Folding medium entrance slot/DC power switch and socket
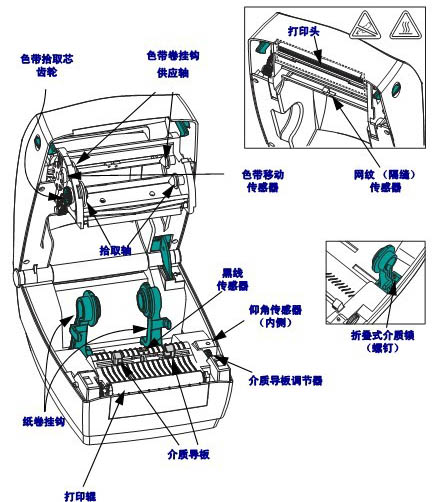
1.2 Ribbon take-up core gear/Ribbon roll hook supply shaft/Take-up shaft/Roll hook/Print roller/Medium guide plate/Medium guide plate adjuster/Elevation sensor/Folding medium lock/Black line sensor/Ribbon movement sensor/Print head/Screen sensor
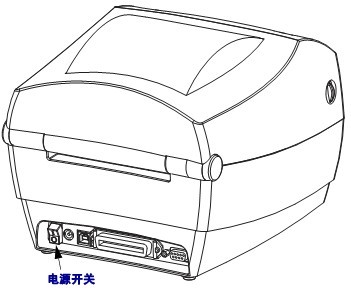
1.3 Power switch
Caution:The printer power should be turned off before connecting or disconnecting the communication cable and power cable

2. Zebra GK888t Barcode Printer Installation Instructions
2.1 Loading Roll Media
When loading media, roll media must be placed in the media supply rack, and the correct media suitable for the required print type must be used.
① Turn on the printer. Note that you need to pull the release knob lever forward of the printer;
② Rotate the media guide adjustment knob backward of the printer to open the media guide;
③ Open the roll media hook. Use your other hand to pull the media guide open, place the roll media on the paper roll hook, and release the guide. Adjust the position of the roll media so that the print side is facing up as it passes over the print (drive) roller;
④ Pull the media out so that it extends from the front of the printer. Check that the roll media can rotate freely. Do not place roll media at the bottom of the media compartment. Check that the print side of the media is facing up;
⑤ Push the media under the two media guides. Turn the media guide adjustment knob forward to close the media guides. The guide plate should just touch the edge of the media, but should not restrict its movement;
⑥ If the thermal transfer ribbon is not required, close the top cover. Note that the top cover lock should be released, the top cover lowered, and pressed down until the release button clicks into place;
⑦ If the printer is powered on, press the “Feed” button to feed the media.
2.2 Loading the Thermal Transfer
Ribbon Requirements for the thermal transfer ribbon:
● The media and ribbon type should match for optimal printing results.
● To protect the print head and avoid wear, use a ribbon wider than the media
. ● Do not install the ribbon in the printer for thermal printing.
● Do not use ribbon rolls with damaged grooves, worn edges, broken pieces, or shredded material. The ribbon core grooves should be intact to secure the ribbon core to the spindle; otherwise, the ribbon core will slip, causing the ribbon to curl, incorrect ribbon end sensing, or other intermittent errors.
Installation steps:
① With the printer on, pass the ribbon through the ribbon holder. Press the right end of the supply roller onto the spring-loaded supply hub. Align the left side of the ribbon core notch with the left feed roller (spindle) hub spoke. Rotate the ribbon spindle until the notch aligns and lock it into the left side of the feed hub.
② Place the empty ribbon core on the printer’s pickup spindle. Rotate the ribbon core until the notch aligns and lock it into the left side of the pickup hub. You can find the first ribbon pickup spindle core in the box. You can then use the empty feed core to pick up the next roll of ribbon.
③ Attach the ribbon to the pickup core. Use the adhesive strip on the new pickup roller, or use other tape. It is essential to align the ribbon when attaching it to the ribbon core so that it winds straight onto the ribbon core and aligns with the consumable.
④ Rotate the ribbon pickup gear counterclockwise (top to back) to tighten the slack portion of the ribbon.
⑤ Check that the media is loaded and the printer is ready to print, then close the printer cover. Note that you need to loosen the top cover lock, lower the top cover, and press down until the release button clicks into place.
⑥ If the printer is powered on, press the “Feed” button to allow the printer to feed at least 10 cm (4 inches) of media, tighten any loose sections and ribbon wrinkles, and align the ribbon on the spindle.
⑦ Change the print mode setting from thermal to thermal transfer to set the printer temperature profile suitable for thermal transfer media. This setting can be done through the printer driver, application software, or printer programming commands.
* To control printer operation using ZPL programming commands, see “Media Type” (^MT) ZPL II commands.
* To control printer operation using “EPL Page Mode,” see “Options” (O) EPL commands.
⑧ To verify that the print mode has switched from thermal to thermal transfer, print the configuration label using the Print Test (Printer Configuration) label. The “PRINT METHOD” on the printer configuration status label should be “THERMAL-TRANS.” Your printer is now ready to print.
2.3 Print Test (Printer Configuration) Label
Before connecting the printer to the computer, ensure that the printer is in normal working order. A configuration status label can be printed for confirmation.
① Ensure the media is installed correctly and the printer cover is closed. If the printer power is not yet on, turn it on. If the printer status indicator is flashing green during initialization (paused state), press the “Paper Feed” button to set the printer to “Ready” mode. If the printer status indicator does not turn continuously green, please refer to the subsequent troubleshooting.
② Press the “Paper Feed” button two to three times to allow the printer to perform calibration based on the loaded media. During this process, the printer may feed multiple labels.
③ While the status indicator remains green, press and hold the “Paper Feed” button until the status indicator flashes once.
④ Release the “Paper Feed” button. A configuration label will be printed.
2.4 Pre-install Windows Printer Driver
Zebra has changed its installation method. For use with the printer via a PC-based Windows operating system, it is recommended to pre-install at least the ZebraDesigner Windows driver to take advantage of its ease of use and the convenience of Windows XP SP2 and later versions.
Zebra provides Zebra Setup Utilities (ZSU), a suite of tools that includes Zebra printer drivers, utilities, and communication and installation tools for most Windows PC operating systems. Zebra Setup Utilities and Zebra Windows printer drivers are available on the user CD, or the latest version can be found on the Minyong website (www.chongshang.com.cn).
Zebra Desugber drivers and Zebra Setup Utilities (which include the drivers) support Windows 7, Windows Vista, Windows XP, Windows 2000, Windows Server 2008, and Windows Server 2003 operating systems. The drivers support both 32-bit and 64-bit Windows operating systems and are Microsoft certified. Zebra Desugber drivers and Zebra Setup Utilities support the following printer communication interfaces: USB, parallel port, serial port, wired and wireless Ethernet, and Bluetooth (using the Bluetooth virtual printer port).
Zebra Setup Utilities should be installed first, and then the printer connected to the PC should be powered on. Zebra Setup Utilities will prompt you to power on the printer; continue with the following steps to complete the printer installation.
2.4.1 Plug and Play (PnP) Printer Detection and Windows Operating System
The updated Windows operating system can automatically detect printers when connected via USB. Depending on hardware configuration and Windows version, printers can be detected via plug-and-play when connected via USB, parallel port, or serial port. Printer drivers no longer support serial port plug-and-play installation. The printer’s serial port PC interface configuration must support and have bidirectional communication capabilities for plug-and-play to work. The first time you connect the printer to your PC, the operating system will automatically launch the “Add New Hardware” wizard. If Zebra Setup Utility includes a pre-installed driver suite, the printer driver will be installed automatically. Go to the Windows Printers directory, right-click, select “Properties,” and click the “Print Test Page” button to verify successful installation.
If you reconnect the printer via USB or power on the printer after your PC has restarted, the Windows operating system will detect and reconnect the previously installed printer. Ignore the warning about the new device detected and close the taskbar notification. Wait a few seconds for the operating system and driver software to match; the warning message will disappear, and the printer is now ready to print.
2.4.2 Universal Serial Bus (USB) Device Communication:
When using the USB interface, the printer is the terminal device (not the host or hub).
Note: Scanners, scales, or other data input (terminal) devices must use the serial port (not the USB port) to send data to the printer.
2.4.3 Serial Port and Windows Operating System:
Except for data flow control settings, the default settings for serial port communication in the Windows operating system match the printer’s default settings. Windows’ default data flow control is set to NONE; the GK888t printer requires data flow control to be set to Hardware.
Note: The GK888t printer does not currently support Plug and Play device detection for the Windows serial port.
2.4.4 Ethernet:
The GK888t printer options offer various methods and applications to help the printer connect to a network (WAN or LAN) and configure wired and wireless (Wi-Fi) printers. The Zebra Setup Utility configuration wizard allows the printer to connect to a shared network using its IP address via a Windows-based system. The printer has an internal webpage that makes printer and network configuration easy; this webpage can be accessed using a web browser via the printer’s IP address. The free version of ZebraNet Bridge software allows users to centrally deploy, manage, and monitor Zebra printers. Zebra’s automatic printer discovery feature can discover up to three printers from any location on a pre-set PC screen across the global network. ZebraNet Bridge Enterprise can be purchased to manage a large number of Zebra printers.
2.5 Connecting the Printer to a Computer
The Zebra GK888t printer supports a variety of interface options and configurations. These include: Universal Serial Bus (USB) interface, RS232 serial interface, parallel interface (IEEE1284), and 10/100 Ethernet.
Caution: When connecting the interface cable, the power switch should be in the off position. Before connecting or disconnecting the communication cable, the power cord must be plugged into the power supply unit and power outlet on the back of the printer.
Interface Cable Requirements:
The data cable must be fully shielded and have a metal or metallized connector housing. Shielded cables and connectors must be used to prevent radiation and received electrical noise.
To minimize the level of electrical noise pickup in the cable, the following should be done:
● Use the shortest possible data cable (1.83 meters is recommended)
● Do not tightly bundle the data cable and power cord together
● Do not tie the data cable to the power cord conduit
2.6 After connecting the printer,
you can now establish basic communication with the printer and test printer communication, and then install other printer-related applications, drivers, or utilities.
Testing the operation of the printing system is a relatively simple task. For Windows operating systems, Zebra Setup Utility or the Windows “Printers and Faxes” control panel can operate and print test labels. For non-Windows operating systems, a (~WC) command can be used to copy a basic ASCII text file to print a configuration status label.
2.6.1 Test printing using Zebra Setup Utility
① Open Zebra Setup Utility
② Click the icon of the newly installed printer, select the printer, and enable the printer configuration button below the printer in the window.
③ Click the “Open Printer Tools” button.
④ In the “Print” tab window, click the “Print configuration label” row and click the “Send” button. The printer will print the configuration status label.
2.6.2 Test Printing Using the Windows “Printers and Faxes” Menu
① Click the Windows “Start” menu button and go to “Printers and Faxes,” or go to the “Printers and Faxes” menu in “Control Panel” to open the menu.
② Select the newly installed printer icon, select the printer, and right-click to open the printer’s “Properties” menu.
③ From the printer’s “General” tab window, click the “Print Test Page” button. The printer will print a Windows test page.
2.6.3 Perform a Test Print for an Ethernet Printer Connected to a Network (LAN or WAN) Using the MS-DOS Command Prompt or from the Windows XP “Start” menu
① Create a text file using three ASCII characters: ~WC
② Save the file as: TEST.ZPL (any filename and extension)
③ Read the IP address from the network status printout on the printer’s configuration status label. When connecting to the same LAN or WAN as the printer, type the following in the address bar of your web browser window, and enter: ftp 123.45.67.01 (assuming the IP address is 123.45.67.01).
④ Type the filename, then type “put” and press Enter. For this “test print” file, it should be: put TEST.ZPL
2.6.4. For non-Windows operating systems, use the copy ZPL command file to perform a test print
: ① Create a text file using three ASCII characters: ~WC
② Save the file as: TEST.ZPL (any filename and extension)
③ Copy the file to the printer. For DOS environments, send the file to a printer connected to the system’s parallel port; the command is very simple: COPY TEST.ZPL LPT1
3. Zebra GK888t Barcode Printer Operation
3.1 Printer Inactivity or Storage
Prolonged storage may cause the print head to stick to the print roller. To avoid this, place a sheet of media (label or paper) between the print head and the print roller when storing the printer. Do not ship the printer with a media roll already installed, as this may damage the printer or media.
3.2 Printing Modes
The GK888t printer can operate in different modes and various media configurations:
● Thermal Printing (This mode uses heat-sensitive media for printing)
● Thermal Transfer Printing (This mode uses a ribbon to print on the media using the principle of thermal transfer)
● Standard Tear-Off Mode allows users to peel off labels (or batches of labels) after each label is printed.
● Label Peel-Off Mode: If a label peeler is installed, the label can be peeled off from the backing material during printing, and the next label can be printed immediately after the label is removed.
● Standalone Mode: The printer can print without connecting to a computer serial port when using the automatic label run function (according to programming) or when using a data input device connected to the printer’s parallel port. In this mode, data input devices such as scanners, scales, Zebra KDU Plus, or Zebra KDU (keyboard display unit) can be used.
● Network Shared Printing: Printers equipped with the Ethernet interface option have a built-in print server that can be managed and monitored via the ZebraLink printer configuration webpage and ZebraNet Bridge software.
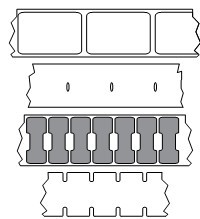
3.3 Types of Printing Media
Important Note: For uninterrupted, high-quality printing, Sensitive recommends using Sensitive’s recommended consumables. Specially designed papers, polyethylene, polyester, and vinyl products can improve printer performance and prevent premature printhead wear.
The GK888t printer can use various media types:
● Standard Media – Most label non-continuous media use adhesive materials that allow multiple individual labels or continuous labels of a certain length to be attached to a backing.
● Continuous Roll Media – Most continuous roll media are thermal (similar to fax paper) and suitable for receipt or ticket printing.
● Unbacked Media – Unbacked labels have adhesive material, but it is wound on a media core without a backing. The media is typically pre-perforated and may also have black markings on the bottom surface to indicate label separation positions. Unbacked media labels have a special coating on the top layer to prevent labels from sticking together. Printers must be equipped with a special “unbacked” option to use unbacked media and must ensure the media does not stick to the printer.
● Label Material – Labels are typically made of thick paper (maximum 0.19 mm thick). The label material has no adhesive or backing and usually has pre-perforations between each label.
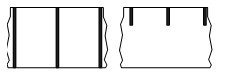
① Non-continuous Roll Media
Roll media can be wound on a paper core with a diameter of 12.7 to 38.1 mm. Labels have an adhesive backing that allows them to adhere to the liner. Labels are separated by spacers, notches, cutouts, or black markings. Labels are separated by perforations. Single labels are separated by one or more of the following methods:
◆ Mesh media is separated by spacers, cutouts, or notches.
◆ Black Marker Media uses pre-printed black markings on the back of the media to indicate the label separation positions.
◆ Pre-perforated media has perforations that allow labels or label materials to be easily separated. The media may also have black markings or other separation methods between labels.
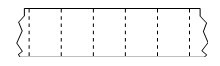
② Intermittently folded media: Folded media folded in an alternating manner. Folded media can have the same separation method as intermittent media rolls. The separation position can be located at or near the fold.
③ Continuous roll media: Rolled media can be wound on a paper core with a diameter of 12.7 to 38.1 mm. Continuous roll media does not have gaps, cuts, notches, or black markings to indicate label separation positions. Images can be printed at any position on the label, and individual labels can be cut using a cutter. If using continuous media, a transmissive (gap) sensor should be used so that the printer can detect the delivery of the media.
3.4 Adjusting Print Width
The print width must be set in the following situations:
● First time using the printer
● Changing the media width
The print width can be set in the following ways:
◆ Windows printer driver or application software such as ZebraDesigner.
◆ With the printer powered on and the top cover closed, press and hold the “Paper Feed” button for a few seconds. The green status indicator light will flash 5 times. Release the button. The printer will adjust the width, printing one frame every 4mm from the minimum print width to the maximum print width. When the printer reaches the desired maximum print width, press the “Paper Feed” button once. Note: Printer drivers and applications may override this setting.
◆ To control printer operation using ZPL programming, see the “Print Width Command” (~PW).
◆ To control printer operation using “EPL Page Mode” programming, see the “Set Label Width” (q) command.
3.5 Adjusting Print Quality
Print quality is affected by printhead temperature or density settings, print speed, and the type of media used. Experiment with these settings to find the best combination for your application. You can use the “Configure Print Quality” program in Zebra Setup Utility to set print quality.
The relative color depth (or density) setting can be controlled in the following ways:
◆ With the printer powered on and the top cover closed, press and hold the “Paper Feed” button for a few seconds. The green status indicator will flash 6 times. Release the button, and the printer will adjust the depth, starting from the minimum color depth (print density/heat) and ending at the printer’s maximum color depth. Use the ZPL depth setting range value to print a continuous barcode simulation pattern in increments of 4. If the pattern is clear and valid, press the “Paper Feed” button once. Do not continue to increase the color depth setting, otherwise the width of the barcode lines may be distorted, resulting in decreased readability. Note: Printer drivers and applications may override this setting.
It will override any color depth/density settings programmed via ZPL or EPL.
◆ The (~SD) ZPL command for “Set Color Depth”.
◆ The “Color Depth” (D) ELP command.
If you find that you need to adjust the print speed, you can use:
◆ Windows printer drivers or application software such as ZebraDesigner.
◆ The “Print Speed” (~PR) command.
◆ The “Speed Selection” (S) command.
3.6 Media Sensing
The printer features automatic media sensing, designed to continuously check and adjust the media length sensor to accommodate minute changes. When printing begins or media is fed, the printer continuously checks and adjusts the media sensor to accommodate minor variations in media parameters between labels within the same roll and between rolls. If the expected media length or label spacing exceeds acceptable variation when a print job begins or media is fed, the printer automatically initiates media length calibration. The automatic media sensing function in the GT800 printer also applies to printers using EPL and ZPL label formats and programming.
If the printer does not detect a label or black line (or a notch with a black line sensor) after feeding media of the default maximum label length of 1 meter, it switches to continuous media mode. These settings are retained unless changed via software or programming or manually calibrated for different media.
Alternatively, the printer can be configured to perform a short media calibration when powered on or when printing is off while the power is on, during which multiple labels are fed.
The printer’s media settings can be verified by printing the “Printer Configuration” label.
The “ZPL Maximum Label Length Command” (~ML) can be used to reduce the maximum distance that the automatic media type detection and sensing process checks. It is recommended to set this distance to no more than twice the longest label to be printed. If the largest label to be printed is 4*6 inches, the detection distance for the maximum label length can be reduced from the default distance of 39 inches to 12 inches.
If the printer cannot automatically detect the media type and perform automatic calibration, perform a full calibration. This calibration process includes a sensor operation of the printed graphic applicable to the user’s media. This method will disable the printer’s automatic media sensing function until the printer’s default parameters are reset to factory defaults using the four-flash feed button mode.
The automatic media calibration function can be modified, enabled, or disabled as needed. Print jobs sometimes require the printer to use an entire roll of media. The “ZPL Media Feed Command” (~MF) can be used to separately control two automatic media feed scenarios (powered on with media loaded, or powered on with the printer cover closed). The feed operation discussed for the ~MF command in the ZPL Programmer’s Guide primarily applies to automatic media sensing and calibration. The ~XS command can be used to perform automatic media calibration operations for controlling media (label-to-label) calibration. If multiple media types of different lengths, materials, and detection methods (mesh/gap, black line, notch, or continuous) are used, these settings should not be changed.
The media calibration and detection process can also be refined to match the type of media loaded into the printer; this can be done using the “ZPL Media Tracking” command (~MN) to set the media type. The printer sometimes detects pre-printed media as spacing between labels or as black marks on the backing with printed content; if the ~MN parameter is set for continuous media, automatic calibration will not be performed during printing. The ~MN command also includes an automatic calibration parameter (~MNA), which can be used to return the printer to its default settings to automatically detect all media types.
3.7 Fonts and Printer
The GK888t printer meets your language and font requirements with a variety of internal fonts, onboard font scaling, international font sets and code pages support, Unicode support, and font download options.
The GK888t printer’s font capabilities are language-dependent. The EPL programming language provides support for basic bitmap fonts and international code page fonts. The ZPL programming language provides advanced font mapping and scaling technology, supporting outline fonts (TrueType or OpenType) and Unicode font mapping, as well as basic bitmap fonts and character code pages.
The GK888t printer has various tools and application software that support downloading fonts to the printer for both printer programming languages.
The GK888t printer has resident character sets to support Simplified or Traditional Chinese.
Important: Some ZPL fonts installed in the printer can be copied, cloned, or restored to the printer by reloading or updating the firmware. If a license-restricted ZPL font is deleted using the dedicated ZPL object deletion command, it is necessary to repurchase these fonts and reinstall them using a font activation and installation tool. EPL fonts do not have this restriction.
3.7.1 Printer Localization via Code Pages
The GK888t printer supports two main programming languages, ZPL and EPL, each with a set of fonts to support regions, countries, and character sets. The printer supports localization using commonly used international character mapping code pages, as well as configuration status printing output.
● For information on zpl code page support, including Unicode, see the ^CI command in the ZPL Programmer’s Guide.
● For the ZPL configuration status printing language, see the ^KL command in the ZPL Programmer’s Guide.
● For EPL code page support, see the I command in the EPL Programmer’s Guide.
3.7.2 Recognizing Fonts in the Printer
Fonts and memory can be shared through the printer’s programming language. Fonts can be loaded into multiple memory areas in the GT800 printer. ZPL programming technology recognizes both EPL and ZPL fonts. EPL programming technology only recognizes EPL fonts.
ZPL Fonts:
● Fonts suitable for ZPL printer operation can be managed and downloaded using the Zebra Setup Utility or ZebraNet Bridge.
● To display all fonts loaded into your printer, send the ZPL ~WD command to the printer. The
.FNT file extension in the ZPL language is used to identify bitmap fonts in different printer memory areas.
The .TTF, .TTE, or .OTF file extensions in the ZPL language are used to identify scalable fonts. EPL does not support these fonts.
EPL Fonts:
● To download fonts for EPL print operations, send the file to the printer using the Zebra Setup Utility or ZebraNet Bridge.
● To display soft fonts (ext.) available for EPL, send the EPL command EI to the printer.
All displayed EPL fonts are bitmap fonts, excluding those with the .FNT file extension or horizontal and vertical indicators displayed using the ZPL command ^WD in the ZPL fonts mentioned above.
● To delete non-Asian EPL fonts programmatically via EPL, use the EK command.
● To delete Asian EPL fonts from the printer, use the ZPL ^ID command.
3.8 Standalone Printing
The printer can be configured to operate independently without being connected to a computer. The GK888t printer can automatically run a single label printing format. One or more downloaded label formats can be accessed using a terminal device, embedded device, or Zebra KDU (Keyboard Display Unit) to use the label format. These methods allow developers to integrate data input devices such as scanners or scales into the printer via a serial port.
The developed label format can be stored in the printer to support labels with the following characteristics:
● No data input required; simply press the “Feed” button to print.
● No data input required; print as the label is removed from the printer’s optional label peeler.
● One or more data variables can be input via a terminal or embedded device. The label will be printed after the last variable data field is entered.
● One or more label formats invoked by scanning a barcode (containing programming information for running the label format).
● Label formats designed as a stage in the processing flow, where each label includes a barcode containing programming information for running the next label during processing.
Both printer programming languages support special label formats that run automatically after a power-on cycle or reset. ZPL looks for a file named AUTOEXEC.ZPL, and EPL looks for a label format named AUTOFR. If both files are loaded into the printer, only AUTOEXEC.ZPL will run. If EPL AUTOFR is not disabled, it will run continuously. Both files must be deleted from the printer, and then a reset or power-on cycle must be performed to completely remove both files.
3.9 Print Counter
The GK888t printer can report printhead maintenance alarms, provides a cleaning function, and can issue an early warning when the printhead life alarm is calculated. If an RTC (Real-Time Clock) is installed in the printer, date information can also be included in the printhead life and history reports. Print count alarms are disabled by default.
Multiple print counter messages and reports can be customized. To enable print counter alarms, send the following commands to the printer:
● EPL command oLY
● ZPL command ^JH,,,,,E
4. Zebra GK888t Barcode Printer Maintenance
4.1 Cleaning the Printhead
Caution: The printhead will heat up during printing. To prevent damage and personal injury, do not touch the printhead. Only use a cleaning pen or alcohol swabs for maintenance.
① Rub the cleaning pen on the black area of the printhead, cleaning from the center outwards. This will remove sticky substances transferred from the media edges to the outside of the printhead in the media path.
② Wait one minute before closing the printer cover.
4.2 Media Path Precautions
Use a cleaning swab to remove accumulated debris, dust, and dirt from the hooks, guides, and media path surfaces.
① Soaking these particles in the alcohol on the cleaning swab will make them lose their stickiness.
② Wipe the protrusions to remove accumulated debris.
③ Wipe the inner edges of the two media guides and the media holder to remove accumulated dirt.
④ Wait one minute before closing the printer cover and discard the used cleaning swab.
4.3 Sensor Cleaning
Dust can accumulate on the media sensors.
① Gently brush away dust with a brush or blow it away with a compressed air canister. Do not use an air compressor – oil and wastewater from the air pump will soil the printer and printhead. Wipe away dust with a dry cotton swab as needed. If there is still adhesive or other dirt, you can remove it with an alcohol-moistened cleaning swab.
② Use a dry cleaning swab to remove any residue remaining after the initial cleaning.
③ Repeat steps 1 and 2 as needed until all residue and dirt are removed from the sensor.
4.4 Cleaning and Replacement of the Print Roller
The label printing roller (active roller) generally does not require cleaning, although paper scraps and backing debris may accumulate, but this will not affect printing operations. Dirt on the printing roller can damage the printhead, causing media slippage or sticking during printing. Adhesive, dirt, dust, oil, and other contaminants should be removed from the printing roller immediately.
If printer performance and print quality are significantly reduced, and media handling is not smooth, the printing roller (and media path) should be cleaned. The printing roller is the printing surface and the drive wheel for the media. If sticking or paper jams still occur after cleaning, the printing roller must be replaced.
Clean the print roller using a lint-free cleaning swab or a lint-free cloth dampened with a small amount of alcohol.
① Remove the print roller from the print roller area by removing the print cover plate.
② Loosen the bearing lock on the left or right side of the print roller and pull the flaps forward and upward.
Note: The support arm structure of the print roller is complex. Move the support arm outside the printer until you can clean the grooves on the bearing housing. Then, slowly and gently pull the support arm towards the front of the printer to remove the print roller. Be careful when installing the bearing.
③ Remove the print roller from the bottom bracket of the printer.
④ Clean the print roller with an alcohol-dampened cleaning swab, cleaning from the center outwards. Repeat this process until all print roller surfaces are clean. If you find a lot of accumulated sticky material or severe label blockage, repeat the process with a new cleaning swab to remove residual dirt. The first cleaning may dilute adhesive and oil stains, but may not completely remove them.
⑤ Reinstall the print roller into the printer. The cleaning swab is not reusable and should be discarded after use.
⑥ Ensure that the bearings and drive gears are on the print roller shaft.
⑦ Align the print roller with the gear on the left side and place it downwards into the bottom bracket of the printer.
⑧ Gently turn the locking pin of the print roller bearing downwards towards the rear of the printer to loosen the flap and lock it into the notches on both sides of the bearing groove.
Allow the printer to dry for about one minute before closing the media cover.
4.5 Replacing the Printhead
Caution: Prepare a work area to prevent static discharge. Anti-static measures must be taken in the work area. Use properly grounded conductive shockproof pads to support the printer. The operator should also wear a conductive wrist strap.
Caution: Turn off the printer power, unplug the power cord, and then replace the printhead.
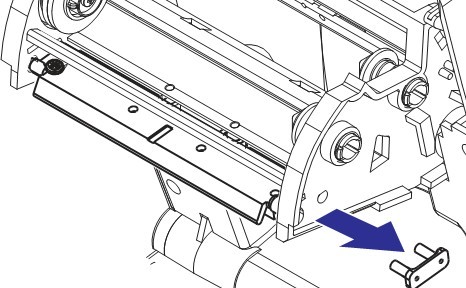
4.5.1 Printhead Removal
① Turn on the printer. Remove the thermal transfer ribbon from the printer.
② Grasp the printhead spring and pull it to the left, then slide it off the bracket.
③ Use the spring to pop the printhead clip off the right side of the bracket.
④ Pull the printhead and bracket forward.
⑤ Use a #2 Phillips screwdriver to remove the screw securing the ground wire.
⑥ Disconnect the two bundles of printhead cables from the connector.
4.5.2 Printhead Reinstallation
New printheads come with clips and grounding screws.
① Align the printhead and bracket, and connect the left and right connectors to the black and white wiring harness.
② Connect the ground wire and secure it with the screw. Tighten the screw using a #2 Phillips screwdriver.
③ Slide the left end of the printhead spring into the left end of the ribbon carriage, and then slide the right end into the other end of the carriage. The “V” angle should align with the notch at the top of the printhead bracket.
④ Insert the bracket pin into the left side of the carriage.
⑤ Align the right side of the bracket and insert the printhead clip through the ribbon carriage into the bracket.
⑥ Check that the printhead moves freely up and down while applying pressure and remains in the locked position when released.
⑦ Clean the printhead. Use a new cleaning pen to wipe away oil (fingerprints) and stains from the printhead. Clean the printhead from the center outwards.
⑧ Reload the media. Plug in the power cord, turn on the printer, and print a status report to ensure the printer is working properly.
5. Troubleshooting Zebra GK888t Barcode Printer
This section provides printer troubleshooting information that may be needed to perform printer troubleshooting, including various diagnostic tests.
5.1 Status Indicator Light Description
| Indicator light status and color | Printer status | For solutions, please refer to the numbers below. |
|---|---|---|
| Extinguish | closure | 1 |
| Continuing to be green | Open | 2 |
| It remains amber in color. | Stopped | 3 |
| Green flashing | Stopped | 4 |
| Red flashing | Stopped | 5 |
| Red hazard lights | Suspended | 6 |
| Amber shimmer | Suspended | 7 |
| Red and green flashing alternately | Needs repair | 8 |
| Red flashing, red and green flashing | Repair or restart required | 9 |
| It will flash red, amber, and green (do not reset or turn off the power). | Memory card defragmentation | 10 |
5.2 Status Indicator Error Troubleshooting
The status indicator error solution numbers below correspond to the “Status Indicator Description” table in 5.1. Each error number has one or more troubleshooting methods to resolve the listed errors.
1. Printer Not Powered On
● Is the printer power on?
● Check the power connections from the wall outlet to the power source and from the power source to the printer.
● Disconnect the printer power from the wall outlet for 30 seconds, then reconnect the printer power to the wall outlet.
2. Printer Power On, in Standby Mode
No action is necessary.
3. Printer Power-On Self-Test (POST) Failed
● If the error occurs when the printer is powered on, contact MinYong Digital for assistance. If the printer is working properly, the printer status indicator light will be amber for 10 seconds before turning green (steady or flashing).
A memory error has occurred.
● If the error occurs after printing, turn the printer power off, then back on, and resume printing.
The print head needs to cool down
. ● If this error persists, turn the printer power off, wait at least five minutes, then turn it back on. If the amber indicator light remains on, the printer needs repair.
4. Printer is receiving data
. ● After receiving all data, the status indicator light will turn green, and the printer will automatically resume operation.
5. Media is used up.
● Reload the roll of media and press the “Feed” button to resume printing.
Ribbon is used up.
● The printer detects the end of the ribbon roll. Replace the ribbon.
Printhead is open .
● Close the top cover and press the “Feed” button to resume printing.
6. Printer is paused.
● Press the “Feed” button to restart printing.
7. Printhead temperature is too high.
● Printing will pause, waiting for the printhead to cool to an acceptable printing temperature. Once this temperature is reached, the printer will automatically resume operation.
8. Flashing memory is not programmed.
● Return the printer to the point of purchase.
9. Printhead or motor has a serious malfunction.
● Return the printer to the point of purchase.
● The printhead may be experiencing a “THERMAL SHUTDOWN” error. Turn off the printer, let it cool for a few minutes, and then turn it back on. If the error persists, send the printer to MinYong Digital.
10. The printer is performing memory defragmentation.
Caution: Do not turn off the printer power during defragmentation, as this will damage the printer.
● Defragmentation is a routine operation of the printer, which helps to better manage memory card space usage. The printer will perform defragmentation on the memory card when factory defaults are restored and when the printer detects that defragmentation is necessary.
While the printer is in this state, allow it to complete defragmentation. If warnings are frequently issued, check the label format. Frequent writing or erasing of the format from memory may cause the printer to defragment frequently. Using a format that avoids frequent rewriting of the memory will minimize the need for defragmentation.
● If the warning does not disappear, contact Technical Support. The printer needs repair.
5.3 Print Quality Issues
5.3.1 No content is printed on the label.
① In the case of printing without a ribbon, the media may not be thermal media.
② For thermal transfer printers, the media must not have winding problems, and an incompatible printer ribbon must not be used.
③ Is the media loaded correctly?
5.3.2 Incorrect printed image
① The print head is dirty; clean the print head.
② The print head temperature is too low.
③ Adjust print depth and/or print speed.
④ The media being used is incompatible with the printer.
⑤ The printhead is worn. The printhead is a consumable part and will wear down due to friction between the media and the printhead. Using incompatible media may shorten the life of the printhead or damage it. Replace the printhead.
⑥ The print roller needs cleaning or replacement. The print roller may lose traction for the following reasons:
● Foreign matter on the surface.
● The smooth surface of the rubber material has become polished and slippery.
● A normally smooth printing surface has folded knife-cut-like damage.
5.3.3 Many labels have many blank vertical lines (no printed content)
① The printhead is dirty. Clean the printhead.
② The printhead components are damaged.
5.3.4 The printing action does not start from the top of the label, or one to three labels have printing errors.
① The media is not properly cascaded.
② The printer needs calibration.
③ ZPL label format – the correct media sensor may not be enabled. Manual calibration allows you to select the media sensing method for the labels to be used. (^MN command)
④ ZPL label format – Check that the “Label Top” (^LT) command is correctly set for your application.
⑤ EPL label format – For label delivery, black line or notch sensing, or slit/cut sensing, the correct media sensor may not be activated. Manual calibration allows you to select the media sensing method for the labels you want to use. (o and Q commands)
⑥ EPL label format – Check that the “Set Label Length” (Q) command is correctly set for your application.
5.3.4 ZPL label format sent to printer, but printer cannot recognize it
① Is printing in pause mode? If so, press the “Paper Feed” button.
② Check that the data cable is correctly installed.
③ A communication failure has occurred. First, check that the correct communication port on the computer is selected.
④ Check that the correct “Format” and “Control Prefix” on the printer match what is used in the ZPL programming label format. The default format is an up arrow (^) character, and the control character is a tilde (~) character.
5.3.5 The EPL label format has been sent to the printer, but the printer cannot recognize it.
① Is printing in pause mode? If so, press the “Paper Feed” button.
② Check that the data cable is installed correctly.
③ A communication failure has occurred. First, check that the correct communication port has been selected on the computer.
④ If the printer has the label peel function enabled, the printer will wait for the user to remove the label. The backing paper/mold must be correctly passed through the label peeler for proper operation in label peel mode.
5.4 Manual Calibration
If you are using pre-printed media or if the printer has not performed automatic calibration correctly, manual calibration is recommended.
① Ensure media is loaded.
② Turn on the printer.
③ Press and hold the “Feed” button until the green indicator light flashes once, then twice, and continues flashing until a set of seven flashes is achieved. Release the “Feed” button.
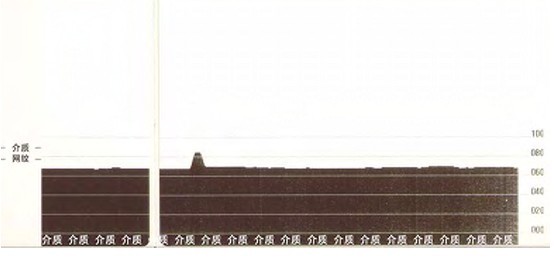
④ The printer will set the media sensor for the label backing to be used. After this adjustment, the roll of media will be automatically fed until the label is positioned under the printhead, and a graph of the media sensor settings will be printed. After the above operations are completed, the printer will save the new settings in its memory and the printer will be ready for normal operation.
⑤ Press the “Feed” button to feed a full sheet of blank label. If it does not feed, try restoring the printer to its default settings and performing a printer recalibration.
Note: Performing manual calibration disables the automatic calibration function. To return to automatic calibration mode, restore the printer to its default settings.
5.5 Feed Button Mode
| Power off mode | |
|---|---|
| With the printer powered off, press and hold the “Paper Feed” button while the printer is powered on. | |
| blinking sequence | operate |
| Amber-red shimmer | Firmware Download Mode – The printer starts flashing red rapidly, indicating that it has entered “Firmware Download Mode”. Releasing the “Paper Feed” button at this time initializes the printer and begins the download. When the printer status indicator light starts flashing red and green slowly, it indicates that the printer is ready to begin downloading the firmware. |
| amber | Normal operating mode – The printer enters the normal initialization process. Releasing the “Paper Feed” button at this time will allow the printer to start normally without downloading firmware and to work in communication diagnostic mode. |
| green | Communication Diagnostic Mode – After the printer status indicator turns green, immediately release the “Feed” button. The printer will print “Now in DUMP” at the top of the label and then advance to the next label. After printing the first label, the printer will automatically enter diagnostic mode, where it will print a text representation of any subsequently received data. To exit diagnostic mode and resume printing, turn the printer off and then on again. Another way to exit diagnostic mode is to press the “Feed” button multiple times, which will clear the printer’s command buffer and print “Out of DUMP” on the label. |
| Power On Mode | |
|---|---|
| With the printer powered on and the top cover closed, press and hold the “Paper Feed” button for a few seconds; the green indicator light will flash several times. The instructions on the right (Operation) show the printer’s status when the button is released after the indicator light has flashed a certain number of times and before the next flashing sequence begins. | |
| blinking sequence | operate |
* | Configuration Status – Prints detailed printer configuration status reports. Labels can be used to verify print quality, help printers calculate communication configurations, perform maintenance and troubleshooting, and assist users with customer service communication. |
* ** | Standard Media Calibration – The printer detects and sets the media type and length, adjusting the media sensor to provide optimal performance for loaded media (equivalent to ZPL command ~JC). During calibration, the printer will feed one to four labels. |
* ** *** | Serial Port Configuration – Only applicable to printers with a serial interface port. To reset the communication parameters of the serial port (excluding database control), press and release the “Paper Feed” button while the indicator light is flashing rapidly in amber and green. To automatically synchronize the baud rate: send the ^XA^XZ command sequence to the printer while the indicator light is flashing rapidly in amber and green. The indicator light will switch to a continuous green display when the printer and host are synchronized. Note: Labels will not be printed during automatic baud rate synchronization. |
* ** *** **** | Factory default settings – Resets the printer to factory default settings (equivalent to ZPL command ~JUN). Some configuration settings are not returned to the initial installation settings. Other settings that are programmatically set, viewed, and controlled will also be reset. During memory defragmentation, the printer will perform a standard media calibration process. After the network printer enters factory default mode, the status indicator light will turn amber within three seconds. During this process, the user can perform two actions: without performing any action, the printer will automatically reset to factory defaults as described above, or the user can press and hold the “Paper Feed” button to enter factory default reset mode for printers equipped with the network printer option (equivalent to ZPL command ^JUF). Releasing the button after the first flash will reset the network’s factory option (equivalent to ZPL command ^JUN). Releasing the button after the second flash sequence (blinks twice) will only reset the printer defaults. Releasing the button after the third flash will reset both the printer and network settings (ZPL commands ^JUN and ^JUF). |
* ** *** **** ***** | Print width adjustment – Starting from the minimum print width and moving up to the printer’s maximum print width, print one frame every 4 mm. When the printer reaches the desired maximum print width, press the “Feed” button. Note that printer drivers and applications may override this setting. |
* ** *** **** ***** ****** | Print Depth (Density) Adjustment – Starting from the minimum color depth (print density/heat) and ending at the printer’s maximum depth, use the ZPL depth setting range to print continuous barcode simulation patterns in four-digit increments. If the pattern is clear and effective, press the “Feed” button once. Do not continue increasing the color depth setting, otherwise the width of the barcode lines may be distorted, leading to decreased readability. Note that printer drivers and applications may override this setting. |
* ** *** **** ***** ****** ******* | Manual Media Calibration – The printer runs a comprehensive test to detect and set the media type and length, adjusting the media sensor for optimal performance with the installed media (equivalent to the ZPL~JG command). Manual calibration is recommended if using pre-printed media; otherwise, errors may appear on the label backing if the printer does not calibrate correctly automatically. A graphical representation of the media sensor readings will be printed. |
| If the “Paper Feed” button remains pressed after a 7-flash sequence, the printer will exit configuration mode when the user releases the “Paper Feed” button. |
6. Zebra GK888t Barcode Printer ZPL Configuration
6.1 ZPL Printer Configuration Format
Create a printer configuration programming file and send it to one or more printers to manage multiple printers. You can also use ZebraNet Bridge to copy printer settings. The basic structure of the ZPL programming configuration file is shown below:
^XA – Start Format Commands
The order of the format commands is very important:
Ⅰ. General Printing and Command Settings
Ⅱ. Media Handling and Operations
Ⅲ. Media Print Size
^JUS Save Command
^XZ – End Format Commands
Create the programming file. You can use the Zebra Setup Utility (ZSU) to send the programming file to the printer. You can also use Windows Notepad (a text editor) to create the programming file.
6.2 ZPL Configuration Status and Command Reference
| Order | List Name | illustrate |
|---|---|---|
| ~SD | DARKNESS | Default value: 10.0 |
| – | DARKNESS SWITCH | not applicable |
| ^PR | PRINT SPEED | Default value: 6 IPS/152.4 mm/s (maximum) |
| ~THAT | TEAR OFF | Default value: +000 |
| ^MN | MEDIA TYPE | Default: GAP/NOTCH |
| SENSOR TYPE | Default: WEB (mesh) | |
| SENSOR SELECT | Default value: AUTO (^MNA – Automatic detection) | |
| ^MT | PRINT METHOD | THERMAL-TRANS or DIRECT-THERMAL |
| ^PW | PRINT WIDTH | Default value: 832 points |
| ^LL | LABEL LENGTH | Default value: 1225 points (a value calibrated in a timely manner by automatically performing mesh-gap detection for the label media) |
| ^ML | MAXIMUM LENGTH | Default value: 39.0 IN 989 MM |
| – | USB COMM. | Connection status: Connected/Not connected |
| – | PARALLEL COMM. | Available connection: BIDIRECTIONAL (bidirectional) |
| ^SCa | BAUD | Default value: 9600 |
| ^SC,b | DATA BITS | Default value: 8 bits |
| ^SC,,C | PARITY | Default value: NONE |
| ^SC,,,,e | HOST HANDSHAKE | Default value: DTR or XON/XOFF |
| ^MFa | MEDIA POWER UP | Default: NO MOTION |
| ^MF,b | HEAD CLOSE | Default: FEED (Paper Feed) |
| ~JS | BACKFEED | Default value: DEFAULT |
| ^LT | LABEL TOP | Default value: +000 |
| ^LS | LEFT POSITION | Default value: +0000 |
7. Zebra GK888t Barcode Printer Interface Connections
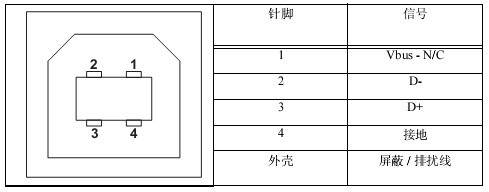
7.1 Universal Serial Bus (USB) Interface
The diagram below shows the cable routing required to use the printer’s USB interface. The printer must use a cable or cable package marked “Certified USB” to ensure compliance with the USB 2.0 specification.
7.2 Parallel Interface
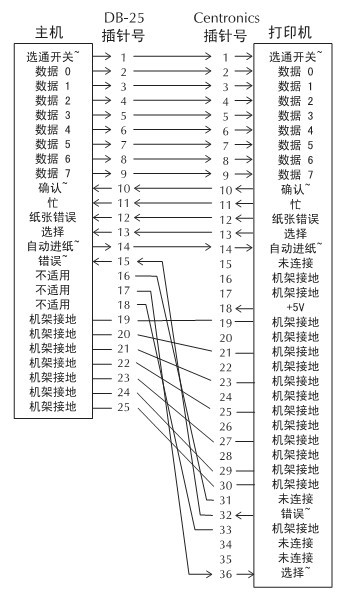
The printer’s parallel interface uses an IEEE 1284-A to 1284-B parallel interface cable. The host connector has a DB-25 pin connector. The printer connector is a Centronics-style connector.
7.3 Ethernet Interface
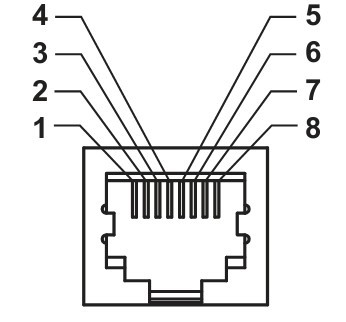
This interface requires a CAT-5 or higher UTP RJ45 Ethernet cable. The table below shows the cable lead assignments.
Pin Definitions: 1: Tx+; 2: Tx-; 3: Rx+; 4: -; 5: -; 6: Rx-; 7: -; 8: –
7.4 Serial Interface
| Stitches | illustrate |
|---|---|
| 1 | Unused |
| 2 | RXD (Receive Data) input to printer |
| 3 | TXD (Transfer Data) output from printer |
| 4 | DTR (Data Terminal Ready) output from the printer — used to control when the host can send data. |
| 5 | rack grounding |
| 6 | DSR (Data Set Ready) input to printer |
| 7 | RTS (Request to Send) output from the printer – always in “Active” condition when the printer is powered on. |
| 8 | CTS (Clear to Send) – Not for printer use |
| 9 | +5V 0.75A fuse |
The maximum total current through the serial and/or parallel interface ports must not exceed a total of 0.75 amps.
If XON/XOFF handshake is selected, the data flow is controlled by ASCII control codes DC1 (XON) and DC3 (XOFF). The DTR control preamble character will be disabled.
Interconnecting to DCE devices – When connecting a printer to a data communication device (DCE) such as a modem via an RS-232 interface, a standard RS-232 (straight-through) interface must be used. The diagram below shows the required connections for this cable.
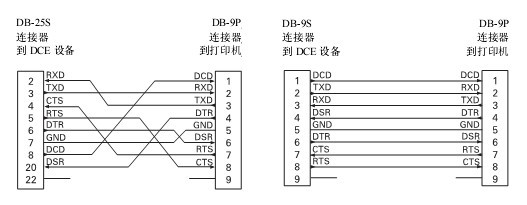
Connecting to the KDU (Keyboard Display Unit) – The KDU is designed for DCE printer connections and requires a custom Zebra serial port male/female adapter. The KDU adapter is now included with the KDU; the Zebra kit number for the KDU adapter is 105934-088.