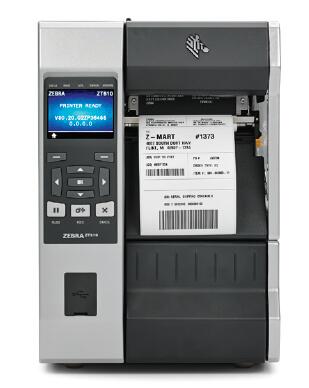
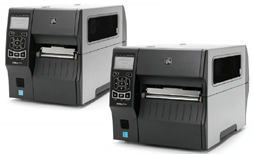
The Zebra ZT610 builds upon its industry-leading predecessor, the Xi series, integrating exceptional durability and superior performance into a user-friendly, future-proof platform.
This next-generation powerhouse helps you navigate the ever-evolving business technology landscape.
Therefore, whether you’re concerned about growing production line demands, increasing operational complexity, integrating disparate systems, or controlling investment costs, the ZT610 industrial printer meets your needs now and in the future.
Zebra ZT610 Product Advantages: ◆ All-Weather Reliability for the Harshest Environments: The ZT610 printers can withstand daily use in the most demanding industrial conditions, virtually eliminating downtime due to printer malfunctions. Furthermore, with excellent print quality and speed achievable in a wide range of applications, they can meet your daily high-intensity production needs. ◆ Consistent Print Performance for High-Quality Small Labels: With highly accurate calibration and print process adjustments, the ZT610 delivers 600 dpi printing results for 3mm labels suitable for applications such as circuit boards, chips, and ultra-small components—avoiding the waste of expensive media due to improper printing. ◆ User-Friendly Setup, Use, Maintenance, and Troubleshooting : The intuitive Link-OS app and user-friendly design simplify everything—from deployment and daily use to routine maintenance. Compatibility with other printing systems and technologies helps simplify integration and management, while built-in sensors, diagnostics, and help resources guide users through troubleshooting, eliminating the need to seek support every time a small problem occurs. ◆ Highly Adaptable Platform for Future Needs : The last thing you need is so-called new technology that will become obsolete within a few years. For this reason, the ZT610 was designed with future needs in mind—from its adaptable design that supports field communication, media handling and other upgrades to its compatibility with SOTI and AirWatch device management software, and even its intuitive Link-OS application that simplifies updates and reconfigurations as needed. ◆ Unparalleled performance to meet current needs * Durable all-metal structured components designed for all-weather, high-intensity use, meeting years of continuous operation * Built-in thermal management eliminates the need for ventilation and cooling fans, effectively preventing dust and debris intrusion and enabling trouble-free printing even in the most challenging environments * High-quality printing mechanisms and internal components are carefully designed to ensure outstanding performance and reliability * High-resolution printing for tiny labels provides the superior quality required for high-precision applications * Long-life printheads reduce replacement costs and help reduce printer downtime * Easily adjustable printhead pressure toggle with graduated and color-coded pressure indicators simplifies printer setup and operation ◆ User-friendly features for everyday operation * Simple, intuitive side media mounting helps ensure normal and efficient printer use and reduces training requirements * High-visibility color display turns red when the printer is in an error state, allowing users to determine the printer’s status from a distance * Guided media path changes color when a media error occurs, providing simple visual cues to help users quickly find and resolve problems * A color graphic display with an icon menu system and local language support helps simplify daily operations and achieve a better user experience. * Built-in chamber lights illuminate the ribbon and media path for superior visibility. * Color-coded components make all contacts easy to identify . * Quick troubleshooting is achieved with QR codes linked to help videos for errors. * Quick-change printheads simplify maintenance with easy-to-plug sockets, eliminating the need for wiring—simple and easy. * Convenient single-knob adjustment without affecting media positioning is achieved with integrated upper and lower media sensors .◆ Powerful insights for a smarter future * Link-OS Printer Profile Manager Enterprise enables administrators to monitor networked Link-OS printers from a user-friendly, browser-based interface. * The Mobile Device Management connector easily integrates networked printers into AirWatch or SOTI Device Management systems. * Link-OS Cloud Connect provides direct, encrypted, and authenticated connectivity to connect printers to clients or cloud-based servers. * Zebra’s visibility services enable businesses to track and analyze printer status, performance, and usage, thereby improving business performance .◆ Exceptional adaptability for a better future * Optional advanced RFID coding for easy installation and use * Field-installable media handling options take full advantage of partition-type electrical connectors for quick and easy installation to expand printer functionality * Two USB host ports for flexible connection of various peripheral devices * Two available communication slots for quick and easy addition of connectivity options, including 802.11ac, parallel, Ethernet, IPv6, and labeler interfaces.
Zebra ZT610 Detailed Specifications
Standard Features ● Printing Methods: Thermal transfer and thermal printing ● Design: Metal frame and folding metal media cover with a large, clear window ● Side-mounted consumable path for simplified media and ribbon installation ● Printhead with Element Energy Equalizer (E3) technology for excellent print quality ● Communication: High-speed USB 2.0, RS-232 serial, Gigabit Ethernet, Bluetooth 4.0 ● Highly intuitive color display that turns red when the printer is in an error state, allowing operators to check the printer’s status from a distance ● Simplified icon-based menu navigation system categorizes settings into different logical function groups
Print Specifications ● Resolution: 203dpi (8 dots/mm), 300dpi (12 dots/mm) (optional), 600dpi (24 dots/mm) (optional) ● Memory: 1GB RAM, 2GB Flash ● Maximum Print Width: 4.09 inches/104 mm ● Maximum Print Length: 203dpi: 3810 mm; 300dpi: 3302 mm; 600dpi: 762 mm ● Maximum Print Speed: 14 inches/second (356 mm/second) ● Media Sensor: Transmissive and Reflective
Media Characteristics ● Media Width (Label and Backing): 0.79 inches/20 mm to 4.5 inches/114 mm ● Minimum Label Length: 0.24 inches/6 mm (Rewind); 0.51 inches/13 mm (Peel); 0.12 inches/3 mm (Tear); 1.5 inches/38 mm (Cut) ● Maximum Media Roll Size: 8 inches/203 mm, Core Outer Diameter 3 inches/76 mm, Core Inner Diameter ● Media Thickness: 0.003 inches/0.076 mm to 0.009 inches/0.23 mm (Cut), 0.012 inches/0.305 mm (Non-Cut) ● Media Type: Continuous paper, Die-cut paper, Notched paper, Black label paper ● GAP Inspection Standards: Label Spacing: 2-4 mm, Optimal Spacing 3 mm; Notch: W6 mm * L3 mm; Hole: 3 mm diameter ● Media Printing Errors: ZT610-203DPI/ZT610-300DPI: Vertical: ±0.3mm (4 inches and below speed), ±0.5mm (5-6 inches speed), ±1.5mm (6 inches and above speed); Horizontal: ±1.5mm. ZT610-600DPI: Vertical: ±0.2mm (2 inches and below speed, tear/rewind/peel mode), ±0.4mm (2 inches and below speed, cutter mode), ±0.43mm (3-6 inches speed, tear/cutter mode), ±0.37mm (3-6 inches speed, rewind/peel mode); Horizontal: ±1.5mm.
Ribbon Characteristics ● Maximum Outer Diameter: 450 meters: 3.2 inches/81.3 mm, Core Outer Diameter: 1 inch/25.4 mm, Core Inner Diameter ● Standard Length: 1476′/450 meters ● Width: 0.79 inches/20 mm to 4.33 inches/110 mm ● Ribbon Setup: Ink side of the ribbon is wound outwards.
Electrical Parameters ● Automatic detection (PFC compliant) 90-250VAC, 47-63Hz, rated power 250 watts ● ENERGY STAR certified
Physical parameters (closed state) ● Width: 10.56 inches / 268 mm ● Height: 15.58 inches / 395.68 mm ● Depth: 19.88 inches / 505 mm ● Weight: 50 lbs / 22.7 kg
Fonts/Graphics/Symbols ● 16 built-in scalable ZPL II bitmap fonts and two built-in scalable ZPL fonts ● Scalable smooth bitmap fonts for Asian and other international languages ● Unicode: suitable for multilingual printing ● Downloadable objects include images, scalable fonts and bitmap fonts, label templates and formatting. ● The IBM Code Page 850 international character set is available for fonts A, B, C, D, E, F, G and 0 via software control. ● Code Page 1250, 1252, 1253, 1254, and 1255 support font 0.
Barcode Types: ● 1D Barcodes: Code 11, Code 39, Code 93, Code 128 with A/B/C subsets and UCC Case Codes, ISBT-128, UPC-A, UPC-E, EAN-8, EAN-13, UPC and EAN 2- or 5-digit extensions, Plessey, Postnet, Standard 2-of-5, Industrial 2-of-5, Interleaved 2-of-5, Logmars, MSI, Codabar and Planet Code ● 2D Barcodes: Codablock, PDF417, Code 49, Data Matrix, MaxiCode, QR Code, TLC 39, MicroPDF RSS-14 (and additional codes), Aztec
Link-OS Solutions : ● Documentation Design: Quickly design custom printing solutions using business data and Zebra’s intuitive plug-and-play design tools. ● Device Integration: Zebra’s applications and products help you integrate Zebra devices into existing systems. ● Device Management: Manage local and global printing operations with Zebra’s device management tool suite. ● Developer Tools: Provides the tools you need to create your own applications, including documentation, source code, programming languages, templates, and more.
Firmware ● Built-in ZPL, ZPL II, and EPL programming languages can be selected via software or front panel. ● Supports XML printing – Enables XML communication for barcode label printing.
Options and Accessories ● Connecting two available communication slots for adding internal cards to 802.11ac, parallel, Ethernet, and labeler interfaces. IPv6 option as an external adapter attached to the parallel port. ● Media Handling * Rewinder: Rewinds all printed labels inwards onto the 3-inch core, and can also peel and rewind backing paper (factory setting only). * Cutter: Forward-facing guillotine cutter and receiving tray. * 1-inch core inner diameter media supply rack. * Ribbon supply shaft supports ribbon ink-side-in winding. ● Radio Frequency Identification (RFID) * Supports signage compatible with UHF EPC Gen 2 V2/ISO/IEC 18000-6C and RAIN RFID protocols. * Integrated RFID system can be upgraded by the user in the field. * Adaptive coding technology automatically selects the optimal coding settings. ● Keyboard Display Unit: Supports ZKDU keyboard display unit, suitable for standalone printing applications.
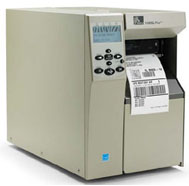
Zebra’s 105SLPlus delivers cost-effective, reliable, and high-performance printing.
This rugged printer is designed for continuous operation and has the features needed for fast, reliable, and cost-effective printing in your manufacturing and warehouse environments.
The Zebra 105SLPlus was designed with ease of use in mind. Its icon-based, multilingual graphical LCD user interface is highly intuitive and easy to operate, minimizing the need for user training and making this printer ideal for multilingual and global applications. A simplified ribbon installation process minimizes downtime. The 105SLPlus offers a durable all-metal construction and a robust printing mechanism that can withstand extremely harsh environments.
The Zebra 105SLPlus leverages Zebra’s proven electronic platform to accelerate high-volume applications—increasing storage for formatting, fonts, and graphics. Element Energy Equalizer (E3) technology extends printhead life and delivers exceptional print quality. The 105SLPlus is designed for easy integration into existing operations. Multiple standard connectivity options, including parallel, serial, USB, and Ethernet, along with full backward compatibility, make integration quick and easy. For added interfaces, the optional ZebraNet b/g print server provides wireless support.
Zebra 105SLPlus Standard Features: ◆ Full-featured front panel and multilingual backlit LCD display with user-programmable password protection ◆ Thin-film printhead with Element Energy Equalizer (E3) technology for excellent print quality ◆ 8 MB Flash memory (including 2.0 MB of user-available non-volatile memory for storing downloaded objects, and serial RS-232 and bidirectional parallel ports) with auto-detection ◆ USB 2.0 ◆ Dual media sensors—transmissive and reflective, selectable via software or front panel ◆ Built-in ZebraNet 10/100 print server—supports 10Base-T, 100Base-TX, and Fast Ethernet 10/100 auto-switching networks ◆ Applications * Manufacturing: Product identification labels, packaging labels, receiving/sorting labels, work-in-process * Transportation & Logistics: Order sorting/packaging, shipping/receiving, direct-to-pack, compliance labeling * Retail: Shipping, returns * Government Agencies: Asset tracking, compliance labeling, inventory labeling
Media Specifications ● Media Type: Continuous paper, die-cut paper, or black label paper, notched paper ● Media Thickness (Labels and Backing Paper): 0.003 inches/0.076 mm to 0.012 inches/0.305 mm ● Maximum Media Roll Size: Outer core diameter 8.0 inches/203 mm; Inner core diameter 3 inches/76 mm ● Media Width (Labels and Backing Paper): 0.79 inches/20 mm to 4.5 inches/114 mm ● Maximum Length of Non-Continuous Labels: 39 inches/991 mm
Ribbon Specifications ● Standard Length: 1476 ft/450 m or 984 ft/300 m, available in 2:1 and 3:1 media roll to ribbon ratios ● Maximum Ribbon Roll Size: Core outer diameter 3.2 inch/81.3 mm; Core inner diameter 1.0 inch/25.4 mm ● Ribbon ink side outward winding ● Ribbon Width: 0.79 inch/20 mm to 4.33 inch/110 mm
Fonts/Graphics/Symbols ● Zebra Global Printing Solution, including Unicode ● Swiss 721 font standard ● Bitmap fonts A through H and GS symbols, height and width can be scaled up to 10 times each ● Scalable smooth fonts (CG Triumvirate bold compressed font), height and width can be scaled up by the dot ● IBM Code Page 850 International characters ● Includes UFST from Agfa Monotype Corporation ● Firmware support for downloadable TrueType fonts ● Additional fonts
Barcode Types: ● Linear Barcodes: Code 11, Code 39, Code 93, Code 128 with A/B/C subsets and UCC Case Codes, ISBT-128, UPC-A, UPC-E, EAN-8, EAN-13, 2-digit or 5-digit extensions of UPC and EAN, Plessey, Postnet, Standard 2-of-5, Industrial 2-of-5, Interleaved 2-of-5, Logmars, MSI, Codabar, Planet Code ● Two-Dimensional Barcodes: Aztec, Codablock, PDF417, Code 49, Data Matrix, MaxiCode, QR Code, MicroPDF417, TLC 39, RSS-14 (and additional codes)
ZebraLink Solutions ● Optional Software: ZebraDesigner Pro; ZebraNet Bridge Enterprise; ZebraNet Setup Utilities v 7.0; ZBI 2.0 ZBI-Developer ● Optional Connectivity: ZebraNet b/g/n Wireless Print Server (built-in) ● ZPL II; Zebra Global Printing Solutions; EPL2; Web View and Warnings, ZBI 2.0 (optional)
Options and Accessories ● Paper cutter and receiving tray ● Media rewind shaft – rewinds or peels used paper via the backing paper take-up shaft ● 64 MB onboard linear flash memory (factory configuration only) ● Scalable fonts and international fonts
The Zebra 105SL barcode printer is the successor to the classic 105Se model. It adds features such as LCD panel control, ZebraLink network connectivity, and larger memory to the 105Se.
It features an all-metal casing and can operate in three shifts. A unique backup battery (optional) allows the printer to retain images for an extended period even when the printer is off.
The 105SL’s built-in rewinder (optional) can rewind 8-inch diameter labels to prevent dust accumulation.
A fast 32-bit microprocessor, coupled with the easy-to-use ZPLII programming language, allows for simultaneous printing and typesetting, enabling you to print more labels in a shorter time.
Zebra 105SL Product Specifications
Zebra 105SL standard features:
Thermal transfer or thermal printing, all-metal frame construction, ZebraLink connectivity, new processor for improved output and processing speed, 4MB SDRAM, 2MB non-volatile flash memory, 300 unique print quality black settings, serial and parallel communication, multi-language backlit LCD control panel, transmissive sensor, multi-level component power equalizer (E3) for superior print quality. ZPLII programming language, ZebraLink connectivity. 1D Barcodes: Code 11, UPC-A, UPC-E, Code 39, EAN-8, EAN-13, Code 93, Plessey, Postnet, Code 128 with subsets A/B/C and UCC Case Codes, Interleaved 2 of 5, EAN and UPC with 2 or 5 digital extensions, Codabar, Standard 2 of 5, MSI, ISBT 128, Industrial 2 of 5, LOGMARS, Planet Code, RSS. 2D Barcodes: Codablock, PDF417, Code 49, Maxi Code, Data Matrix, QR Code, TLC 39. Seven bitmap fonts and one smoothly scaled standard font are supported, based on the IBM Code page 850 international character set. User-defined fonts and graphics, including custom icons, are also supported.
Zebra 105SL Maximum Print Area:
Width: 104mm ; Print length with 203dpi printhead: 2692mm; Print length with 300dpi printhead: 1651mm
Zebra 105SL resolution:
203dpi printhead (8 dots per millimeter), 300dpi printhead (12 dots per millimeter)
Zebra 105SL memory:
4MB SDRAM (2MB available to users), 2MB non-volatile flash memory (750KB available to users)
Zebra 105SL Label Ribbon Media Specifications Label and backing paper width: 20 mm to 115 mm; Maximum label roll size: Outer diameter 203 mm, inner diameter 76 mm Label thickness: 0.076 mm to 0.305 mm Label media type: Continuous paper, die-cut paper. Ribbon width: 20 mm to 114 mm Standard ribbon length: 450 meters or 300 meters, ink side out.
ZebraNet PrintServer II, ZebraNet wireless network card slot, label rewinder, label cutter, label peeler, media supply shaft with 40mm label roll inner diameter, scalable fonts and international fonts, PC card, adapter interface, IBM Twinax interface, IBM Coax interface, small flash memory card
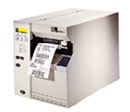
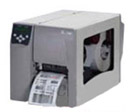
The Zebra S4M thermal/thermal transfer printer is an affordable printing solution that meets your diverse label printing needs.
It’s easy to use, features a durable metal frame, and boasts a full 8-inch (203 mm) media roll capacity (reducing label replacements). The S4M offers significantly better value than comparable products on the market.
The S4M ‘s front control panel is user-friendly, and its well-designed side media loading system allows for quick and easy media loading while effectively eliminating label and ribbon threads. This frees up operators to focus on more valuable tasks. The
S4M supports multiple connectivity options (serial, parallel, USB, built-in 10/100 Ethernet, or 802.11b Wi-Fi ) . APL support allows for easy switching from other brands of printers without changing label formats , making it an unparalleled performance business printer.
Zebra S4M Product Specifications Printing Resolution: 203 DPI / 300 DPI Printing Speed: 152 mm/sec Printing Width: 104 mm Paper Width: 114 mm Printing Length: 3988 mm (1854 mm at 300 DPI) Printing Method: Thermal, Thermal Transfer Standard Memory: 8MB DRAM; 4MB Flash (64MB Flash optional) Standard Interfaces: Parallel, RS232, USB Programming Languages: ZPL II, EPL2, APL Display: 2 lines × 14 characters Features Zebra Link remote monitoring and maintenance capabilities
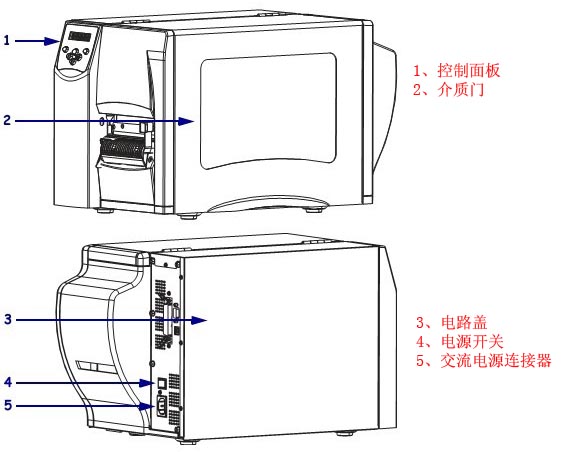
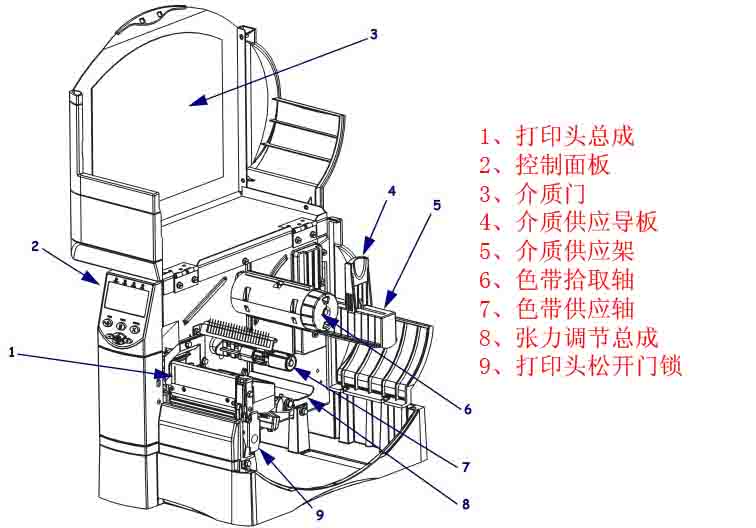
1. Introduction to the Components of the Zebra S4M Barcode Printer
1.1 Control Panel/Media Door/Circuit Cover/Power Switch/AC Power Connector
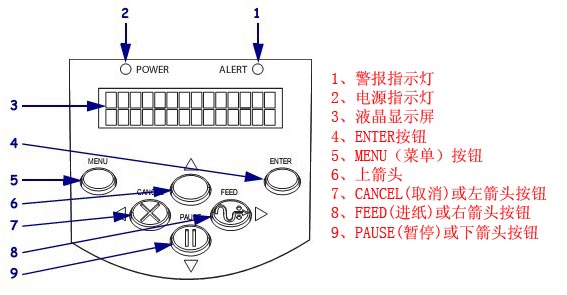
1.2 Alarm Indicator/Power Indicator/LCD Display/ENTER Button/MENU Button/Up Arrow/CANCEL or Left Arrow Button/FEED or Right Arrow Button/PAUSE or Down Arrow Button
2. Zebra S4M Barcode Printer Control Panel Button and Indicator Light Description 2.1 Control Panel LCD Screen Description The control panel LCD screen displays different modes depending on the printing mode. ■ In working mode, the LCD screen displays the printer status and sometimes also shows control panel indicator lights. When the printer is receiving data, the control panel displays “DATA” and cycles through dots and blanks. ■ In pause mode, the printer pauses printing. ■ In settings mode, the control panel LCD screen can be used to view or modify printer parameters. ■ In error mode, the LCD screen can display alarms or error messages.
2.2 Control Panel Button Description The printer has six basic control buttons on the control panel. When the printer is in settings mode, some of these buttons can also be used as navigation keys. The current function of a specific button is determined by the flashing of the indicator light next to it.
Button
Appearance
Functions/Description
MENU
Entering and exiting settings mode
ENTER
If you need to select parameters or options in settings mode, press ENTER to select an item. This button is only active when needed.
CANCEL
The CANCEL function is only available in “Pause” mode. Pressing the CANCEL button will have the following effects: ① Cancel the currently printing label format; ② If there is no label format being printed, the next content to be printed will be canceled; ③ If there are no label formats waiting to be printed, the CANCEL command will be ignored. To clear the printer’s entire label format memory, press and hold the CANCEL button.
FEED (Paper Feed)
Feed a blank label. ① If the printer is idle or paused, the label will be fed immediately; ② If the printer is printing, the label will be fed after printing is complete.
PAUSE
Stop and restart the printing process, or clear the error message and clear the LCD screen display. The “Pause” light illuminates when the printer is paused. ① If the printer is idle, it will immediately enter “Pause” mode; ② If the printer is printing, the labels will be completed before the printer pauses.
Left arrow
In settings mode, you can scroll the LCD screen to the previous parameter.
Right arrow
In settings mode, you can scroll the LCD screen to the next parameter.
Up arrow
In settings mode, you can increase the setting value or scroll to the next option.
Down arrow
In settings mode, you can decrease the setting value or scroll to the previous option.
2.3 Control Panel Indicator Light Description
indicator lights
Appearance
Functions/Description
POWER (Power Supply)
Indicates printer power is on.
ALERT
In case of an error or alarm, the “alarm” indicator light will flash.
PAUSE (part of the PAUSE button)
When the printer is in “Pause” mode, the indicator light will flash unless the printer enters “Setup” mode and the down arrow is active.
FEED (part of the FEED button)
During normal printer operation, the printer is instructed to feed blank labels.
CANCEL (part of the CANCEL button)
Open when the uncheck label is an active option.
3. Zebra S4M Barcode Printer Data Communication Interface Selection Users can send label formats to the printer through any available data communication interface. All necessary data cables must be provided for the specific situation. Ethernet does not require shielding, but other data cables must be fully shielded and equipped with metal or metallized connector housings. Using unshielded cables will result in electromagnetic radiation levels exceeding regulatory limits. Minimize cable noise levels: ● Use the shortest possible data cable ● Do not tightly bundle data cables and power cords ● Do not tie data cables to power cord conduits Data Communication Interface Characteristics: ● RS232 Serial Port (Standard): ① Maximum cable length 15.24 meters; ② Printer parameters need to be changed to match the host computer; ③ If using a standard modem cable, a blank modem needs to be connected to the printer. ● IEEE1284 Bidirectional Parallel Port (Standard): ① Maximum cable length 3 meters; ② Recommended cable length 1.83 meters; ③ No printer parameter changes are required for compatibility with the host computer. ● USB (Standard): Features: ① Maximum cable length 5 meters; ② Compatible with host computer without requiring changes to printer parameters. ● Internal Wired Ethernet Print Server (Optional): Features: ① Prints from any computer on the user’s LAN to the printer; ② Communicates with the printer via its web interface in ZPL mode; ③ The computer must have an Ethernet card; ④ The printer must be configured to use the LAN. ● Wireless Ethernet Print Server (Optional): Features: ① Prints from any computer on a wireless LAN (WLAN) to the printer; ② Communicates with the printer via its web interface in ZPL mode; ③ The printer must be configured to use the WLAN. Note: Before connecting the data communication cable, ensure the printer is powered off (O). Connecting the data communication cable while the power switch is on (I) may damage the printer.
4. Zebra S4M Printer Calibration and Adjustment Components 4.1 Calibrating the Printer The printer can be set to automatic or manual calibration. 4.1.1 Automatic Calibration When the control panel for MEDIA POWER UP or HEAD CLOSE is set to CALIBRATION, the printer will automatically perform calibration when the printhead is powered on or off. During automatic calibration, the printer determines the label length and sensor settings. The results of automatic calibration are stored in the printer’s memory and are not lost even when the printer is powered off. These parameters remain valid until the next calibration. Note: If the control panel for MEDIA POWER UP or HEAD CLOSE is set to LENGTH, NO MOTION, or FEED, the printer will begin printing without automatic calibration. 4.1.2 Manual Calibration Performing media and ribbon sensor calibration resets the sensor sensitivity for more accurate media and ribbon detection. If you have changed the ribbon or media type, performing this calibration process will allow your printer to work better. The sensitivity of the media and ribbon sensors can be adjusted using the following steps: ① Press the SETUP/EXIT button on the control panel. ② Press the plus (+) or minus (-) button to select the “Media and Ribbon Calibration” parameter. ③ Press SELECT to select the parameter. ④ Press the plus (+) button to start the calibration process. The LOAD BACKING prompt will be displayed. ⑤ Open the printhead . ⑥ Peel approximately 203 mm of label off the backing paper and feed the media into the printer, ensuring only the backing paper is between the media sensors. ⑦ Keep the printhead open. ⑧ Press the plus (+) button to continue; the REMOVE RIBBON prompt will be displayed. ⑨ If a ribbon is used, it should be removed. ⑩ Close the printhead. ⑾ Press the plus (+) button to continue; the CALIBRATING PLEASE WAIT message will be displayed. The printer adjusts the signal gain received from the media and ribbon sensors based on the specific media and ribbon combination used. On the sensor graph, this corresponds to the graphical peak that moves up and down to better read your printing application. After calibration, RELOAD ALL will be displayed. ⑿ Open the printhead and push the media forward so that the label is below the media sensor. ⑃ Reload the ribbon (if used). ⑭ Close the printhead . ⑮ Press the plus sign (+) to continue. The printer performs automatic calibration, during which it checks the media and ribbon readings against a newly established scale to determine the ribbon length and printing mode. To view the readings on the new scale, print a sensor graph . ⑮ Press SELECT to accept any changes and cancel parameter selection.
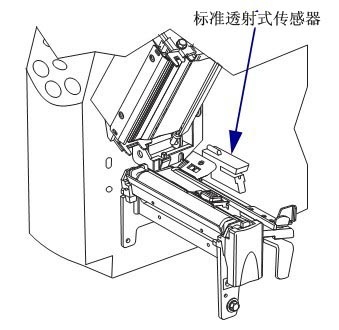
4.2 Selecting or Adjusting the Media Sensor This printer can use two types of media sensors: transmissive and reflective sensors. 4.2.1 Selecting a Transmissive Sensor The standard transmissive sensor is in a fixed position and can be enabled from the control panel.
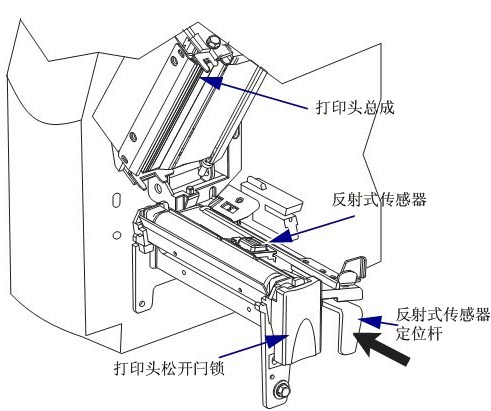
4.2.2 Adjusting the Reflective Sensor The reflective sensor is compatible with most types of media. When using intermittent media, the reflective sensor can detect label start indicators (notches, perforations, black marks, or gaps in die-cut labels). With both continuous and intermittent media, the sensor detects paper shortages. If calibration is difficult with this sensor, use a transmissive sensor. Position the reflective sensor as follows: ● Directly below notches, perforations, or black marks on these types of labels. ● Any location in the media width direction if there are gaps between labels. ● Any location below continuous media . The flashing red light through the media can help accurately position the sensor.
To adjust the reflective sensor, complete the following steps: ① Press the printhead release lever. ② Lift the printhead until the latch opens. ③ Locate the reflective sensor positioning lever. ④ Move the reflective sensor positioning lever laterally across the media to align the reflective sensor with the gap or notch. ⑤ Close the printhead assembly.
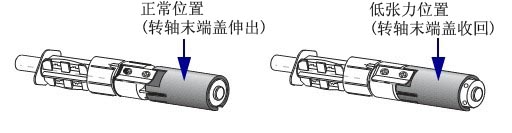
4.3 Ribbon Supply Shaft Tension Adjustment The ribbon supply shaft is a bi-directional tightening type. Most applications require the spindle to be in the normal position. A low-tension position is recommended only when using narrow ribbons or when normal tension affects ribbon movement.
To place the ribbon supply spindle in the normal position, push the spindle end cap out until it extends and locks in place; this setting is suitable for most applications. To place the ribbon supply spindle in the low-tension position, push the spindle end cap in until it retracts and locks in place; this setting should be used if using narrow ribbons or when normal tension hinders ribbon movement.
4.4 Adjusting Printhead Pressure If the printed color is too light on one side, if the media is too thick, or if the media shifts to one side during printing, you may need to adjust the printhead pressure.
The S4M pressure adjustment wheel has four available settings, indicated by progressively larger embossed markers on the printing unit, with the smallest marker (maximum counter-clockwise rotation) at position 1 and the largest marker (maximum clockwise rotation) at position 4. Adjust the positions of the inner adjusting wheel 2 and the outer adjusting wheel 1 according to the media width: ● Media width 25.4mm: Inner adjusting wheel at position 3, outer adjusting wheel at position 1. ● Media width 51mm: Inner adjusting wheel at position 4, outer adjusting wheel at position 1. ● Media width 76mm: Inner adjusting wheel at position 3, outer adjusting wheel at position 2. ● Media width ≥ 89mm: Inner adjusting wheel at position 3, outer adjusting wheel at position 4. If the pressure adjusting wheel needs to be adjusted due to media thickness or other factors, it can be adjusted as follows: ● If the media requires higher pressure to improve print quality, increase the position of both adjusting wheels by one position . ● If the media slides to the left during printing, increase the position of the outer adjusting wheel by one position, or decrease the position of the inner adjusting wheel by one position. ● If the media slides to the right during printing, increase the position of the inner adjusting wheel by one position, or decrease the position of the outer adjusting wheel by one position . ● If the printed content on the left side of the media label is too light, increase the position of the inner adjusting wheel by one position. ● If the printed content on the right side of the media label is too light, increase the position of the outer adjusting wheel by one position.
5. Zebra S4M Barcode Printer Configuration 5.1 Entering and Exiting Setup Mode After installing the media and ribbon and performing a power-on self-test, the control panel will display “PRINTER READY.” Now you can use the control panel LCD screen and the buttons below it to set printer parameters for your printing applications. Important Note: Some specific printing situations may require adjusting printing parameters such as print speed or ink depth. These situations include: ① High-speed printing; ② Peel-off media; ③ Using very thin composite coated labels with small areas. Because print quality is affected by the above or other factors, it is necessary to print test samples to determine the printer settings best suited for your printing applications. Inappropriate settings may affect print quality or print speed, and may also prevent the printer from working properly in the required printing modes. 5.1.1 Entering Setup Mode ① Press MENU. ② Use the left and right arrow keys to scroll through the parameters. 5.1.2 Exiting Setup Mode You can exit setup mode at any time. When exiting “Setup” mode, you can choose to save or discard the changes made, or return to your previous position in setup mode. ① Press MENU. The printer will display SAVE CHANGES. Press ENTER. ② Do you want to save the changes made after entering setup mode?
If you want…
but…
Save changes
① Select YES (Yes) using the up and down arrows as needed; ② Press ENTER to save the changes and exit the settings mode.
Abandon the change
① Use the up and down arrows to select NO; ② Press ENTER to discard the changes and exit the settings mode.
Return to settings mode
Press one of the following buttons: ① MENU (return to the same parameter); ② The left arrow will take you to the previous parameter; ③ The right arrow will take you to the next parameter.
5.2 Password Protection for Parameters The printer has four password levels. When entering setup mode from the control panel, only parameters without password protection are displayed. To view more parameters, you must enter the corresponding password at the ADVANCED SETUP prompt. After entering the correct password, you do not need to enter it again before leaving and re-entering setup mode. When prompted for a password, enter the password for the desired display level or a higher level. Entering a higher-level password will remove password protection for the parameters at that level and for all parameters at the following levels (for example, removing password protection for level 4 also removes password protection for levels 1, 2, and 3).
Password Level
Controlled functions
Default password
4
All functions including sensor adjustment and other sensitive parameters
For advanced users only
3
Installation and reconfiguration. This password is also used for the printer’s anilox interface.
1234
2
Tag configuration operations (media type, tag delivery method, tag length)
0000 (No protection)
1
Color depth, paper cutting position, label top
0000 (No protection)
To enter a password when prompted, complete the following steps: ① When the printer displays ADVANCED SETUP X, press ENTER. The printer displays PASSWORD and the number 0000. ② Enter a four-digit password for the displayed password level or higher. ● You can use the left and right arrow keys to change the position of the selected digits. ● You can use the up and down arrow keys to change the selected digit value. ③ After entering the password, press ENTER. Note: When you enter a password at the ADVANCED SETUP prompt, the first parameter you see depends on whether you press the left or right arrow key to enter the ADVANCED SETUP prompt: ■ If you use the right arrow key, the first parameter you see depends on the password level prompted by the printer.
The advanced settings level was prompted.
Password level entered
I saw the first parameter
1
1, 2, 3 or 4
DARKNESS (Level 1 Top)
2
2, 3 or 4
MEDIA TYPE (Level Type) (Level 2 Top)
3
3 or 4
PRINT OUT (Level 3, top)
4
4
LABEL LEVEL (Level 4, Top)
■ If you use the left arrow, the first parameter you see depends on the password you enter at the prompt, and is not related to the password level prompted by the printer.
The advanced settings level was prompted.
Password level entered
I saw the first parameter
1
1
LABEL TOP (Level 1, Bottom)
1,2
2
LENGTH (Level 2, bottom)
1,2,3
3
LANGUAGE (Level 3 bottom)
1, 2, 3 or 4
4
LANGUAGE (Level 4 bottom)
5.3 Standard Control Panel Parameters Use the LCD screen on the control panel to adjust printer settings. Note: Label printing software or printer drivers may override adjustments made through the control panel. 5.3.1 Password Level 1 and 2 Parameters
■DARKNESS: Adjusts the print depth. The optimal depth setting depends on various factors, including ribbon type, label, and printhead condition. Stable, optimal print quality can be achieved by adjusting the density. Note: Set the depth to the lowest value that provides the best print quality. If the density is set too high, the ink will spread, the ribbon will burn through, and the printhead will wear out prematurely. If the printed content is too light or there are blank areas in the printed area, the print density should be increased. If the printed color is too dark, or if the print ink spreads or bleeds, the print density should be decreased. Default: +10, Range: 00 to +30
■TEAR OFF: Adjusts the paper cutting position. This parameter sets the position of the media on the cutter/peel bar after printing. Increasing the number moves the media outward (the cutting line moves to the leading edge of the next label), while decreasing the number moves the media inward (the cutting line moves towards the edge of the printed label). Default: 0, Range: -120 to +120
■LABEL TOP (Label Top): Adjusts the top position of the label. This parameter adjusts the vertical printing position of the label. A positive number moves the top of the label down (away from the print head) by a specified number of dots, while a negative number moves the label down (towards the print head) by a specified number of dots. Default: +000, Options: Range: -120 to +120
■LEFT POSITION: Adjusts the left-side position of the label. This parameter adjusts the horizontal printing position of the label. A positive number moves the left edge of the image towards the center of the label, while a negative number moves the left edge of the image towards the left side of the label. Default: +000, Options: Range: -9999 to +9999
■MEDIA TYPE (Media Type): Sets the media type. This parameter informs the printer which type of parameters you are using. If Option Media is selected, a label length instruction must be included in the label format. If Non-Continuous Media is selected, the printer feeds the media to calculate the label length (the distance between two alignment points identified on the label gap, weave, alignment notch, or cut). Default: Gap/Cut; Options: Gap/Cut, Marking, Continuous
■SENSOR SELECT: Select the media sensor. Use the setting that provides the best performance. Reflective sensors can be used for most media. REFLECTIVE – For media marked in black and most other media types. TRANSMISSIVE – Can be used for any media where reflective sensors don’t work well (except for media marked in black). To use a transmissive sensor for media with perforations or notches, check that the perforation or notch passes through the sensor for detection. If the perforation or notch does not pass through the sensor, a reflective sensor should be used. Default: REFLECTIVE
■REMOVAL (Retrieval Method): Select the label delivery method. The label delivery method must correspond to the printing mode. Ensure that the label delivery method supported by the hardware configuration is selected, as some displayed options are optional printing functions. Default: TEAR; Options: TEAR, PEEL, CUTTER, REWIND, DELAYED CUT
■PRINT SPEED: Adjusts the print speed. Lowering the print speed usually results in higher print quality. Changes to the print speed take effect upon exiting “Setup” mode. Default: 2 IPS, Range: 2 to 6 IPS
■PRINT WIDTH: Sets the print width, which determines the printable area within the label’s width range. Note: Setting the width too narrow may prevent some label formats from printing on the media; setting it too wide will waste formatting memory, causing labels to print outside the lines or onto the print roller. If using flipped images, this setting will affect the horizontal position of the label format. Default: 832 (203 dpi), 1248 (300 dpi); Range: 2 to 832 (203 dpi), 2 to 1248 (300 dpi)
■KDU MODE: Enables KDU, allowing the S4M printer to use the “Keyboard Display Unit”. Default: OFF; Options: ON, OFF
■LENGTH: Sets the maximum label length. This parameter is used during the media portion of the calibration process. The maximum label length should be set to at least 25.4 mm longer than the actual label length. If this value is set to less than the label length, the printer will assume continuous media is loaded and will be unable to calibrate. Default: AUTO; Options: AUTO, this value can be adjusted in 25.4 mm increments.
5.3.2 Password Level 3 Parameters
■PRINT OUT: Prints the selected label. This parameter allows the user to print a specific label type using information about the printer. SETTINGS: Prints a printer configuration label. FONTS: Prints a label listing the fonts available in the printer, including standard printer fonts and any optional fonts. Fonts can be stored in RAM, flash memory, an optional memory card, or a field card. FORMATS: Prints a label listing the available formats stored in the printer’s RAM, flash memory, or an optional memory card. BARCODES: Prints a label listing the barcodes available in the printer. ALL: Prints a label listing the available fonts, barcodes, graphics, formats, and the current printer and network configuration. NETWORK: Prints a network configuration label.
■PARALLEL COMM. (Parallel Communication): Configures parallel communication by selecting a communication port that matches the computer host’s settings. Default: UNIDIRECTIONAL; Options: UNIDIRECTIONAL, BIDIRECTIONAL
■BAUD (Baud Rate): Sets the baud rate. This setting is only applicable when using a serial port. For accurate communication, the computer host’s baud rate setting must match the printer’s baud rate setting. Select a value that matches the settings used by the computer host. Default: 9600, Options: 300, 600, 1200, 2400, 4800, 9600, 14400, 19200, 28800, 38400, 57600, 115200
■DATA BITS: Sets the number of data bits. This setting is only applicable when using a serial port. For accurate communication, the computer host’s data bit setting must match the printer’s data bit setting. Select a value that matches the settings used by the computer host. Default: 8 bits; Options: 7 bits, 8 bits.
■PARITY (Parity): Sets the parity. This setting only applies when using a serial port. For accurate communication, the computer host’s parity setting must match the printer’s parity setting. Select a value that matches the parity used by the computer host. Default: NONE, Options: ENVEN (Even), ODD (Odd), NONE (None)
■HOST HANDSHAKE: Configures the host handshake. This setting is only applicable when using a serial port. For accurate communication, the computer host’s handshake protocol must match the printer’s handshake protocol. Select a handshake protocol that matches the settings used by the computer host. Default: XON/XOFF; Options: XON/XOFF, DSR/DTR, RTS/CTS
■CONTROL CHAR (Control Character): Sets the control character. The printer looks for this two-digit hexadecimal character to indicate the start of the ZPL control specification. Note: Do not use the same hexadecimal value for the control, format, and delimiter characters. The printer must use different characters to function correctly. Default: 7E, Range: 00 to FF
■COMMAND CHAR (Command Character): Sets the command character. The command prefix is a two-digit hexadecimal value used as a parameter position marker in the ZPL format specification. The printer looks for this hexadecimal character, which indicates the start of a ZPL format instruction. Note: Do not use the same hexadecimal value for the control, format, and delimiter characters; the printer must use different characters to function correctly. Default: 5E, Range: 00 to FF
■DELIM.CHAR (Delimiter Character): Sets the delimiter, which is a two-digit hexadecimal value used as a parameter position marker in the ZPL format specification. Note: Do not use the same hexadecimal value for the control, format, and delimiter characters; the printer must use different characters to function correctly. Default: 2C, Range: 00 to FF
■HEXDUMP, Hexadecimal Dump. Hexadecimal dump mode is a troubleshooting tool that can be used to check the interconnection between the printer and the host computer. Default: NO; Options: NO, YES
■REPRINT MODE: Sets the reprint mode. If enabled, users can issue the ~PR command or press the minus (-) button on the control panel to reprint the previously printed label. Default: DISABLED, Options: ENABLED, DISABLED
■CHANGE RTC DATE (Real-Time Clock Date): Sets the Real-Time Clock (RTC) date. This parameter allows users to set the date according to the specifications listed in IDLE DUSPLAY (Standby Display).
■CHANGE RTC TIME (Real-Time Clock Time): Sets the real-time clock (RTC) time. This parameter allows users to set the time according to the specifications listed in IDLE DUSPLAY (Standby Display).
■LOAD DEFAULTS: Loads factory default values, restoring all parameters to their factory default settings. Important: Use this command with caution. This command resets all printer parameters to factory default values. If possible, print a configuration label as a record of the printer settings before loading the defaults.
■DEFAULT NET (Default Network Settings): Resets network parameters to factory default values.
■INIT FLASH MEM (Initialize Flash Memory): Initializes the flash memory. This parameter allows you to erase the printer’s flash memory.
■RIBBON (ribbon): Configures ribbon usage. This parameter is only displayed on printers with the “Heat Transfer” option installed. Default: YES; Options: YES, NO
■ZPL OVERRIDE (ZPL Override): Overrides specific ZPL commands, allowing the following ZPL commands to replace user settings: ^MM (Media Mode) ^MT (Media Type: Thermal or Thermal Transfer) ^MN (Media: Non-continuous or Continuous) Default: YES (Allows the printer to accept the listed ZPL commands); Options: YES (Allows the printer to accept the listed ZPL commands), NO (Instructs the printer to ignore the listed ZPL commands)
■SENSOR PROFILE (Sensor Profile): Prints a sensor profile. Media sensor profiles can be used to resolve alignment problems caused by the media sensor detecting a pre-printed area on the media or being unable to determine the position of the pattern.
■MEDIA/RIBBON CALIBRATE (Media and Ribbon Calibration): To calibrate the sensitivity of the media and ribbon sensors, follow these steps: ① Press ENTER to begin the calibration process. The prompt “LOAD BACKING/REMOVE RIBBON” will appear. ② Open the printhead . ③ Peel approximately 203 mm of label from the backing paper and feed the media into the printer, ensuring only the backing paper is between the media sensors. ④ If a ribbon was used, remove it. ⑤ Close the printhead. ⑥ Press ENTER. The message “CALIBRATING PLEASE WAIT” will appear. The printer adjusts the level (gain) of the signal received from the media and ribbon sensors. On the sensor graph, this corresponds to the graphical peak that moves up and down to better read your printing application. “RELOAD ALL” will appear. ⑦ Open the printhead and push the media forward until the label is below the media sensors. ⑧ Reload the media and ribbon (if used). ⑨ Close the printhead ⑩ Press ENTER. The message “CALIBRATING PLEASE WAIT” will be displayed. The printer will perform calibration. During this process, the printer will determine the label length. To view the reading on the new ruler, you can print a sensor chart.
■LANGUAGE (Language): Select the display language. This parameter allows the user to display control panel content in the selected language.
6. Zebra S4M Barcode Printer Routine Maintenance Important Note: Zebra is not responsible for damage caused by the use of cleaning solutions on this printer. 6.1 Recommended Cleaning Schedule Depending on the application and media, more frequent cleaning may be required. Printhead, Method: 95% alcohol solvent, Interval: After one media roll in thermal mode, after using a Perfect Silk ribbon for thermal transfer, or after every three media rolls. Rollers, Method: 95% alcohol solvent, Interval: After one media roll in thermal mode, after using a Perfect Silk ribbon for thermal transfer, or after every three media rolls. Media Sensor, Method: Air jetting, Interval: After one media roll in thermal mode, after using a Perfect Silk ribbon for thermal transfer, or after every three media rolls. Ribbon Sensor, Method: Air jetting, Interval: After one media roll in thermal mode, after using a Perfect Silk ribbon for thermal transfer, or after every three media rolls. Media Path, Method: 95% alcohol solvent, Interval: After one media roll in thermal mode, after using a Perfect Silk ribbon for thermal transfer, or after every three media rolls. Ribbon Path: Method: 95% alcohol solvent, Time Interval: After using one media roll in thermal mode, after using a perfect silk ribbon in thermal transfer or after every three media rolls. 6.2 Cleaning Steps 6.2.1 Cleaning the Printer Housing The printer’s outer surface can be cleaned with a lint-free cloth and a small amount of neutral detergent. Do not use abrasive cleaners or solvents. 6.2.2 Cleaning the Printhead and Roller Printhead wear can be minimized and print quality maintained through routine maintenance. As printing continues, the media or ribbon passing through the printhead will continuously wear down the ceramic protective layer, constantly exposing and eventually damaging the printed elements. To prevent corrosion: ◆ Clean the printhead frequently and use a backed and fully lubricated thermal transfer ribbon to reduce friction. ◆ Optimize the balance between the two by using the lowest possible printhead pressure and burn-in temperature settings. ◆ Ensure the thermal transfer ribbon width is greater than or equal to the label media width to protect the printed elements from exposure to more corrosive label materials. For best results, clean the printhead after each ribbon roll change. Unstable print quality, such as blank spaces in printed barcodes or graphics, may indicate a dirty printhead. Caution: When performing tasks involving close proximity to the exposed printhead, remove all rings, watches, long necklaces, ID cards, and other metal objects that may come into contact with the printhead. Caution: The printhead can get very hot and may cause severe burns; allow it to cool completely. Caution: Before touching the printhead assembly, touch the printer’s metal frame or use an anti-static wrist strap or pad to discharge any accumulated static electricity. To clean the printhead and rollers, follow these steps: ① Open the printhead assembly . ② Remove the media and ribbon . ③ Use a cleaning swab to wipe the brown strip on the printhead assembly from one end to the other. ④ While manually rotating the pressure roller, thoroughly clean it with a cotton swab to allow the solution to evaporate completely. ⑤ Reinstall the media and ribbon and close the printhead assembly. Note: If print quality does not improve after performing the above steps, try cleaning the printhead with the Save-a-Printhead cleaning film. This is a material with a special coating that removes accumulated dirt without damaging the printhead. 6.2.3 Cleaning the Media Tank and Sensors To clean the media tank and sensors, complete the following steps: ① Use a brush or vacuum cleaner to remove accumulated paper scraps and dust from the media and ribbon path. ② Use a brush or vacuum cleaner to remove paper scraps and dust from the sensors.
7. Troubleshooting Zebra S4M Barcode Printer 7.1 Troubleshooting Checklist 7.1.1 Is an error message displayed on the LCD screen? If so, please check the LCD screen error message in the table below.
LCD screen/printer conditions
Possible reasons
Recommended solution
The printer stopped and the ALERT light flashed.
In heat transfer mode, the ribbon is not loaded or is loaded incorrectly.
Correctly load the media
In heat transfer mode, the ribbon sensor did not detect the ribbon.
① Correctly load the medium; ② Calibrate the sensor.
In thermal transfer mode, the medium blocks the ribbon sensor.
① Correctly load the medium; ② Calibrate the sensor.
In thermal transfer mode, the printer does not detect the ribbon even though it is correctly loaded.
① Print sensor charts; ② Calibrate the sensor or load printer defaults.
If using thermal media, the printer will wait for the ribbon to be loaded because it has been incorrectly set to thermal transfer mode.
Set the printer to thermal mode.
The color strip light is on, the ERROR indicator light is flashing, and the ALERT indicator light is flashing.
The ribbon is loaded, but the printer is set to thermal mode.
Thermal media does not require a ribbon. If you wish to use thermal media, you should remove the ribbon. This operation will not affect printing.
If you want to use thermal transfer media that requires a ribbon, you should set the printer to thermal transfer mode.
The printer stopped and the ALERT light flashed.
Media not loaded, or media loaded improperly.
Correctly load the media
Medium sensor misalignment
Check the position of the medium sensor
The printer is set to use non-continuous media, but continuous media has been loaded.
Install the correct media type, or reset the printer to the current media type and perform calibration.
The printer stopped and the ALERT light flashed.
The print head did not close completely.
Completely close the print head
The printhead opening sensor is malfunctioning.
Replace sensor
The ERROR indicator light is flashing.
The printhead has a faulty thermistor.
Replace the print head
The printer stops, and the ERROR indicator light illuminates: the printer displays these three messages in a loop.
The printhead data cable was not connected correctly.
Before performing this step, the printer power should be turned off, otherwise the print head may be damaged. Ensure the cable connector is fully inserted into the printer connector.
The printhead has a faulty thermistor.
Replace the print head
The printer is printing, and the ALERT light is flashing.
The printhead temperature is approaching its minimum operating limit.
Continue printing once the printhead reaches the correct operating temperature. If errors persist, the ambient temperature may be too low for proper printing. The printer should be placed in a warmer environment.
The printhead data cable was not connected correctly.
Before performing this step, the printer power should be turned off, otherwise the print head may be damaged. Ensure the cable connector is fully inserted into the printer connector.
The printhead has a faulty thermistor.
Replace the print head
The printer stopped and the ALERT light flashed.
Print head overheating
The printer should be allowed to cool down sufficiently. Printing will automatically resume when the printhead components have cooled to an acceptable operating temperature.
Printer stopped
Printhead not installed, printhead data cable not connected, printhead damaged.
Before performing this step, the printer power should be turned off, otherwise the printhead may be damaged. Ensure the cable connector is fully inserted into the printer connector. If the problem persists, the printhead should be replaced.
Printer stopped
The printer is performing memory defragmentation.
Caution: Do not turn off the printer power during the defragmentation process, otherwise it will damage the printer.
The printer stopped and the ALERT light flashed.
The paper cutter blade is located in the media path.
Turn off the printer and check the paper cutter module for debris; clean it if necessary.
7.1.2 Are non-continuous labels being treated as continuous labels? If so, please calibrate the media and ribbon sensor. 7.1.3 With the ribbon correctly loaded, is the CHECK RIBBON light illuminated? If so, please calibrate the media and ribbon sensor. 7.1.4 Are you experiencing any print quality issues? If so, please check the print quality issue categories in the table below:
Fault
Possible reasons
Recommended solution
Common print quality issues
Incorrect printer speed setting
To achieve the best print quality, you should set the minimum possible print speed for your application via the control panel, driver, or software.
The incorrect combination of labels and ribbons was selected for your application.
① Switch to different types of media or ribbons to find a compatible combination; ② Contact MinYong Digital for information and advice as needed.
The printer’s print depth setting is incorrect.
To achieve optimal print quality, you should set the lowest possible depth setting for your application via the control panel, driver, or software. The ideal depth setting can be determined by performing a “Paper Feed Self-Test.”
Dirty printhead
Clean the print head
Incorrect or uneven printhead pressure
Set the printhead pressure to the minimum value that yields the best print quality.
Print head not properly balanced
Call Minyong Service Engineer
Long, incomplete printing marks appeared on multiple labels.
Damaged printing components
Call a Minyong service engineer to replace the printhead.
Colored ribbon folds
Adjust the corresponding components
Colored ribbon folds
Improper feeding of ribbon into the ribbon system
Correctly load the ribbon
Incorrect burning temperature
Set the color depth to the lowest value for optimal print quality.
Incorrect or uneven printhead pressure
Set the pressure of the proposal to the minimum value that yields the best print quality.
Improper medium feeding caused it to deviate from one side to the other.
Ensure the medium is level by adjusting the medium guide plate.
Print head not properly balanced
Call Minyong Service Engineer
A thin, slanted gray line appears on the blank label.
Colored ribbon folds
Please refer to the solution for ribbon wrinkles.
The entire label is printed too dark or too light.
The media or ribbon was not designed for high-speed printing.
Replace consumables for high-speed printing operations
The wrong combination of media and ribbon was selected for your application.
① Switch to different types of media or ribbons to find a compatible combination; ② Contact MinYong Digital for information and advice as needed.
Users use ribbons for thermal media.
Thermal media do not require ribbons; check whether thermal media has been used.
Incorrect or uneven printhead pressure
Set the pressure to the desired minimum value.
The label has a stain mark
The media or ribbon was not designed for high-speed printing.
Replace consumables for high-speed printing operations
Improper alignment/skipped labels
Printer not calibrated
Recalibrate the printer
Incorrect label format
Use the correct label format
One to three labels are misaligned or have printing errors.
The printing roller is too dirty
Clean the printing roller shaft
The medium does not meet specifications
Use media that meet specifications.
Adjust vertically to the top of the form
Printer not calibrated
Recalibrate the printer
Note on normal tolerances for mechanical parts and printer patterns : Vertical offset of ±4 to 6 lines (approximately 0.5 mm) is within the normal tolerance range.
① Calibrate the printer; ② Adjust the label top position setting.
The printing roller is too dirty
Clean the printing roller shaft
Label or image vertical offset
The printer uses non-continuous labels, but is configured to work in continuous mode.
Configure the printer to operate in non-continuous mode and run calibration routines as needed.
Incorrect calibration of the medium sensor
Calibration media and ribbon sensor
The printing roller is too dirty
Clean the printing roller
Printhead pressure setting incorrect (switch)
Adjust the printhead pressure to ensure it works properly.
The ribbon or media was not loaded correctly.
Check if the printer is loaded correctly.
Media incompatibility
Ensure that the label spacing or gaps are evenly distributed between 2 and 4 mm, and that the medium does not exceed the minimum size specified for the operating mode.
Unable to scan the barcode printed on the label
The barcode is out of specification because it was printed too dark or too light.
Perform a “paper feed self-test” and adjust the depth or printing speed settings as needed.
There is not enough blank space around the barcode.
Leave at least 3.2mm clearance between the barcode and other printed areas on the label, as well as between the barcode and the label edge.
7.1.5 Have you encountered any communication problems? If so, please check the communication fault categories in the table below:
Fault
Possible reasons
Recommended solution
The label format has been sent to the printer, but it is not recognized.
Incorrect communication parameters
Check printer driver or software communication settings.
If you are to use serial communication, ensure that you are using a blank modem cable or a blank modem adapter.
If using a driver, you should check the driver communication settings related to the connection.
The label format has been sent to the printer, but after printing multiple labels, the printer skips labels, misplaces them, loses images, or distorts the images.
Incorrect serial communication settings
Ensure that flow control settings are matched.
Check the length of the communication cable
Check printer driver or software communication settings.
The label format has been sent to the printer, but it is not recognized and will not print.
The prefix and separator character sets in the printer do not match the character sets in the label format.
Check prefix and separator characters
Incorrect data is being sent to the printer.
Check the communication settings on the printer to ensure they match the printer’s settings.
Ensure that the label format you use matches the printer’s operating language.
If the problem persists, check the label format.
7.1.5 Calibration Failure
Fault
Possible reasons
Recommended solution
The print alignment mark on the label is missing, and the vertical offset of the alignment mark at the top of the form is too large.
The printing roller is too dirty
Clean the printing roller
The dielectric guide plate is not in the correct position.
Ensure correct positioning of the media guide plate
Incorrect media type setting
Configure the printer to work with the correct media type (slit/cut, continuous, or marking).
The wrong sensor was used for the media type.
Manually select and use the correct sensor
Automatic calibration failed
Incorrect loading of media or ribbon
Ensure that the media and ribbon are loaded correctly.
The sensor did not detect the medium or color band.
Manually calibrate the printer
The sensor is too dirty or the medium is not positioned correctly, so the sensor cannot detect anything.
Ensure the sensor is clean and the medium is in the correct position.
7.1.6 Ribbon Failure
Fault
Possible reasons
Recommended solution
The printer did not detect that the ribbon was used up.
The printer was calibrated without a ribbon, and then the ribbon was inserted without performing a user recalibration or loading the printer’s default settings.
Now calibrate the printer using the ribbon, or load the printer defaults.
If the RIBBON parameter is set to YES, the printer will remain in thermal mode (this mode is displayed on the printer configuration label) even if the ribbon is correctly loaded into the printer.
ribbon damaged or melted
The depth setting is too high.
① Reduce the depth setting; ② Thoroughly clean the printhead.
Even if the ribbon is correctly loaded, the printer still displays “ribbon exhausted”.
No calibration was performed for the labels and ribbons to be used.
Perform calibration of media and ribbon sensors
7.1.7 Other printer malfunctions
Fault
Possible reasons
Recommended solution
The LCD screen displayed an unreadable language.
Change language parameters via control panel or firmware commands
Change language parameters
LCD screen characters or partial characters are missing
The LCD screen may need to be replaced.
Call a Minyong service engineer to replace the LCD screen.
The changed parameter settings did not take effect.
Incorrect parameter settings
① Set the parameters and save them permanently; ② Turn off the printer power and then turn it back on.
Firmware commands have disabled the ability to change parameters.
Call Minyong Service Engineer
The firmware command has changed the parameter back to the previous setting.
Call Minyong Service Engineer
If the problem persists, the main logic circuit board may be faulty.
Call Minyong Service Engineer
Even when the switch is switched to “Peel Function Off”, the printer remains in “Peel Mode”.
If the printer is powered on with the peeling assembly open, the printer will not recognize the label pickup sensor and will not be able to operate in “peel” mode until the sensor is recognized.
① Close the peel assembly; ② Ensure no labels protrude from the cutter/peel bar; ③ Use the control panel to set the printer to “Peel Function Off” mode and save the changes; ④ Turn off the printer power and then turn it back on.
The printer cannot calibrate or detect the top of the label.
No printer was calibrated for the label to be used.
Perform calibration of media and ribbon sensors
Configure the printer to use continuous media.
Set the media type to discontinuous media.
Incorrect driver or software configuration settings.
Commands issued by the driver or software settings can override printer configuration; check the relevant settings of the driver or software media.
Treat non-continuous tags as continuous tags
No printer was calibrated for the media to be used.
Perform calibration of media and ribbon sensors
All indicator lights are on, but the LCD screen is blank, and the printer is stuck.
Internal electrical component or firmware failure
Call Minyong Service Engineer
The printer freezes during the power-on self-test.
Main logic board failure
Call Minyong Service Engineer
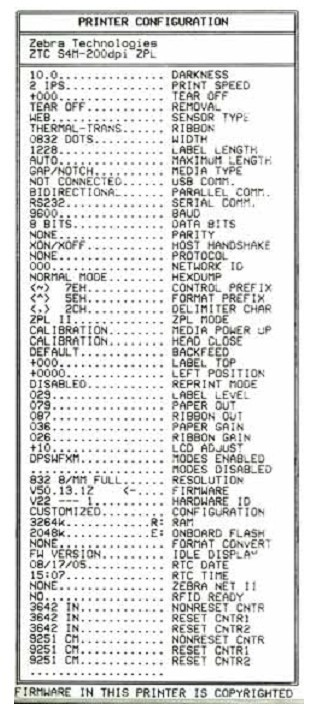
7.2 Printer Diagnostics Self-tests and other diagnostic methods provide specific information about the printer’s status. Self-tests can provide sample printouts and offer specific information to help determine the printer’s operating condition. The most commonly used are the “Power-On” self-test and the “CANCEL” self-test. Important Note: Use full-width media when performing self-tests. If your media is not wide enough, the test label will print on the print roller. With the printer powered on, press the specific control panel button or button combination to activate each self-test. Press and hold the button until the first indicator light goes out. The selected self-test will automatically start after the “Power-On” self-test is complete. Note: ① Do not send data from the host to the printer while these self-tests are performing; ② If the media is shorter than the label to be printed, the test will continue printing on the next label; ③ If you cancel a self-test before it is actually completed, you can reset the printer by turning off the power and then turning it back on. 7.2.1 Power-On Self-Test A power-on self-test will be performed each time the printer is powered on. During this self-test, the control panel indicator lights will turn on and off to ensure correct operation. At the end of the self-test, only the power indicator light will be on. When the power-on self-test is complete, the media will be fed into the correct position. 7.2.2 CANCEL Self-Test To perform the “CANCEL self-test,” complete the following steps: ① Turn off the printer power. ② With the printer power on, press and hold the CANCEL button until the first control panel light goes out. A printer configuration label will be printed, as shown below.
7.2.3 PAUSE Self-Test This self-test can be used to provide a necessary checklist when adjusting the printer’s mechanical components or determining whether the printhead components are working properly. To perform the PAUSE self-test, complete the following steps: ① Turn off the printer power . ② With the printer power on, press and hold the PAUSE button until the first control panel light goes out. ● During the initial self-test, the printer prints 15 labels at its lowest speed, then automatically pauses. Each press of the PAUSE button will print an additional 15 labels.
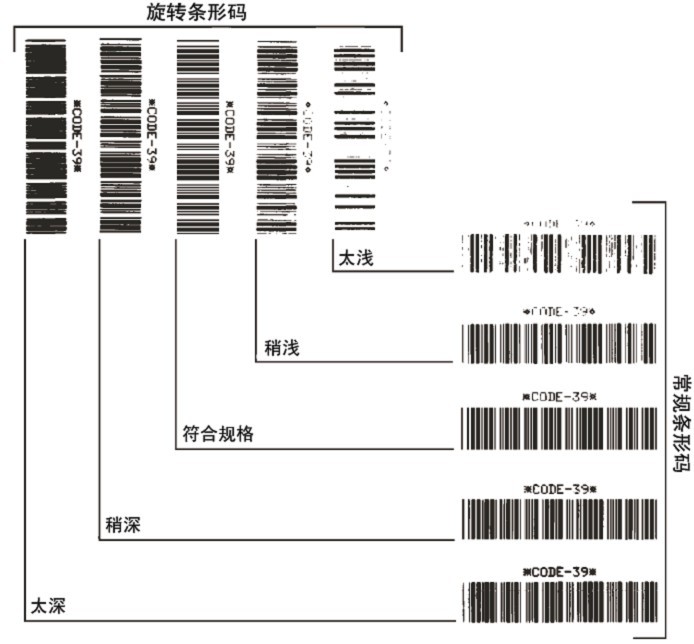
● While the printer is paused, pressing CANCEL will change the self-test; each press of PAUSE will print 15 labels at 152 mm/s. ● While the printer is paused, pressing CANCEL again will change the self-test; each press of PAUSE will print 50 labels at the lowest speed. ● While the printer is paused, pressing CANCEL again will change the self-test a third time; each press of PAUSE will print 50 labels at 152 mm/s. ● While the printer is paused, pressing CANCEL again will change the self-test a fourth time; each press of PAUSE will print 15 labels at the highest speed. ● Holding down CANCEL will exit the self-test at any time. 7.2.4 FEED Self-Test Different types of media may require different depth settings. During the FEED self-test, labels are printed at two different printing speeds with different depth settings. Each label will be printed at a relative depth and printing speed. ANSI grading can be performed on the barcodes on these labels to check print quality. The depth value starts below the printer’s current depth value (relative depth 3) and increases to a depth three depth settings above the current depth value (relative depth + 3). To perform a FEED self-test, complete the following steps: ① Print a configuration label to display the printer’s current configuration. ② Turn off the printer power. ③ With the printer power on, press and hold the FEED button until the first control panel light goes out. The printer will print a series of labels at different speeds and depths above and below the depth value shown in the configuration label.
④ Check the test labels using the diagram below to determine which label has the best print quality for your application. If you have a barcode detector , you can use it to measure the barcode/blank and calculate the print contrast. If you do not have a barcode detector, you can use a visual method or a system scanner to select the optimal depth setting based on the labels printed in this self-test.
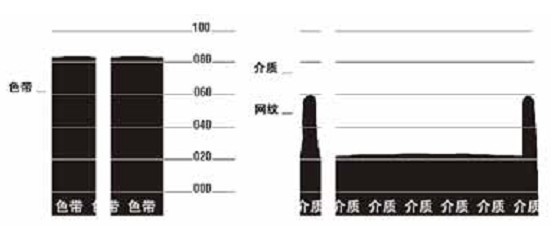
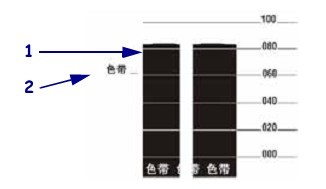
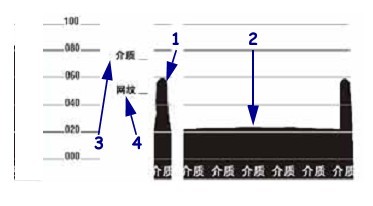
■ Too Dark: The label is too dark and obvious. It is readable but does not conform to specifications. This manifests as an enlarged size of the regular barcode, with ink filling the spaces for small alphanumeric characters. Rotating the barcode results in crowded spaces. ■ Slightly Dark: The label is slightly darker and not very noticeable. This is a standard barcode with slightly thickened small alphanumeric characters, appearing somewhat crowded. Rotating barcodes have less space compared to standard barcodes, potentially making the code unreadable. ■ Conforms to Specifications: This type of barcode can only be verified using a barcode detector, but it still has some visual characteristics. Regular barcodes have complete, balanced bars and clear, distinct gaps; rotating barcodes also have complete, balanced bars and clear, distinct gaps. While not as visually appealing as slightly darker barcodes, these barcodes conform to specifications. In both regular and rotating styles, small alphanumeric characters appear more complete. ■ Slightly Lighter: In some cases, for “conforms to specifications” barcodes, slightly lighter labels are more effective than darker ones. The results show that both regular and rotating barcodes conform to specifications, but small alphanumeric characters may be incomplete. ■ Too light: The label color is too light and not clearly visible. This manifests as incomplete regular and rotating barcodes, and small alphanumeric characters are unreadable. ⑤ Pay attention to the relative depth value and printing speed on the label that produces the best results. ⑥ The relative depth value can be added to or subtracted from the depth value specified on the configuration label; the resulting numerical value is the optimal depth value for a specific label/ribbon combination and printing speed. ⑦ If necessary, the depth value should be changed to the depth value on the label that produces the best results. ⑧ The printing speed should be changed to the same speed as the label that produces the best results, as needed. 7.2.5 FEED and PAUSE Self-Test Performing this self-test can temporarily reset the printer to factory defaults. Unless these values are retained in memory, they will only take effect after the power is turned off. If the factory defaults are permanently retained, a media calibration procedure must be performed. To perform the FEED and PAUSE self-test, complete the following steps: ① Turn off the printer power. ② With the printer power on, press and hold the FEED (Paper Feed) and PAUSE (Pause) buttons. ③ Press and hold the FEED and PAUSE buttons until the first control panel light goes out. The printer configuration is temporarily reset to factory defaults, and no labels are printed when the test is complete. 7.2.6 Sensor Charts Use sensor chart labels to diagnose the following fault types: ● If the media sensor malfunctions, the gap (mesh) between two labels cannot be determined. ● If the media sensor cannot correctly identify the pre-printed area on the label as a gap (mesh). ● If the ribbon sensor cannot detect the ribbon. ① Ribbon Sensor Chart The bars (1) on the sensor chart indicate the ribbon sensor reading. The ribbon sensor threshold is indicated by the word RIBBON (ribbon) (2). If the ribbon reading is below the threshold, the printer cannot confirm that the ribbon is loaded.
② Media Sensor Chart The media sensor reading is displayed as bars and horizontal areas on the sensor chart. The bars (1) represent the gaps in the middle of the label (mesh), and the area below (2) indicates the location of the label. If the sensor chart is printed and compared with the blank length of the media, the gaps on the media should be the same distance between the two bars. If the distances are different, the printer may not be able to determine the gap location. The media sensor threshold setting is indicated by MEDIA (3) for the media threshold and WEB (4) for the mesh threshold. The digital reading is compared with the sensor setting using the number to the left of the sensor reading.
8. Zebra S4M Barcode Printer Specifications 8.1 Media Specifications
Tag length
Minimum value (paper cutting)
0.7 inches
17.8mm
Minimum value (stripping)
0.5 inches
12.7mm
Maximum value
39 inches
991mm
Tag width
Minimum value
0.75 inches
19mm
Maximum value
4.5 inches
114mm
Total thickness (including backing)
Minimum value
0.003 inches
0.076mm
Maximum value
0.01 inches
0.25mm
Maximum outer diameter of the dielectric roll
76mm dielectric core
8 inches
203mm
25mm dielectric core
6 inches
152mm
Label internal gap
Minimum value
0.079 inches
2mm
Recommended value
0.118 inches
3mm
Maximum value
0.157 inches
4mm
Notch size for tickets/labels (width × length)
0.25 inches × 0.12 inches
6mm×3mm
aperture
0.125 inches
3mm
Location of the cut or notch (distance from the center to the inner edge of the medium)
Minimum value
0.15 inches
3.8mm
Maximum value
2.25 inches
57mm
Density expressed in optical density units (marked in black)
>1.0 ODU
Maximum dielectric density
≤0.5 ODU
Transmission sensor
Fixed display
The distance to the inner edge is 11mm (7/16 inches).
8.2 Ribbon Specifications
Ribbon width (It is recommended that the ribbon width be at least the same as the media width to protect the print head from wear).
The Zebra Z4M and Zebra Z6M Plus series printers are the latest additions to Zebra’s Z series, bringing together all the advantages of Zebra printers – their rugged appearance and sensory characteristics make them a mainstay of the Zebra product line.
The charcoal gray tone enhances the printer’s smooth, curved design while also improving its stain resistance in industrial environments.
Offering excellent printing performance at an economical price, the Z4M and Z6M printers have won over a wide range of users. Suitable for small to medium-volume label printing applications (including loose, batch, or individual shipments), such as industrial production lines, shipping/receiving, cargo tracking, invoice printing, logistics control, and process monitoring.Zebra Z4M/Zebra Z6M Product Specifications
Zebra Z4M/Zebra Z6M standard features: thermal transfer or thermal printing, robust die-cast metal housing, ZebraLink connectivity, new processor for improved output and processing speed, 4MB SDRAM, 2MB non-volatile flash memory, 300 unique print quality black levels, serial and parallel communication, multi-language backlit LCD control panel, transmissive and reflective label sensors, multi-level component power equalizer (E3) for superior print quality, ZPLII programming language, and ZebraLink connectivity. 1D Barcodes: Code 11, UPC-A, UPC-E, Code 39, EAN-8, EAN-13, Code 93, Plessey, Postnet, Code 128 with subsets A/B/C and UCC Case Codes, Interleaved 2 of 5, EAN and UPC with 2 or 5 digital extensions, Codabar, Standard 2 of 5, MSI, ISBT 128, Industrial 2 of 5, LOGMARS, Planet Code, RSS. 2D Barcodes: Codablock, PDF417, Code 49, Maxi Code, Data Matrix, QR Code, TLC 39. Seven bitmap fonts and one smoothly scaled standard font are supported, based on the IBM Code page 850 international character set. User-defined fonts and graphics, including custom icons, are also supported.
Zebra Z4M/Zebra Z6M Maximum Printing Area:
Z4M : Maximum width: 104mm ; Print length with 203dpi printhead: 2667mm ; Print length with 300dpi printhead: 1245mm. Z6M : Maximum width: 168mm; Print length with 203dpi printhead: 1651mm; Print length with 300dpi printhead: 737mm.
Zebra Z4M/Zebra Z6M features a 203dpi printhead (8 dots per millimeter) and a 300dpi printhead (12 dots per millimeter).
Zebra Z4M/Zebra Z6M Maximum Print Speed : 203 dpi Printhead: 10 inches (254 mm) per second; 300 dpi Printhead: 10 inches (254 mm) per second.
Zebra Z4M/Zebra Z6M memory: 4MB SDRAM (2MB usable by the user)
Zebra Z4M/Zebra Z6M Label Ribbon Media Specifications: Z4M: Label and backing paper width: 25.4 mm to 114 mm; Maximum label roll size: Outer diameter 203 mm, inner diameter 76 mm Label thickness: 0.076 mm to 0.305 mm Label media type: Continuous paper, die-cut paper, black label paper. Ribbon width: 51 mm to 110 mm Standard ribbon length: 450 meters or 300 meters, ink side outwards. Z6M: Label and backing paper width: 51 mm to 178 mm; Maximum label roll size: Outer diameter 203 mm, inner diameter 76 mm Label thickness: 0.076 mm to 0.305 mm Label media type: Continuous paper, die-cut paper, black label paper. Ribbon width: 51 mm to 174 mm Standard ribbon length: 450 meters or 300 meters, with the ink side of the ribbon wound outwards.
Zebra Z4M/Zebra Z6M features RS-232 communication interfaces, a high-speed bidirectional IEEE 1284 parallel interface, ZebraNet PrintServer II (optional), and a ZebraNet wireless network card slot (optional).
Zebra Z4M/Zebra Z6M accessories include ZebraNet PrintServer II, ZebraNet wireless network card slot, label rewinder, label cutter, label peeler, scalable fonts and international fonts, PC card, adapter interface, IBM Twinax interface, IBM Coax interface, and mini flash memory card.
The Zebra ZM600 barcode label printer brings new flexibility to the popular Z-Series platform, which offers significant advantages in performance and price.
With its 10-inch-per-second print speed, industry-leading processing efficiency, high reliability, and extensive options, these metal-bodied printers ensure high printing efficiency even in harsh environments and demanding application conditions.
Consumable loading is simple and convenient, and printhead and roller replacements can be easily and quickly done on-site, simplifying use and maintenance. It better meets the needs of most warehousing/manufacturing and commercial applications. Network connectivity is further enhanced by the Zebranet 10/100 print server, which supports simultaneous parallel and Ethernet connections via USB 2.0 and secure 802.11b/g wireless protocol.
Zebra ZM600 Printer Specifications : Printing Method: Thermal Transfer/Thermal Printing; Maximum Print Width: 168mm ; Resolution: 203dpi/300dpi ; Maximum Print Speed: 254mm/s (203dpi), 203mm/s (300dpi); Maximum Print Length: 2590mm (203dpi), 1143mm/s (300dpi); Standard Memory: Zebra ZM600
Physical Characteristics : Dimensions: Width 278mm * Length 475mm * Height 338mm ; Net Weight: 15Kg; Standard Memory: 16MB DRAM (2MB for user use) ; Zebra’s E3 Print Element Control Technology ; Optional: Upgrade to 64MB FLASH memory or via PCMCIA card; Zebra ZM600 Software : ZPL II Programming Language Zebra ZM600 Operating Environment Operating Temperature: 5 to 40 degrees Celsius Storage Temperature: -40 to 60 degrees Celsius Operating Humidity: 20% to 85% (non-condensing) Storage Humidity: 5% to 85% (non-condensing) Zebra ZM600 Other Parameters Electrical Parameters: Automatic detection 90-265V AC, 48-62Hz, maximum current 5A Communication Interface: RS232C, parallel port, USB port Label Width: 25.4mm-178mm Label Roll Diameter: Outer diameter 203mm, inner diameter 76mm Label Thickness: 0.058 to 0.25mm Label Paper Type: Continuous, film-cut, notched, black label, perforated Ribbon Length: 300m/450m Ribbon Roll Diameter: Outer diameter 81.3mm, inner diameter 25.4mm
The Zebra ZM400 barcode label printer, with its metal casing and multilingual printing capabilities, is an ideal choice for multi-functional, high-speed printing in various businesses.
Consumable loading is simple and convenient, and printhead and roller replacements can be easily and quickly done on-site, simplifying use and maintenance. It better meets the needs of most warehousing/manufacturing and commercial applications. Network connectivity is further enhanced by the Zebranet 10/100 print server, which supports both parallel and Ethernet connections via USB 2.0 and secure 802.11b/g wireless protocols.
Furthermore, this printer is more widely applicable, offering RFID upgrades for investment protection, optional print resolutions including 600 dpi for high-quality printing, and XML printing options for easy integration with ERP applications.
Zebra ZM400 Printer Specifications : Printing Method: Thermal Transfer/Thermal Printing; Maximum Print Width: 104mm ; Resolution: 203dpi (300dpi and 600dpi optional); Maximum Print Speed: 254mm/s (203dpi), 203mm/s (300dpi), 102mm/s (600dpi); Maximum Print Length: 2667mm (203dpi), 1245mm/s (300dpi), 1245mm/s (600dpi); Standard Memory:
Zebra ZM400 Product Features : Standard Memory: 4MB DRAM (2MB for user use); Zebra’s E3 Print Element Control Technology ; Optional: Upgrade to 2MB FLASH memory or upgrade to 8MB FLASH via PCMCIA card;
Zebra ZM400 Software : ZPL II. Programming Language
Zebra ZM400 Operating Environment : Operating Temperature: 5 to 40 degrees Celsius; Storage Temperature: -40 to 60 degrees Celsius ; Operating Humidity: 20% to 85% (non-condensing); Storage Humidity: 5% to 85% (non-condensing).
Zebra ZM400 Other Parameters : Electrical Parameters: Automatic detection; 90-265V AC, 48-62Hz, maximum current 5A; Communication Interface: RS232C, parallel port, USB port; Tag Width: 25.4mm-114mm ; Tag Roll Diameter: Outer diameter 203mm, inner diameter 76mm; Tag Thickness: 0.058 to 0.25mm; Tag Paper Type: Continuous, film-cut, notched, black label, perforated; Ribbon Length: 300m/450m; Ribbon Roll Diameter: Outer diameter 81.3mm, inner diameter 25.4mm.
1. Introduction to the Components of the Zebra ZM400 Barcode Printer 1.1 Printhead Assembly / Control Panel / Media Door / Media Supply Guide / Media Supply Rack / Ribbon Pickup / Ribbon Supply Shaft / Tension Adjustment Assembly / Printhead Release Door Lock
1.2 Power Indicator / Pause Indicator / Error Indicator / Data Indicator / LCD Display / CANCEL Button / Plus (+) Button / SETUPEXIT Button / Minus (-) Button / SELECT Button / FEED Button / PAUSE Button
1.3 Power Switch / AC Power Connector / Wireless Print Server Card Slot / Wireless Card Ejection Button / Serial Port / Internal Wiring Print Server Port / USB Port / Parallel Port
2. Zebra ZM400 Barcode Printer Control Panel Button and Indicator Description 2.1 Control Panel Button Description ■ FEED (Paper Feed): Function: Each press forces the printer to feed a blank label. ① If the printer is not printing, immediately feed a blank label; ② If printing is in progress, feed a blank label after completing the current batch of labels. ■ PAUSE (Pause): Function: Starts and stops the printing process. ① If the printer is not printing, there is no printing action. Pressing PAUSE again resumes printing; ② If printing is in progress, stop printing after completing the current batch of labels. ■ CANCEL (Cancel ): Function: Cancels the print job when the printer is paused. ① If the printer is not printing, the next stored label format will not be printed; ② If printing is in progress, print all labels for the day and cancel the next label format. Pressing and holding for a few seconds cancels all print jobs in memory. ■ SETUP/EXIT (Setup/Exit), Function: Enters and exits configuration mode. ■ SELECT (Select), Function: Switches the functions of the plus (+) and minus (-) signs between “scrolling” and “changing mode”. ① Press once to change the selected value using the plus (+) and minus (-) signs; ② Press again to scroll between menu items using the plus (+) and minus (-) signs. ■ Plus (+) (Scrolling Mode), Function: Scrolls to the next option. ■ Plus (+) (Changing Mode), Function: ① Increases the value; ② Performs operations at the bottom right of the LCD screen. ■ Minus (-) (Scrolling Mode), Function: Scrolls to the previous option. ■ Minus (-) (Changing Mode), Function: ① Decreases the value; ② Performs operations at the bottom right of the LCD screen; ③ Moves to the next digit. 2.2 Control Panel Indicator Light Description ■ POWER (Power), Off: Printer is off or not powered; On: Printer power is on. ■ PAUSE: Off: Printer is working normally; On: Printer has stopped all printing operations; Flashing: The “Pause” indicator flashes when initializing the “Flash” memory or when a label is in “Peel Mode”. ■ ERROR: Off: Printer is working normally; On: An error condition prevents printing, including MEDIA OUT and RIBBON OUT errors; Flashing: An error condition exists, but printing can still continue, including RIBBON IN warning, HEAD UNDER TEMP warning, and HEAD OVER TEMP error. ■ DATA: Off: Printer is working normally and is not receiving or processing data; Flash once: The CANCEL button was pressed and the format was successfully canceled; Slow flashing: The printer cannot accept more data from the host; Rapid flashing: The printer is receiving data; On: Partial format has been received, and there is no further data activity.
3. Zebra ZM400 Barcode Printer Data Communication Interface Selection Users can send label formats to the printer through any available data communication interface. All necessary data cables must be provided for the specific situation. Ethernet does not require shielding, but other data cables must be fully shielded and equipped with metal or metallized connector housings. Using unshielded cables will result in electromagnetic radiation levels exceeding regulatory limits. To minimize electrical noise pickup levels in the cables: ● Use the shortest possible data cables . ● Do not tightly bundle data cables and power cords together. ● Do not tie data cables to power cord conduits. Data Communication Interface Characteristics: ● RS232 Serial Port (Standard): ① Maximum cable length 15.24 meters; ② Printer parameters need to be changed to match the host computer; ③ If using a standard modem cable, a blank modem needs to be connected to the printer. ● IEEE1284 Bidirectional Parallel Port (Standard): ① Maximum cable length 3 meters; ② Recommended cable length 1.83 meters; ③ No printer parameter changes are required for compatibility with the host computer. ● USB (Standard): Features: ① Maximum cable length 5 meters; ② Compatible with host computer without requiring changes to printer parameters. ● Internal Wired Ethernet Print Server (Optional): Features: ① Prints from any computer on the user’s LAN to the printer; ② Communicates with the printer via its web interface in ZPL mode; ③ The computer must have an Ethernet card; ④ The printer must be configured to use the LAN. ● Wireless Ethernet Print Server (Optional): Features: ① Prints from any computer on a wireless LAN (WLAN) to the printer; ② Communicates with the printer via its web interface in ZPL mode; ③ The printer must be configured to use the WLAN. Note: Before connecting the data communication cable, ensure the printer is powered off (O). Connecting the data communication cable while the power switch is on (I) may damage the printer.
4. Zebra ZM400 Printer Calibration and Printhead Pressure Adjustment 4.1 Printer Calibration The printer can be set to automatic or manual calibration. 4.1.1 Automatic Calibration When the MEDIA POWER UP or HEAD CLOSE control panel is set to CALIBRATION, the printer will automatically perform calibration when the printhead is powered on or off. During automatic calibration, the printer determines the label length and sensor settings. The results of automatic calibration are stored in the printer’s memory and are not lost even when the printer is powered off. These parameters remain valid until the next calibration is performed. Note: If the MEDIA POWER UP or HEAD CLOSE control panel is set to LENGTH, NO MOTION, or FEED, the printer will begin printing without automatic calibration. 4.1.2 Manual Calibration Performing media and ribbon sensor calibration resets the sensor sensitivity for more accurate media and ribbon detection. If you have changed the ribbon or media type, this calibration process will improve your printer’s performance. You can adjust the sensitivity of the media and ribbon sensors using the following steps: ① Press the SETUP/EXIT button on the control panel. ② Press the plus (+) or minus (-) button to select the “Media and Ribbon Calibration” parameter. ③ Press SELECT to select the parameter. ④ Press the plus (+) button to begin the calibration process. The printer displays the LOAD BACKING prompt. ⑤ Open the printhead . ⑥ Peel approximately 203 mm of the label off the backing paper and feed the media into the printer, ensuring only the backing paper is between the media sensors. ⑦ Keep the printhead open. ⑧ Press the plus sign (+) to continue; the REMOVE RIBBON prompt will appear. ⑨ If a ribbon is used, it should be removed. ⑩ Close the printhead. ⑾ Press the plus sign (+) to continue; the CALIBRATING PLEASE WAIT message will appear. The printer adjusts the signal gain received from the media and ribbon sensors based on the specific media and ribbon combination used. On the sensor graph, this corresponds to the graphical peak that moves up and down to better read your printing application. After calibration is complete, RELOAD ALL will be displayed. 12. Open the printhead and push the media forward so that the label is below the media sensor. 13. Reload the ribbon (if used). 14. Close the printhead . 15. Press the plus sign (+) to continue. The printer performs automatic calibration. During this process, the printer checks the media and ribbon readings against the newly established scale to determine the ribbon length and printing mode. To view the readings on the new scale, you can print a sensor chart. 16. Press SELECT to accept any changes and cancel parameter selection. 4.1.3 Adjusting the Printhead Pressure If the printed color is too light on one side, if the media is too thick, or if the media shifts to one side during printing, you may need to adjust the printhead pressure.
The ZM400 pressure adjustment wheel has four available settings, indicated by progressively larger embossed markers on the printing unit. The smallest marker (maximum counterclockwise rotation) is position 1, and the largest marker (maximum clockwise rotation) is position 4. Adjust the positions of the inner adjusting wheel 2 and the outer adjusting wheel 1 according to the media width: ● Media width 25.4mm: Inner adjusting wheel at position 3, outer adjusting wheel at position 1. ● Media width 51mm: Inner adjusting wheel at position 4, outer adjusting wheel at position 1. ● Media width 76mm: Inner adjusting wheel at position 3, outer adjusting wheel at position 2. ● Media width ≥ 89mm: Inner adjusting wheel at position 3, outer adjusting wheel at position 4. If the pressure adjusting wheel needs to be adjusted due to media thickness or other factors, it can be adjusted as follows: ● If the media requires higher pressure to improve print quality, increase the position of both adjusting wheels by one position . ● If the media slides to the left during printing, increase the position of the outer adjusting wheel by one position, or decrease the position of the inner adjusting wheel by one position. ● If the media slides to the right during printing, increase the position of the inner adjusting wheel by one position, or decrease the position of the outer adjusting wheel by one position . ● If the printed content on the left side of the media label is too light, increase the position of the inner adjusting wheel by one position. ● If the printed content on the right side of the media label is too light, increase the position of the outer adjusting wheel by one position.
5. Zebra ZM400 Barcode Printer Configuration 5.1 Entering, Using, and Exiting Setup Mode 5.1.1 Entering Setup Mode Use the LCD screen on the control panel to view and adjust printer settings in setup mode. When changing parameters, an asterisk (*) displayed in the upper left corner of the screen indicates that the value is different from the value used in the printer that day. Press the SETUP/EXIT key to enter or exit setup mode. Press the SELECT key to select or deselect parameters. Press the plus (+) key to continue processing the next parameter. Press the minus (-) key to return to the previous parameter in the loop. 5.1.2 Exiting Setup Mode When exiting setup mode, there are several options to save, change, or not change parameters. To exit Setup Mode, complete the following steps: ① Press SETUP/EXIT. The LCD screen will display SAVE CHANGES. ② Press the plus (+) or minus (-) button to select the save option: ◆PERMANENT: These values are saved in the printer even after the printer is powered off. ◆TEMPORARY: Saves changes until the power is turned off. ◆CANCEL: Cancels all changes made after entering “Setup” mode, excluding color depth and cutter settings, which take effect immediately after changes. ◆LOAD DEFAULTS: Restores all parameters except network settings to factory default values. Be careful when loading default values, as you will need to reload all manually changed settings afterward. ◆LOAD LAST SAVE: Loads the parameter values that were last permanently saved. ◆DEFAULT NET: Restores wired and wireless network settings to factory default values. ③ Press the SETUP/EXIT button to select the displayed option. After the configuration and calibration process is complete, PRINTER READY will be displayed. 5.2 Changing Password-Protected Parameters Certain parameters, including communication parameters, are password-protected by the manufacturer’s default values. Do not change password-protected parameters unless you have a complete understanding of their function; otherwise, the printer will not function properly. When a user attempts to change a password-protected parameter for the first time, the printer will display ENTER PASSWORD. The user must enter a four-digit numeric password to change the parameter. After correctly entering the password, unless SETUP/EXIT or the printer power is turned off, the password does not need to be entered again. To enter a password for a password-protected parameter, complete the following steps: ① You can use the minus sign (-) at the password prompt to change the selected digits. ② If you have already selected the digits to change, you can use the plus sign (+) to increase the selected value. Repeat the above two steps for each digit of the password. ③ After entering the password, press SELECT to display the parameter you selected to change. If the user has entered the correct password, the value can be changed. The default password value is 1234. The password can be changed using the ZPL’s ^KP command or the printer’s web page. The ^KP command can be used to set the password to 0000 to disable password protection, thus eliminating the need for the user to enter a password. To re-enable password protection, send the ZPL command ^KPx, where x can be a number from 1 to 9999. 5.3 Standard Control Panel Parameters Note: Label printing software or printer drivers may override adjustments made through the control panel.
■Density: Adjusting print density. The optimal density setting depends on various factors, including ribbon type, label, and printhead condition. Adjusting the density allows for consistent, optimal print quality. Note: Set the density to the lowest value that provides the best print quality. If the density is set too high, the ink will spread, the ribbon will burn through, and the printhead will wear out prematurely. If the printed content is too light or there are blank areas in the printed area, increase the print density. If the printed color is too dark, or if the print ink spreads or bleeds, decrease the print density. Default: +10, Range: 00 to +30
■ Print speed: Adjusting the print speed usually results in higher print quality. Default: 2 IPS, Range: 2 to 10 IPS (203 dpi) / 2 to 8 IPS (300 dpi) / 1 to 4 IPS (600 dpi)
■ Tear off the paper and adjust the cutting position. This parameter sets the position of the media on the cutter/peel bar after printing. Increasing the number moves the media outward (the cutting line moves to the leading edge of the next label), and decreasing the number moves the media inward (the cutting line moves towards the edge of the printed label). Default value: 0, range: -120 to +120
■ Print Mode: Select the print mode. This parameter instructs the printer how to feed the printed label. Ensure that the user has selected a print mode compatible with the printer and printer options. Default: TEAR-OFF; Options: TEAR-OFF, PEEL-OFF, CUTTER, DELAYED CUT, REWIND.
■Media Type: Sets the media type. This parameter informs the printer of the type of parameters you are using. If Option Media is selected, a label length instruction must be included in the label format. If Non-Continuous Media is selected, the printer feeds the media to calculate the label length (the distance between two alignment points identified on the label gap, weave, alignment notch, or perforation). Default: Gap/Notch; Options: Gap/Notch, Marking, Continuous.
■ Printing Method: Select the printing method. This parameter informs the printer user of the desired printing method: thermal (without ribbon) or thermal transfer (using thermal transfer media and ribbon). Default: Thermal Transfer; Options: Thermal Transfer, Thermal
■ Print Width: Sets the print width. This parameter specifies the printable area within the label width range. 200dpi: Default 832, range 2 to 832 300dpi: Default 1248, range 2 to 1248 600dpi: Default 2496, range 2 to 2496 Note: Setting the width too narrow may prevent some label formats from printing on the media. Setting the width too wide will waste format memory, causing labels to print outside the lines or onto the print roller. If using a flipped image, this setting will affect the horizontal position of the label format.
■Maximum Length: Sets the maximum label length. This parameter is used during the media section of the calibration process. The maximum label length should be set to at least 25.4 mm longer than the actual label length. If this value is set to less than the label length, the printer will assume continuous media is loaded, and the printer will be unable to calibrate. Default: 988 mm. Option: This value can be adjusted in 25.4 mm increments.
■ Early Warning: Enables early maintenance warnings. If this function is enabled, the printer will warn you when the printhead needs cleaning. Default: MAINT.OFF (Maintenance Off), Options: MAINT.OFF (Maintenance Off), MAINTENANCE ON (Maintenance On)
■ The printhead is being cleaned. This setting provides an early warning for the printhead cleaning interval. This parameter is only displayed when “Early Maintenance Warning” is enabled. The value should correspond to the length of the media or ribbon roll used by the user. Default: 450 meters/1476 feet; Options: 100 meters/328 feet to 450 meters/1476 feet, in 50-meter increments.
■ Printhead cleaned? This is an early warning to reset the printhead cleaning counter. This parameter is only displayed when “Early Maintenance Warning” is enabled.
■ Printhead Life: Sets the printhead life for early warning. This parameter is only displayed when “Early Maintenance Warning” is enabled. Set this value to the number of inches of media the printhead is expected to print. Default: 1,000,000 inches; Range: 100 to 1,000,000 inches.
■A new printhead has been used? This is a warning to reset the printhead life counter. This parameter is only displayed when “Early Maintenance Warning” is enabled.
■ Non-reset counter: View the non-reset counter. This parameter displays the total length of media printed by the printer.
■ Reset Counter 1. View the user-controlled Counter 1. This parameter displays the total length of media printed by the printer since the last reset. The ZPL command can be used to change the unit of measurement of this counter and reset it.
■ Reset Counter 2. View the user-controlled Counter 2. This parameter displays the total length of media printed by the printer since the last reset. The ZPL command can be used to change the unit of measurement of this counter and reset it.
■ Print meter readings, print counter readings, and can print a label listing the following length readings: ① Non-resettable counter ② Two user-controlled counters ③ “Early Maintenance Warning” indicates the last time the printhead was cleaned and the lifespan of the printhead (if the “Early Maintenance Warning” function is disabled, the associated counters will not be printed).
■ List Fonts: This option prints a label listing the fonts available in the printer, including standard printer fonts and any optional fonts. Fonts can be stored in RAM or flash memory.
■ List barcodes. This option prints a label listing the barcodes available in the printer. The barcodes can be stored in RAM or flash memory.
■ List Images: This option prints a label listing the images available in the printer, which can be stored in RAM, flash memory, or an optional PCMCIA card.
■ List Formats: This option prints a label listing the available formats for your printer. These images can be stored in RAM, flash memory, or an optional PCMCIA card.
■ List Settings: This option prints a configuration label that lists the current printer configuration.
■ List Networks: This option prints a list of network configuration tabs, which show the settings of the installed print servers.
■ List All: This option allows you to print labels that list available fonts, barcodes, graphics, formats, and current printer and network configurations.
■ Format the memory card. This parameter will only appear if a flash memory chip is installed on the Wireless Plus tab.
■ Initialize flash memory. This option erases information previously stored in the flash memory, and can completely erase the contents stored in the flash memory.
■ Sensor calibration chart, media sensor graph. The sensor graph shows the settings compared to the actual sensor readings. This label can be used to troubleshoot printing problems.
■ Media and Ribbon: To calibrate the sensitivity of the media and ribbon sensors, follow these steps: ① Press the SETUP/EXIT button on the control panel. ② Press the plus (+) or minus (-) button to select the “Media and Ribbon Calibration” parameter. ③ Press SELECT to select the parameter. ④ Press the plus (+) button to start the calibration process. The LOAD BACKING message will appear. ⑤ Open the printhead . ⑥ Peel approximately 203 mm of label from the backing paper and feed the media into the printer, ensuring only the backing paper is between the media sensors. ⑦ Keep the printhead open. ⑧ Press the plus (+) button to continue; the REMOVE RIBBON message will appear. ⑨ If a ribbon is used, remove it. ⑩ Close the printhead. ⑾ Press the plus (+) button to continue; the CALIBRATING PLEASE WAIT message will appear. The printer adjusts the signal gain received from the media and ribbon sensors based on the specific media and ribbon combination used. On the sensor graph, this corresponds to the graphical peak that moves up and down to better read your printing application. After calibration, RELOAD ALL will be displayed. ⑿ Open the printhead and push the media forward so the label is below the media sensor. ⑃ Reload the ribbon (if used). ⑭ Close the printhead . ⑮ Press the plus sign (+) to continue. The printer performs automatic calibration, during which it checks the media and ribbon readings against the newly established scale to determine the ribbon length and printing mode. To view the readings on the new scale, print a sensor graph. ⑮ Press SELECT to accept any changes and deselect parameters.
■ Parallel Communication: Configure parallel traffic by selecting a communication port that matches the computer host’s settings. Default: Bidirectional; Options: BIDIRECTIONAL (Bidirectional), UNIDIRECTIONAL (Unidirectional)
■ Serial Communication: Configure serial communication by selecting the communication port that matches the settings used by the computer host. This setting only applies when using a serial port. Note: If using an external adapter to enable RS422/485 operation, select RS232. Default: RS232, Options: RS232, RS485 MULTIFROP
■ Baud Rate: Set the baud rate. This setting is only applicable when using a serial port. For accurate communication, the computer host’s baud rate setting must match the printer’s baud rate setting. Select a value that matches the settings used by the computer host. Default: 9600, Options: 300, 600, 1200, 2400, 4800, 9600, 14400, 19200, 28800, 38400, 57600, 115200
■ Data Bits: Sets the data bits. This setting is only applicable when using a serial port. For accurate communication, the computer host’s data bit setting must match the printer’s data bit setting. Select a value that matches the settings used by the computer host. Default: 8 bits, Options: 7 bits, 8 bits
■ Parity bit: Sets the parity. This setting only applies when using a serial port. For accurate communication, the computer host’s parity setting must match the printer’s parity setting. Select a value that matches the parity setting used by the computer host. Default: NONE, Options: ENVEN (Even), ODD (Odd), NONE (None)
■ Host Handshake: Configure host handshake. This setting is only applicable when using a serial port. For accurate communication, the computer host’s handshake protocol must match the printer’s handshake protocol. Select a handshake protocol that matches the settings used by the computer host. Default: XON/XOFF, Options: XON/XOFF, DSR/DTR, RTS/CTS
■ Protocol: Configure the protocol. The protocol is an error type checking system. Depending on the options, an indicator can be sent from the printer to the host computer, indicating that data has been received. The protocol requested by the host computer should be selected. Default: NONE; Options: NONE, ZEBRA, ACK_NAK. Note: ZEBRA and ACK_NAK are the same, but the ZEBRA response message order is different. If ZEBRA is selected, the printer must use DSR/DTR as the host handshake protocol.
■ Network Identifier: Set a network identifier. If the printer operates in an RS422/485 multi-point download environment, a unique identifier should be assigned to the printer. This allows the host computer to communicate with the specific printer without affecting the TCP/IP or IPX network. Default: 000, Range: 000 to 999
■ Communication: Configure communication mode. The communication diagnostic mode is a troubleshooting tool used to check the interconnection between the printer and the host computer. Default: Normal mode; Options: Normal mode, Diagnostics.
■ Control Character Prefix: Sets the control character prefix. The printer looks for this two-digit hexadecimal character to indicate the start of the ZPL control specification. Note: Do not use the same hexadecimal value for the control, format, and delimiter characters. The printer must use different characters to function correctly. Default: 7E, Range: 00 to FF
■ Format Prefix: Sets the format prefix, which is a two-digit hexadecimal value used as a parameter position marker in the ZPL format specification. The printer looks for this hexadecimal character that indicates the start of the ZPL format instruction. Note: Do not use the same hexadecimal value for the control, format, and delimiter characters; the printer must use different characters to function correctly. Default: 5E, Range: 00 to FF
■ Separator: Sets the separator, which is a two-digit hexadecimal value used as a parameter position marker in the ZPL format specification. Note: Do not use the same hexadecimal value for the control, format, and separator characters; the printer must use different characters to function correctly. Default: 2C, Range: 00 to FF
■ZPL Mode: Selecting ZPL mode will keep the printer in that mode until the mode is changed by this parameter or the ZPL command. The printer can accept label formats written using ZPL or ZPLII without needing to rewrite any existing ZPL formats. Default: ZPLII, Options: ZPLII, ZPL
■ Media is powered on. Select the Media Power-On option. This parameter sets the media operation when the printer is powered on. Default: CALIBRATION, Options: CALIBRATION, SHORT CAL, LENGTH, NO MOTION, FEED. The calibration process adjusts the sensor level and threshold, determines the length, and feeds the media to the next mesh. Short calibration sets the media and mesh thresholds without adjusting the sensor gain, determines the length, and feeds the media to the next mesh. Length is used to determine the label length using the current sensor value and feeds the media to the next mesh. No Motion instructs the printer not to move the media; you must manually confirm that the mesh is correctly positioned, or you can press the Feed button to position the next mesh. Feed feeds the label to the first alignment point.
■ Printhead Close: Sets the printhead close options. This parameter is used to set media operation when the printhead is closed. Default: CALIBRATION, Options: CALIBRATION, SHORT CAL, LENGTH, NO MOTION, FEED. The calibration process adjusts the sensor level and threshold, determines the length, and feeds the media to the next mesh. Short calibration sets the media and mesh thresholds without adjusting the sensor gain, determines the length, and feeds the media to the next mesh. Length is used to determine the label length using the current sensor value and feeds the media to the next mesh. No movement instructs the printer not to move the media; you must manually confirm that the mesh is correctly positioned, or you can press the feed button to position the next mesh. Feed feeds the label to the first alignment point.
■Rewind: Select the rewind sequence. This parameter sets when the label rewinds after being retrieved in some printing modes. This setting is invalid in “Wrap-up” mode. When received as part of the label format, this setting is replaced by ~JS. Default: Default (90%), Options: DEFAULT (default), AFTER (before), OFF (off), FEFORE (after), 10%, 20%, 30%, 40%, 50%, 60%, 70%, 80%
■ Label Top: Adjusts the top position of the label. This parameter adjusts the vertical printing position of the label. A positive number moves the top of the label down (away from the print head) by a specified number of dots, while a negative number moves the label down (towards the print head) by a specified number of dots. Default: +000, Options: Range: -120 to +120
■Left Position: Adjusting the left position allows you to adjust the label’s horizontal printing position. Positive numbers shift the printed content to the left by a specified number of dots, while negative numbers shift it to the right. Default: +000, Options: Range: -9999 to +9999
■ Reprint Mode: This setting allows users to reprint the previously printed label by issuing the ~PR command or pressing the minus (-) button on the control panel. Default: Disabled; Options: Enable, Disabled
■ Format Conversion: Select Format Conversion, then select Bitmap Scaling. The first number is the origin of the dots per inch (dpi) value, and the second number is the dpi to be scaled. Default: NONE, Options: None, 150 300, 150 600, 200 600, 300, 600
■ Idle Display: Selecting standby display allows you to choose the LCD screen option for the real-time clock. Note: If the default value is not selected, pressing the plus (+) or minus (-) sign will briefly display the printer’s firmware version. Default: Firmware version; Options: MM/DD/YY (24HR), MM/DD/YY (12HR), DD/MM/YY (24HR), DD/MM/YY (12HR), Firmware version
■ Real-time clock date: Sets the real-time clock (RTC) date. This parameter allows users to set the date according to the specifications listed in IDLE DUSPLAY (Standby Display).
■ Real-time clock time: Sets the real-time clock (RTC) time. This parameter allows users to set the time according to the specifications listed in IDLE DUSPLAY (Standby Display).
■ Password Level: Specifies the password level. This parameter allows the user to choose whether to password-protect selected menu items or all menu items. Default: Selected items; Options: Selected items, All items.
■Language: Select the display language. This parameter changes the language displayed on the LCD screen. Each language option is displayed in its own language. Default: English; Options: English, Spanish, French, German, Italian, Norwegian, Portuguese, Swedish, Danish, Spanish 2, Dutch, Finnish, Japanese, Korean, Simplified Chinese, Traditional Chinese
6. Zebra ZM400 Barcode Printer Routine Maintenance Important Note: Zebra is not responsible for damage caused by the use of cleaning solutions on this printer. 6.1 Recommended Cleaning Schedule Depending on the application and media, more frequent cleaning may be required. Printhead, Method: 95% alcohol solvent, Interval: After one media roll in thermal mode, after using a Perfect Silk ribbon for thermal transfer, or after every three media rolls. Rollers, Method: 95% alcohol solvent, Interval: After one media roll in thermal mode, after using a Perfect Silk ribbon for thermal transfer, or after every three media rolls. Media Sensor, Method: Air jetting, Interval: After one media roll in thermal mode, after using a Perfect Silk ribbon for thermal transfer, or after every three media rolls. Ribbon Sensor, Method: Air jetting, Interval: After one media roll in thermal mode, after using a Perfect Silk ribbon for thermal transfer, or after every three media rolls. Media Path, Method: 95% alcohol solvent, Interval: After one media roll in thermal mode, after using a Perfect Silk ribbon for thermal transfer, or after every three media rolls. Ribbon Path: Method: 95% alcohol solvent, Time Interval: After using one media roll in thermal mode, after using a perfect silk ribbon in thermal transfer or after every three media rolls. 6.2 Cleaning Steps 6.2.1 Cleaning the Printer Housing The printer’s outer surface can be cleaned with a lint-free cloth and a small amount of neutral detergent. Do not use abrasive cleaners or solvents. 6.2.2 Cleaning the Printhead and Roller Printhead wear can be minimized and print quality maintained through routine maintenance. As printing continues, the media or ribbon passing through the printhead will continuously wear down the ceramic protective layer, constantly exposing and eventually damaging the printed elements. To prevent corrosion: ◆ Clean the printhead frequently and use a backed and fully lubricated thermal transfer ribbon to reduce friction. ◆ Optimize the balance between the two by using the lowest possible printhead pressure and burn-in temperature settings. ◆ Ensure the thermal transfer ribbon width is greater than or equal to the label media width to protect the printed elements from exposure to more corrosive label materials. For best results, clean the printhead after each ribbon roll change. Unstable print quality, such as blank spaces in printed barcodes or graphics, may indicate a dirty printhead. Caution: When performing tasks involving close proximity to the exposed printhead, remove all rings, watches, long necklaces, ID cards, and other metal objects that may come into contact with the printhead. Caution: The printhead can get very hot and may cause severe burns; allow it to cool completely. Caution: Before touching the printhead assembly, touch the printer’s metal frame or use an anti-static wrist strap or pad to discharge any accumulated static electricity. To clean the printhead and rollers, follow these steps: ① Open the printhead assembly . ② Remove the media and ribbon . ③ Use a cleaning swab to wipe the brown strip on the printhead assembly from one end to the other. ④ While manually rotating the pressure roller, thoroughly clean it with a cotton swab to allow the solution to evaporate completely. ⑤ Reinstall the media and ribbon and close the printhead assembly. Note: If print quality does not improve after performing the above steps, try cleaning the printhead with the Save-a-Printhead cleaning film. This is a material with a special coating that removes accumulated dirt without damaging the printhead. 6.2.3 Cleaning the Media Tank and Sensors To clean the media tank and sensors, complete the following steps: ① Use a brush or vacuum cleaner to remove accumulated paper scraps and dust from the media and ribbon path. ② Use a brush or vacuum cleaner to remove paper scraps and dust from the sensors.
7. Troubleshooting Zebra ZM400 Barcode Printer 7.1 LCD Screen Error Messages When an error occurs, the LCD screen displays a message. The following lists the LCD screen errors, possible causes, and recommended solutions. ●INVALID HEAD (Invalid printhead); Possible cause: An original Zebra printhead was not used when replacing the printhead; Solution: Install an original Zebra printhead. ●RIBBON OUT (Ribbon exhausted); Possible causes and solutions: ① In thermal transfer mode, the ribbon is not loaded or is incorrectly loaded. Please load the media correctly. ② In thermal transfer mode, the ribbon sensor does not detect an incorrectly loaded ribbon. Please load the media correctly and calibrate the sensor. ③ In thermal transfer mode, the media is blocking the ribbon sensor. Please load the media correctly and calibrate the sensor. ④ In thermal transfer mode, even if the ribbon is loaded, the printer still does not detect the ribbon. Please print the sensor chart, calibrate the sensor, or load the printer default settings. ●RIBBON IN (Ribbon loaded); Possible cause: The ribbon is loaded, but the printer is set to thermal mode; Solution: Thermal media does not require a ribbon. If you want to use thermal transfer media that requires a ribbon, you should set the printer to “Thermal Transfer” mode. ●PAPER OUT (Paper Out), Possible Causes and Solutions: ① No media loaded or improper media loading. Please load the media correctly. ② Media sensor misalignment. Please check the media sensor position. ③ The printer is set to use non-continuous media, but continuous media is loaded. Please install the correct media type, or reset the printer to the current media type and perform calibration. ● HEAD OPEN (Print Head Open), Possible Causes and Solutions: ① Print head not fully closed. Please fully close the print head. ② Print head open sensor malfunction. Please replace the sensor. 7.2 Calibration Fault ● Fault: Print alignment mark missing on label, vertical offset of top alignment mark on form too much. Possible Causes and Solutions: ① Paper pressure roller too dirty. Please clean the paper pressure roller. ② Media guide plate position incorrect. Please ensure the media guide plate is correctly positioned. ③ Incorrect media type. Please set the printer to use the correct media type. ④ Incorrect media loading. Please load the media correctly. ● Fault: Automatic calibration failed. Possible causes and solutions: ① Incorrect media or ribbon loading. Please load the media and ribbon correctly. ② The sensor did not detect the media or ribbon. Please manually calibrate the printer. ③ The sensor is too dirty or incorrectly positioned, preventing detection. Please ensure the sensor is clean and the media is in the correct position. ④ Incorrect media type setting. Please set the printer to use the correct media type. 7.3 Communication Failure ● Failure: The label format has been sent to the printer, but it is not recognized, and the DATA indicator light is not flashing. Possible cause: Incorrect communication parameters. Solutions: ① Check the printer driver or software communication settings. ② If using a serial port, check the port settings in the control panel menu. ③ If using a driver, check the driver communication settings related to the connection. ● Failure: The label format has been sent to the printer, but after printing multiple labels, the printer skips, misplaces, loses, or distorts the image on the labels. Possible cause: Incorrect serial communication settings. Solutions: ① Ensure the flow control settings match. ② Check the communication cable length. ③ Check the printer driver or software communication settings. ● Failure: The label format has been sent to the printer, but it is not recognized. The DATA light flashes, but no printing occurs. Possible causes and solutions: ① The prefix and separator character sets in the printer do not match the character sets in the label format. Please check the prefix and separator characters. ② Incorrect data is being sent to the printer. Please check the communication settings on your computer to ensure that these settings match the settings on the printer. If the problem persists, check the label format. 7.4 Ribbon Fault ● Fault: Ribbon is damaged or melted. Possible cause: Depth setting value is too high. Solution: ① Lower the depth setting value. ② Thoroughly clean the print head. ● Fault: The printer does not detect that the ribbon is used up. Possible cause: The printer was calibrated without a ribbon, and then the ribbon was inserted without performing a user recalibration of the printer, or the printer defaults were not loaded. Solution: Now calibrate the printer with the ribbon, or load the printer defaults. ● Fault: In thermal transfer mode, the printer does not detect the ribbon even though it is correctly loaded. Possible cause: The printer was calibrated without a ribbon, and then the ribbon was inserted without performing a user recalibration of the printer, or the printer defaults were not loaded. Solutions: Use the ribbon to calibrate the printer now, or load the printer defaults. ● Fault: The ribbon indicator light is still on even when the ribbon is correctly loaded. Possible Cause: The printer has not been calibrated for the labels and ribbon to be used. Solution: Perform calibration of the media and ribbon sensor sensitivity 7.5. Printer Diagnostics Self-tests and other diagnostic methods can provide specific information about the printer’s condition. Self-tests can provide sample printouts and can provide specific information to help determine the printer’s working condition . The most commonly used are the “Power-On” self-test and the CANCEL self-test. Important Note: Use full-width media when performing self-tests. If your media is not wide enough, the test label will print on the pressure rollers. To prevent this, check the print width setting on the control panel and ensure that the width is correct for the media to be used. Note: ▲ Do not send data from the host to the printer while performing these self-tests. ▲ If the media is shorter than the label to be printed, the test will continue printing on the next label. ▲ If you cancel the self-test before it is actually completed, you can reset the printer by turning off the power and then on again. 7.5.1 Power-On Self-Test A power-on self-test will be performed each time the printer is powered on. During this self-test, the control panel indicator lights will turn on and off to ensure correct operation. At the end of the self-test, only the power indicator light will be on. When the power-on self-test is complete, the media will be fed into the correct position. 7.5.2 CANCEL Self-Test To perform the “CANCEL self-test,” complete the following steps: ① Turn off the printer power. ② With the printer power on, press and hold the CANCEL button until the first control panel light goes out. A printer configuration label will be printed, as shown below.
7.5.3 PAUSE Self-Test This self-test can be used to provide a necessary checklist when adjusting the printer’s mechanical components or determining whether the printhead components are working properly. To perform the PAUSE self-test, complete the following steps: ① Turn off the printer power . ② With the printer power on, press and hold the PAUSE button until the first control panel light goes out. ● During the initial self-test, the printer prints 15 labels at its lowest speed, then automatically pauses. Each time the PAUSE button is pressed, an additional 15 labels will be printed.
● While the printer is paused, pressing CANCEL will change the self-test; each time PAUSE is pressed, 15 labels will be printed at a speed of 152 mm/s. ● While the printer is paused, pressing CANCEL again will change the self-test; each time PAUSE is pressed, 50 labels will be printed at the printer’s lowest speed. ● When the printer is paused, pressing CANCEL again will change the self-test for the third time. Each time PAUSE is pressed, 50 labels will be printed at a speed of 152 mm/s. ● When the printer is paused, pressing CANCEL again will change the self-test for the fourth time. Each time PAUSE is pressed, 15 labels will be printed at the printer’s maximum speed. ● Holding down CANCEL will exit the self-test at any time. 7.5.4 FEED Self-Test Different types of media may require different depth settings. During the FEED self-test, labels are printed at two different printing speeds with different depth settings. Each label will be printed with a relative depth and printing speed. ANSI grading can be performed on the barcodes on these labels to check print quality. The depth value starts below the printer’s current depth value (relative depth 3) and increases to three depth settings above the current depth value (relative depth + 3). Depending on the printhead dot density, a series of 7 labels can be printed at each speed: ● 203dpi printer: 2ips, 6ips, and 10ips ● 300dpi printer: 2ips, 6ips, and 8ips ● 600dpi printer: 2ips and 4ips To perform a FEED self-test, complete the following steps: ① Print a configuration label to display the printer’s current configuration. ② Turn off the printer power. ③ With the printer power on, press and hold the FEED button until the first control panel light goes out. The printer will print a series of labels at different speeds and depths above and below the depth value shown in the configuration label.
④ Use the diagram below to check the test labels and determine which label has the best print quality for your application. If you have a barcode detector , you can use it to measure the barcode/blank and calculate the print contrast. If you do not have a barcode detector, you can use a visual method or a system scanner to select the best depth setting based on the labels printed in this self-test.
■ Too Dark: The label is too dark and obvious. It is readable but does not conform to specifications. This manifests as an enlarged size of the regular barcode, with ink filling the spaces for small alphanumeric characters. Rotating the barcode results in crowded spaces. ■ Slightly Dark: The label is slightly darker and not very noticeable. This is a standard barcode with slightly thickened small alphanumeric characters, appearing somewhat crowded. Rotating barcodes have less space compared to standard barcodes, potentially making the code unreadable. ■ Conforms to Specifications: This type of barcode can only be verified using a barcode detector, but it still has some visual characteristics. Regular barcodes have complete, balanced bars and clear, distinct gaps; rotating barcodes also have complete, balanced bars and clear, distinct gaps. While not as visually appealing as slightly darker barcodes, these barcodes conform to specifications. In both regular and rotating styles, small alphanumeric characters appear more complete. ■ Slightly Lighter: In some cases, for “conforms to specifications” barcodes, slightly lighter labels are more effective than darker ones. The results show that both regular and rotating barcodes conform to specifications, but small alphanumeric characters may be incomplete. ■ Too light, indicating the label color is too light and indistinct. This manifests as incomplete regular and rotating barcodes, and unreadable small alphanumeric characters. ⑤ Pay attention to the relative depth value and printing speed on the label that produces the best results. ⑥ The relative depth value can be added to or subtracted from the depth value specified on the configuration label; the resulting numerical value is the optimal depth value for a specific label/ribbon combination and printing speed. ⑦ If necessary, the depth value should be changed to the depth value on the label that produces the best results. ⑧ The printing speed should be changed to the same speed as the label that produces the best results, as needed. 7.5.5 FEED and PAUSE Self-Test Performing this self-test can temporarily reset the printer to factory defaults. Unless these values are retained in memory, they will only take effect after the power is turned off. If the factory defaults are permanently retained, a media calibration procedure must be performed. To perform the FEED and PAUSE self-test, complete the following steps: ① Turn off the printer power. ② With the printer power on, press and hold the FEED (paper feed) and PAUSE (pause) buttons. ③ Press and hold the FEED and PAUSE buttons until the first control panel light goes out. The printer configuration will be temporarily reset to factory defaults. No labels, barcodes, or ribbons will be printed when this test is completed.
The meticulously designed Zebra ZT420 printer is durable and delivers exceptional performance in a wide range of applications. This series of printers ensures your critical business operates efficiently.Print head and other accessories are available in large quantities.
Built on the Z series’ field-proven reliability, the ZT420 enhances print speed, print quality, and connectivity options. The ZT420 printer is exceptionally easy to use, featuring an intuitive icon-based LCD graphical user interface and easy-to-install consumables.
Furthermore, the ZT420 printer includes standard USB, serial, Ethernet, and Bluetooth connectivity. Expanded RFID capabilities provide enhanced tracking, deeper visibility, and business insights.
The ZT420 is a 6-inch model that comes standard with a range of advanced features to ensure your printer investment meets your needs now and in the future. Its all-metal frame and unique folding door design make it ideal for use in space-constrained environments. With Zebra’s Link-OS environment—an innovative operating system that combines a powerful multi-platform software development kit (SDK) with software applications—the ZT420 printer can be easily integrated, managed, and maintained from anywhere in the world.
Zebra ZT420 Product Advantages: ◆ Application Flexibility * Extend your printer’s capabilities with a wide range of excellent media features and media delivery options. * Customize your printer to match current and future business needs with end-user-installable media handling options. * Standard serial, USB, Ethernet, and Bluetooth capabilities—along with two open media slots—enable you to utilize non-standard connectivity options. * Extended RFID functionality is easy to install and use. ◆ Easy Integration * The USB host port allows for easy data transfer from USB flash drives via mapping and extended mapped drive memory, simplifying printer configuration. * In addition to ZPL and EPL, the Virtual Device application enables Link-OS-enabled printers to support some common existing printer languages and competitor printer languages—effectively ensuring your return on investment. ◆ Ease of Use * Dynamic QR codes provide web-based on-demand support for quickly resolving printer errors. * With Print Touch, these Link-OS-enabled printers offer web-based startup using Near Field Communication (NFC) for easy access to Zebra’s comprehensive knowledge base, including instructional videos and product support. * Illuminated media and ribbon paths facilitate easy viewing of the printer’s interior, even in low-light conditions. ◆ Easy Management * Zebra’s Link-OS environment provides enhanced functionality for monitoring, managing, and maintaining printers from anywhere. * Cloud connectivity enables Link-OS-enabled printers to securely interact directly with the cloud environment for printing and device management. Profile Manager allows you to edit and manage a single printer, volume printer, or all Link-OS-enabled printers on your network from anywhere in the world. ◆ Applicable Scenarios * Manufacturing – Work-in-Process Management – Product ID/Serial Number – Packaging Labels – Receiving/Handling Labels * Transportation & Logistics – Order Sorting/Packaging – Shipping/Receiving – Direct Replacement – Compliance Label Printing * Retail – Distribution Centers – Store Back-Office Operations * Healthcare – Laboratory Labels – Blood Bank Labels – Asset Tracking – Drug Label Printing
Zebra ZT420 Detailed Specifications
Standard Features ● Printing Method: Thermal or Thermal Transfer ● Printing Mode: Thermal Transfer and Thermal Printing ● Design: Metal frame and folding metal media cover with a large, clear window ● Side-mounted consumable loading for simplified media and ribbon installation ● Excellent print quality with Element Energy Equalizer (E3) technology ● Communication: USB 2.0, High Speed, RS-232 Serial, 10/100 Ethernet, Bluetooth 2.1, USB host port ● Backlit, multi-graphic LCD display with intuitive menus and an easy-to-use keyboard for quick operation ● Dual-color status LEDs for quick monitoring of printer status ● ENERGY STAR certified
Print Specifications ● Resolution: 203 dpi (8 dots/mm), 300 dpi (12 dots/mm) (optional) ● Memory: Standard: 256MB RAM, 512MB Flash ● Maximum Print Width: 6.6 inches/168 mm ● Maximum Print Length: 203 dpi: 2591 mm; 300 dpi: 1143 mm ● Maximum Print Speed: 12 inches/second (305 mm/second) ● Media Sensor: Transmissive and Reflective
Media Characteristics ● Media Width (Label and Backing): 2 inches/51 mm to 7 inches/178 mm, tear/cutter; 2 inches/51 mm to 6.75 inches/171 mm, peel/rewind ● Maximum Length of Non-Continuous Labels: 39 inches/991 mm ● Maximum Media Roll Size: 8 inches/203 mm, Core Outer Diameter 3 inches/76 mm, Core Inner Diameter ● Media Thickness: 0.0023 inches/0.058 mm to 0.010 inches/0.25 mm ● Media Types: Continuous paper, die-cut paper, notched paper, black label paper
Ribbon Characteristics ● Maximum Outer Diameter: 450 meters: 3.2 inches/81.3 mm, Core Outer Diameter: 1 inch/25.4 mm, Core Inner Diameter ● Standard Length: 1476′/450 meters ● Width: 2 inches/51 mm to 6.85 inches/174 mm ● Ribbon Setup: Ink side of the ribbon is wound outwards; optional ribbon reels can be used for ink side winding inwards.
Electrical Parameters ● Automatic detection (PFC compliant) 100-240VAC, 50-60Hz, rated power 100 watts ● ENERGY STAR certified
Physical parameters (closed state) ● Width: 13.25 inches / 336.55 mm ● Height: 12.75 inches / 324 mm ● Depth: 19.50 inches / 495 mm ● Weight: 40 lbs / 18.14 kg
Fonts/Graphics/Symbols ● 16 built-in scalable ZPL II bitmap fonts and two built-in scalable ZPL fonts ● Scalable smooth bitmap fonts for Asian and other international languages ● Unicode: suitable for multilingual printing ● Downloadable objects include images, scalable fonts and bitmap fonts, label templates and formatting. ● The IBM Code Page 850 international character set is available for fonts A, B, C, D, E, F, G and 0 via software control. ● Code Page 1250, 1252, 1253, 1254, and 1255 support font 0.
Barcode Types: ● 1D Barcodes: Code 11, Code 39, Code 93, Code 128 with A/B/C subsets and UCC Case Codes, ISBT-128, UPC-A, UPC-E, EAN-8, EAN-13, UPC and EAN 2- or 5-digit extensions, Plessey, Postnet, Standard 2-of-5, Industrial 2-of-5, Interleaved 2-of-5, Logmars, MSI, Codabar and Planet Code ● 2D Barcodes: Codablock, PDF417, Code 49, Data Matrix, MaxiCode, QR Code, TLC 39, MicroPDF RSS-14 (and additional codes), Aztec
Link-OS Solutions : ● Documentation Design: Quickly design custom printing solutions using business data and Zebra’s intuitive plug-and-play design tools. ● Device Integration: Zebra’s applications and products help you integrate Zebra devices into existing systems. ● Device Management: Manage local and global printing operations with Zebra’s device management tool suite. ● Developer Tools: Provides the tools you need to create your own applications, including documentation, source code, programming languages, templates, and more.
Firmware ● Built-in ZPL, ZPL II, and EPL programming languages can be selected via software or front panel. ● Supports XML printing – Enables XML communication for barcode label printing.
Options and Accessories ● Communication * Parallel Port (Bidirectional Interface) * Wireless: ZebraNet Print Server — Supports 802.11a/b/g/n networks via internal integrated options supporting Webview and Alert functionality ● Media Handling * Rewinder: Rewinds all printed labels inwards onto the 3-inch core, and can also peel and rewind backing paper (factory setting only) * Peeler: Forward backing paper, passively peelable * Peeler: Backing paper take-up option — When used with the peeler option, the entire backing paper take-up shaft can accommodate various standard printers * Cutter: Forward-facing guillotine cutter and receiving tray * 1-inch core inner diameter media supply rack * Ribbon supply shaft supports ribbon ink-side inward winding ● Radio Frequency Identification (RFID) * Supports signage compatible with UHF EPC Gen 2 V1.2/ISO 18000-6C * Integrated RFID system can be upgraded by the user in the field * Adaptive coding technology automatically selects the optimal coding settings ● Keyboard Display Unit: Supports KDU Plus and ZKDU – Input variable data, retrieve stored format, suitable for standalone applications.